LIGHT PAINTING
This is the second post in a series of four showing my selected images for my portfolio of work that I submitted to the University Of Wolverhampton for my application. The first post was around Street Photography section, this one will see me learning to play with light in images.
My fascination with light painting began early in my life with the arresting images of cars travelling on a dark road leaving light trails or using sparklers to write letters in the air. I never really spent a lot of time considering the methods until I picked up my first digital camera with shutter speed manual control. It was an early Olympus C960Z and I learned a little how to expose correctly for the conditions and how to use torches and other items to make interesting pictures. This started in 2002 and I used to occasionally practice different methods throughout the following years.
All photographs are technically using light but the subject to me means that using light in an unusual way to make an image, whether it be by using torches, beams of sunlight through windows, fire or even lasers.
Page one of my Light Painting Section is devoted to early experiments between 2012 and 2013.
LIGHT PAINTING #1
In this image gallery you can see an image of the lights of the Boathouse Pub and it’s reflection in the river whilst I moved the camera horizontally. Although not a great picture, I still love it for the great analogue feeling I get from it. It was taken with my Canon EOS 500D and kit lens with a 1 sec shutter speed.
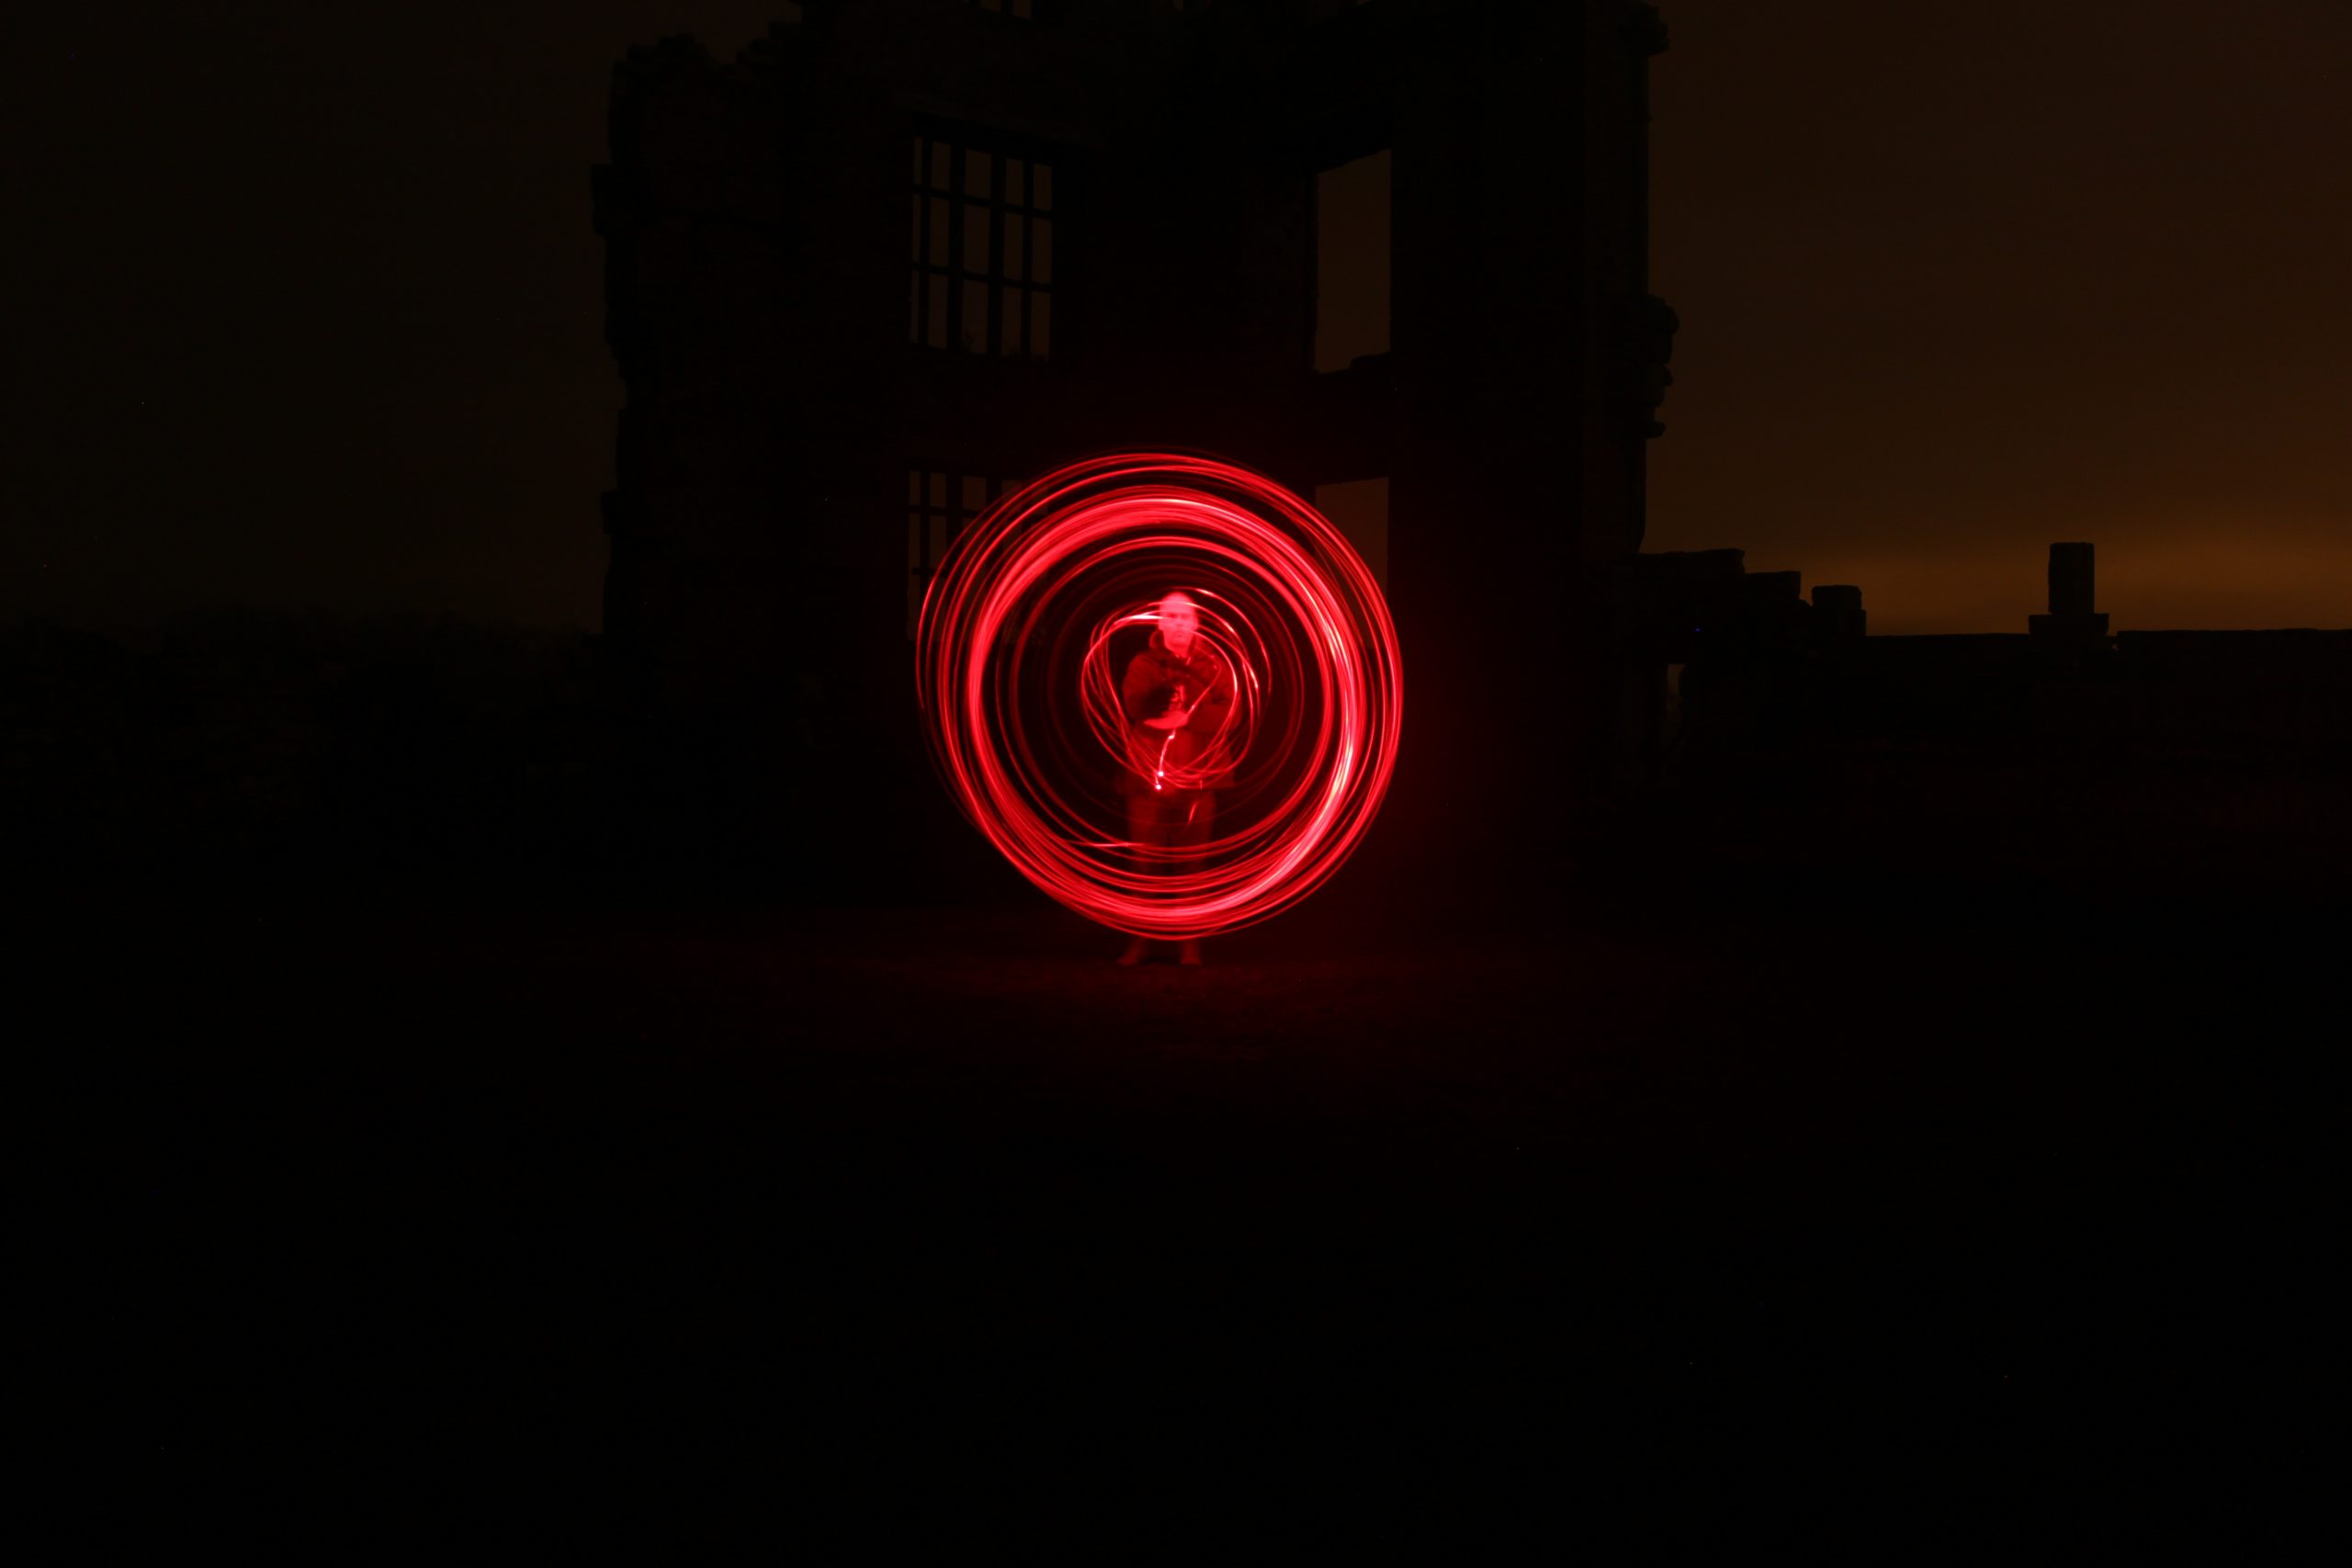
The red circles and white circles were made with torches and coloured filters over the lenses of them. I swung these around on a string with the shutter released remotely and on Bulb mode until I’d finished the movement. The red and white orb photo didn’t turn out as I’d like as I’d forgotten to focus on the subject in the middle of the orb, me. I soon figured out to put a bag there, light it with a torch and focus on the bag, before removing it and then taking the photo.
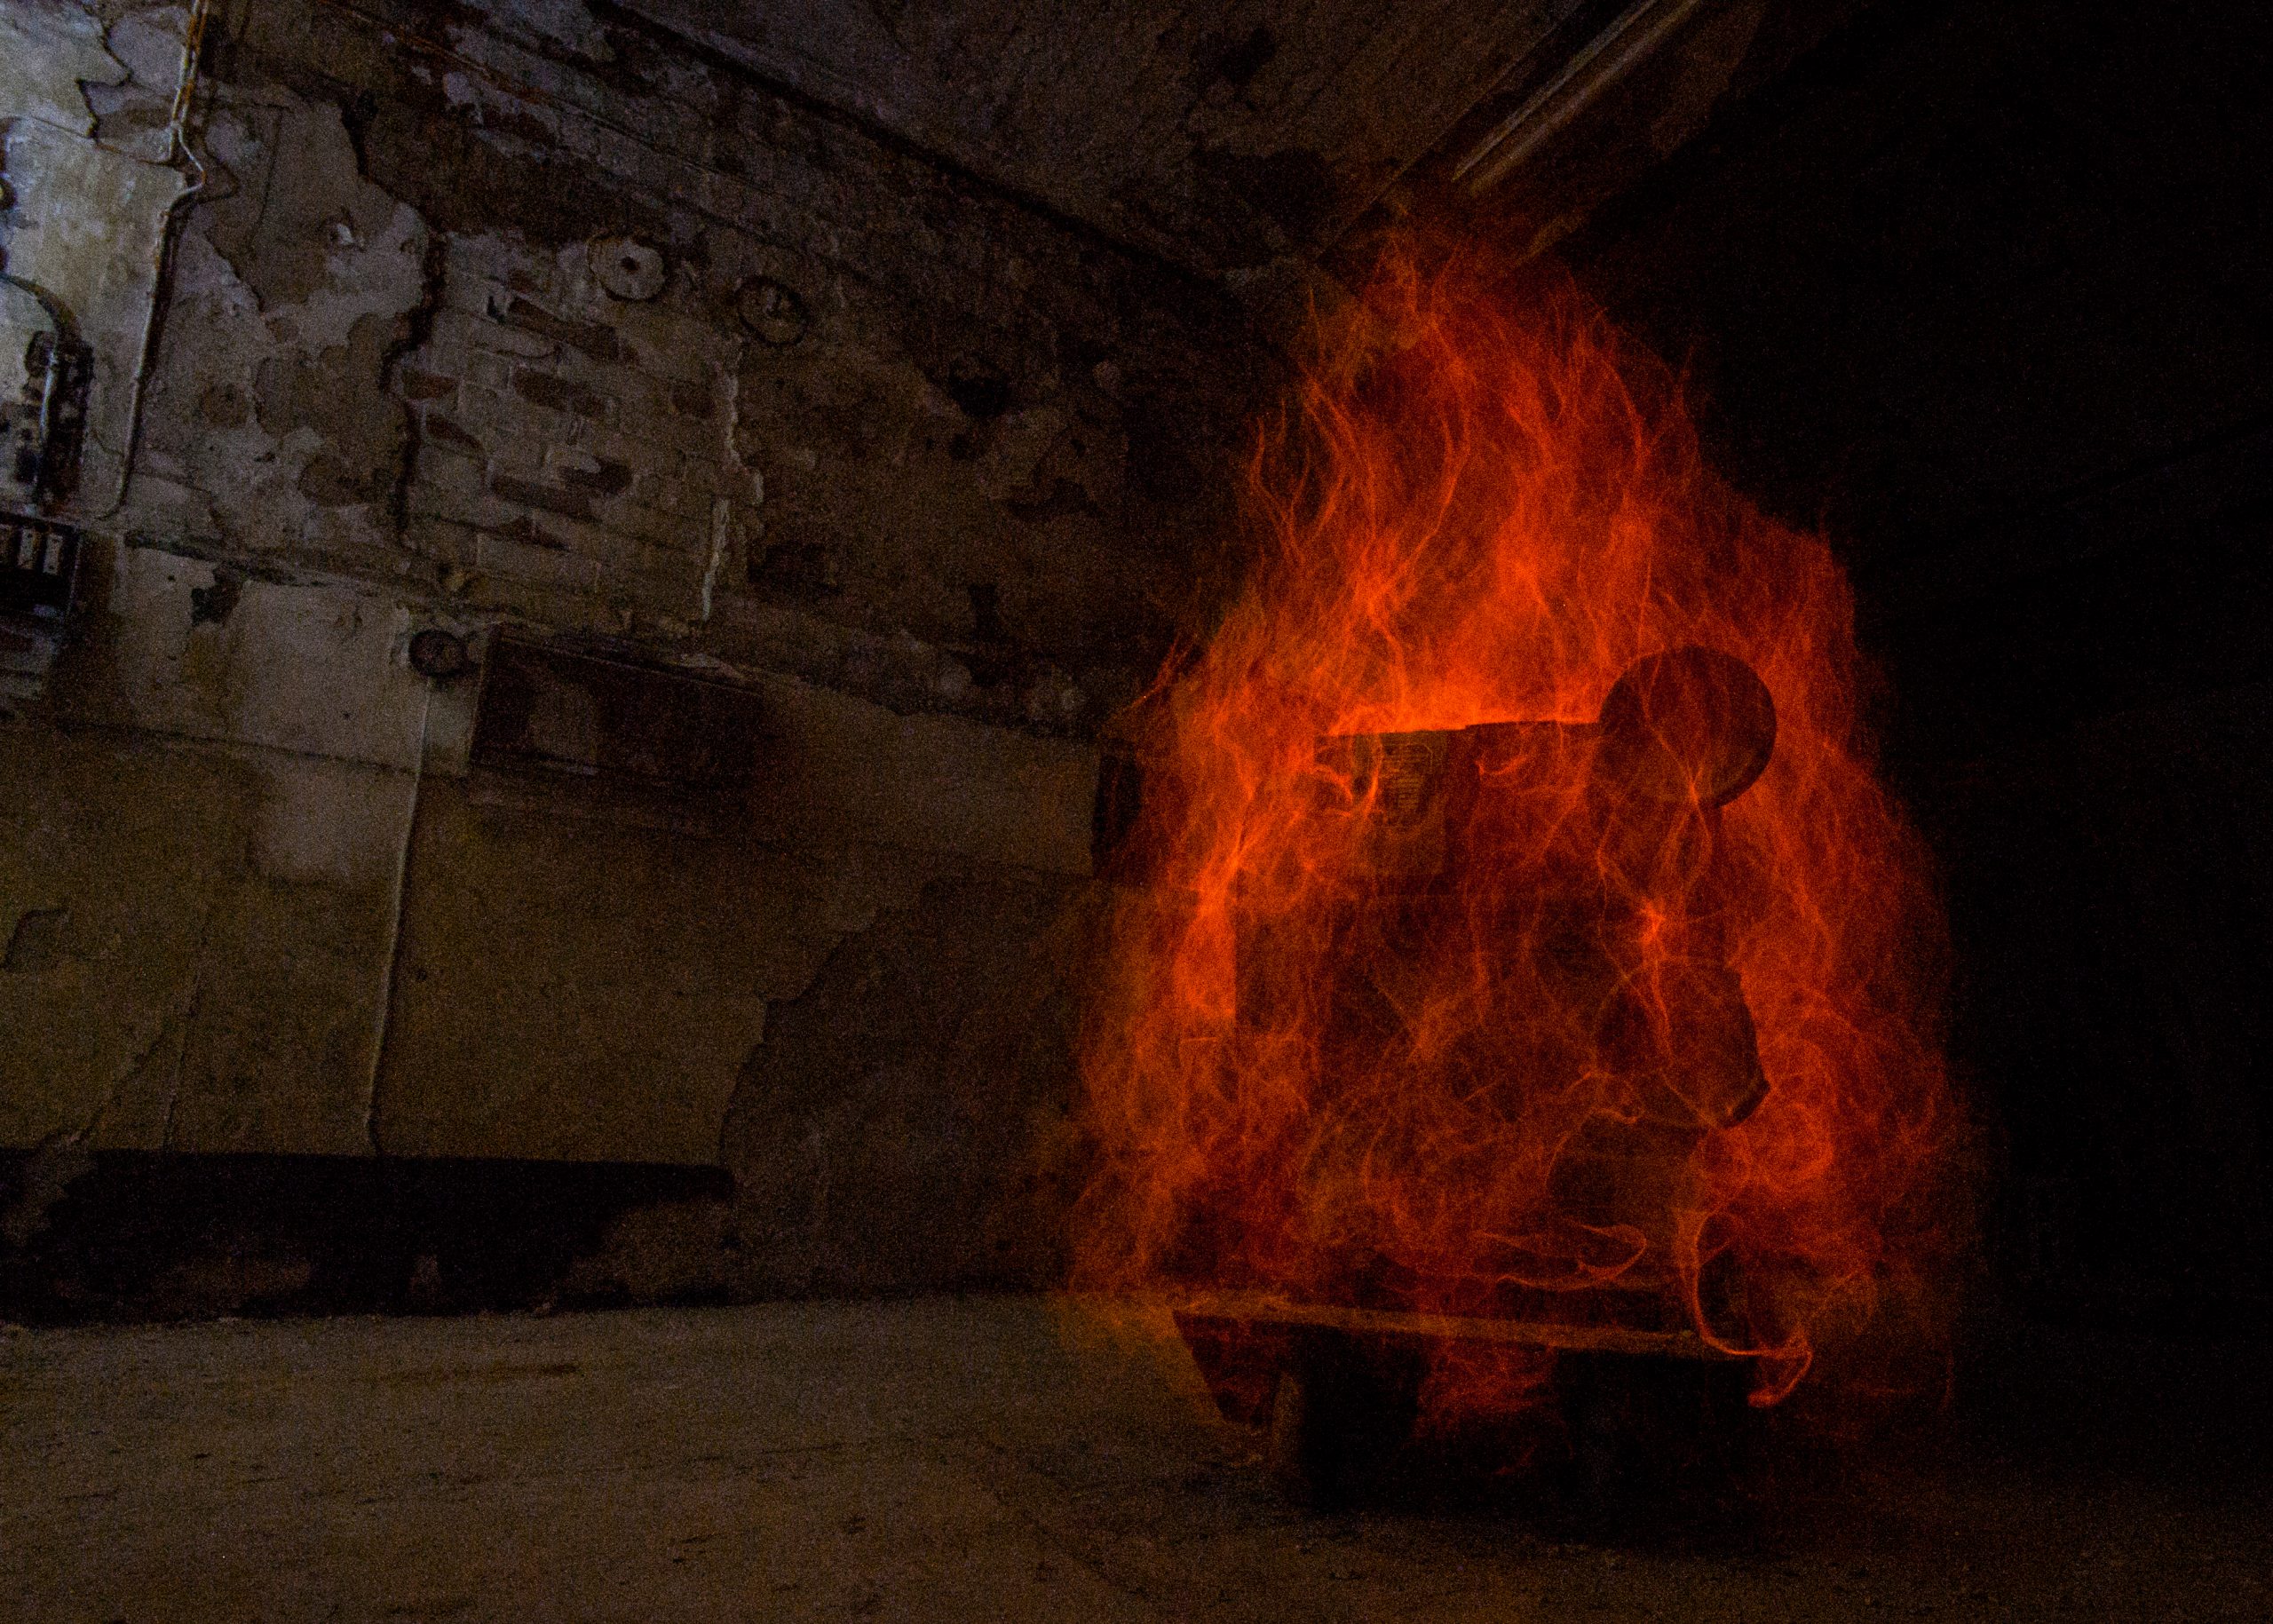
The picture with the machine that looks as though it’s covered with red flames was done in possibly the darkest room I’ve ever been in, in the Shrewsbury Flaxmill Maltings whilst I was a member of the “Friends”, documenting the works on the site. I used Electro Luminescent wire and an incredibly long 170 seconds shutter speed, and slowly walked around the item with the glowing cable. It took multiple attempts to get this one but there’s still a little more tidying I could have done to improve it such as some foreground detail, but I still like the mood of the image as it is.
LIGHT PAINTING #2
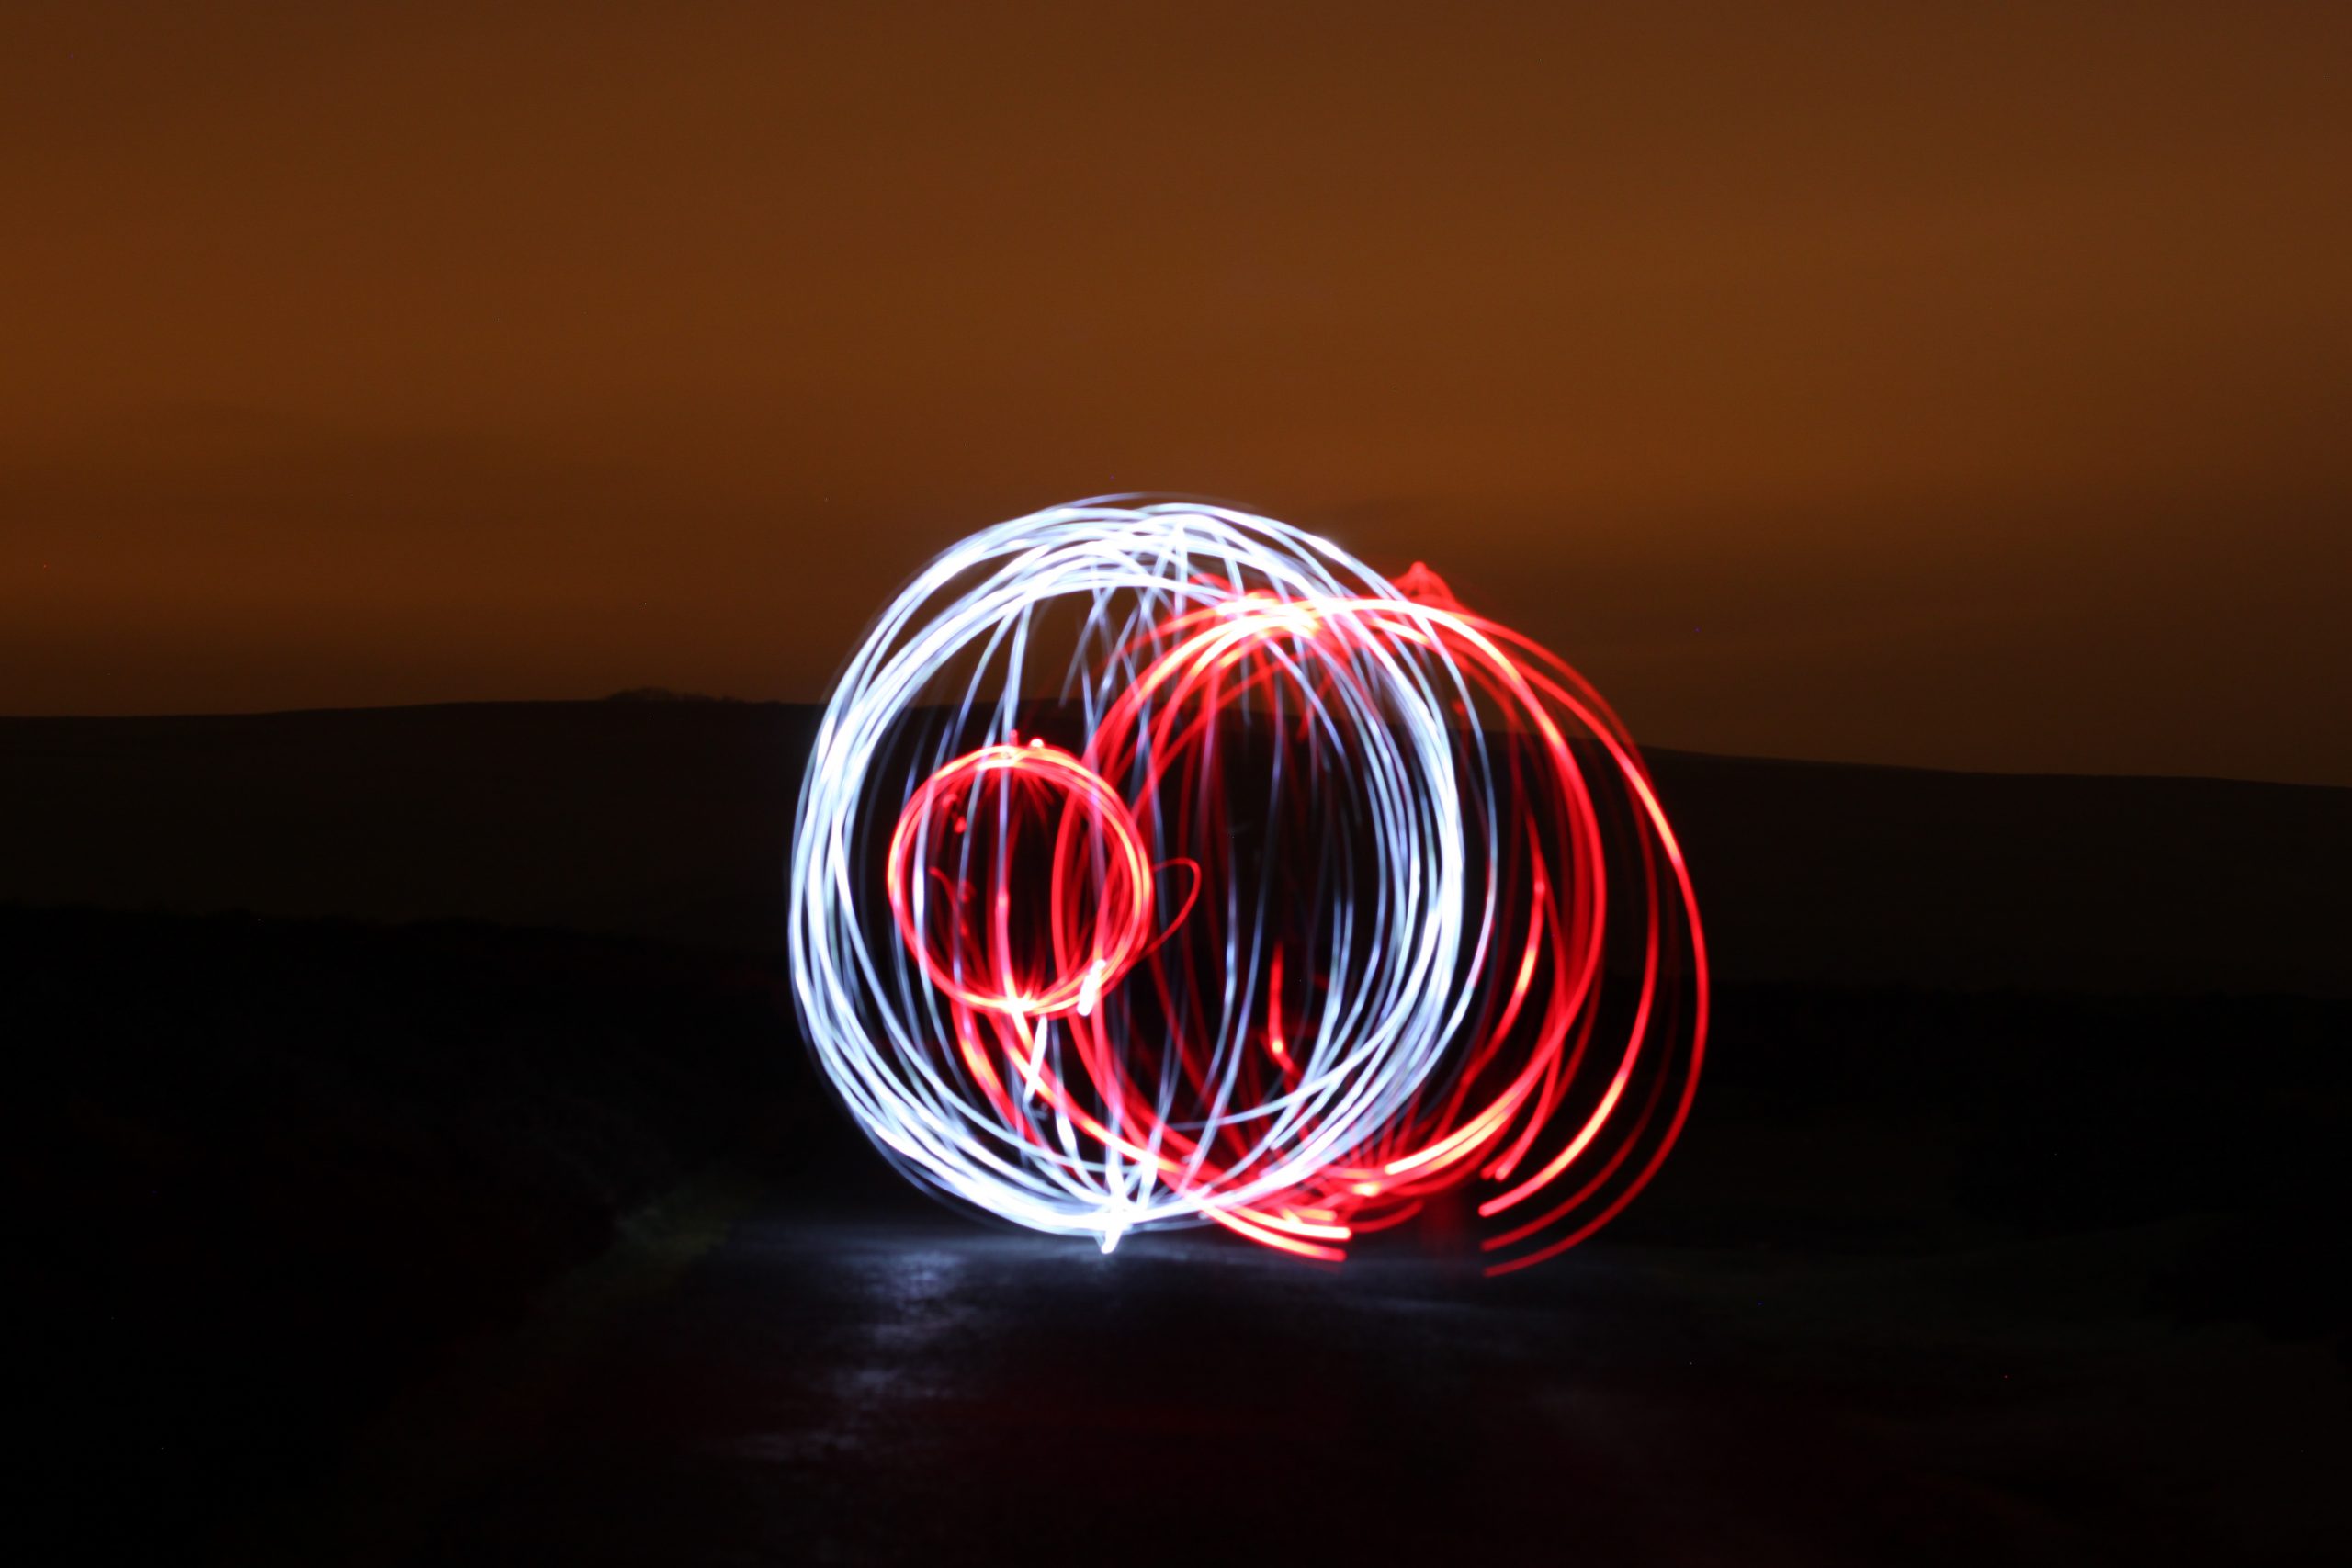
Wrekin Orb was taken very late in the evening on top of one of Shropshire’s tallest landmarks. It consists of me swinging a torch around over a spot on the floor, which I marked with a pebble, whilst standing between the Trig point and the TV broadcast antenna.

This image took a while to get right as the torches I used before were single LED and the speed of me swinging them around meant that the refresh rate, normally unseen by the naked eye, was picked up in camera as a dotted set of lines rather than a solid continuous line.
The bright red lights, the town’s light pollution and the few visible stars delighted me when I saw this image on the viewfinder LCD. It’s a 42 sec exposure at ISO 1600 so isn’t as noisy as it perhaps could have been. I’m very proud of this photo. At one point I thought to light up the trig point artificially but it was a major distraction to the rest of the image.
LIGHT PAINTING #3
This image isn’t me using the light to create a picture but me capturing the effect of a pinhole image projection in a camera obscura style effect. I was taking photos in this very dark room of the Flaxmill Maltings and using a laser pen to create light graffiti on the walls when I noticed the subject of the image.
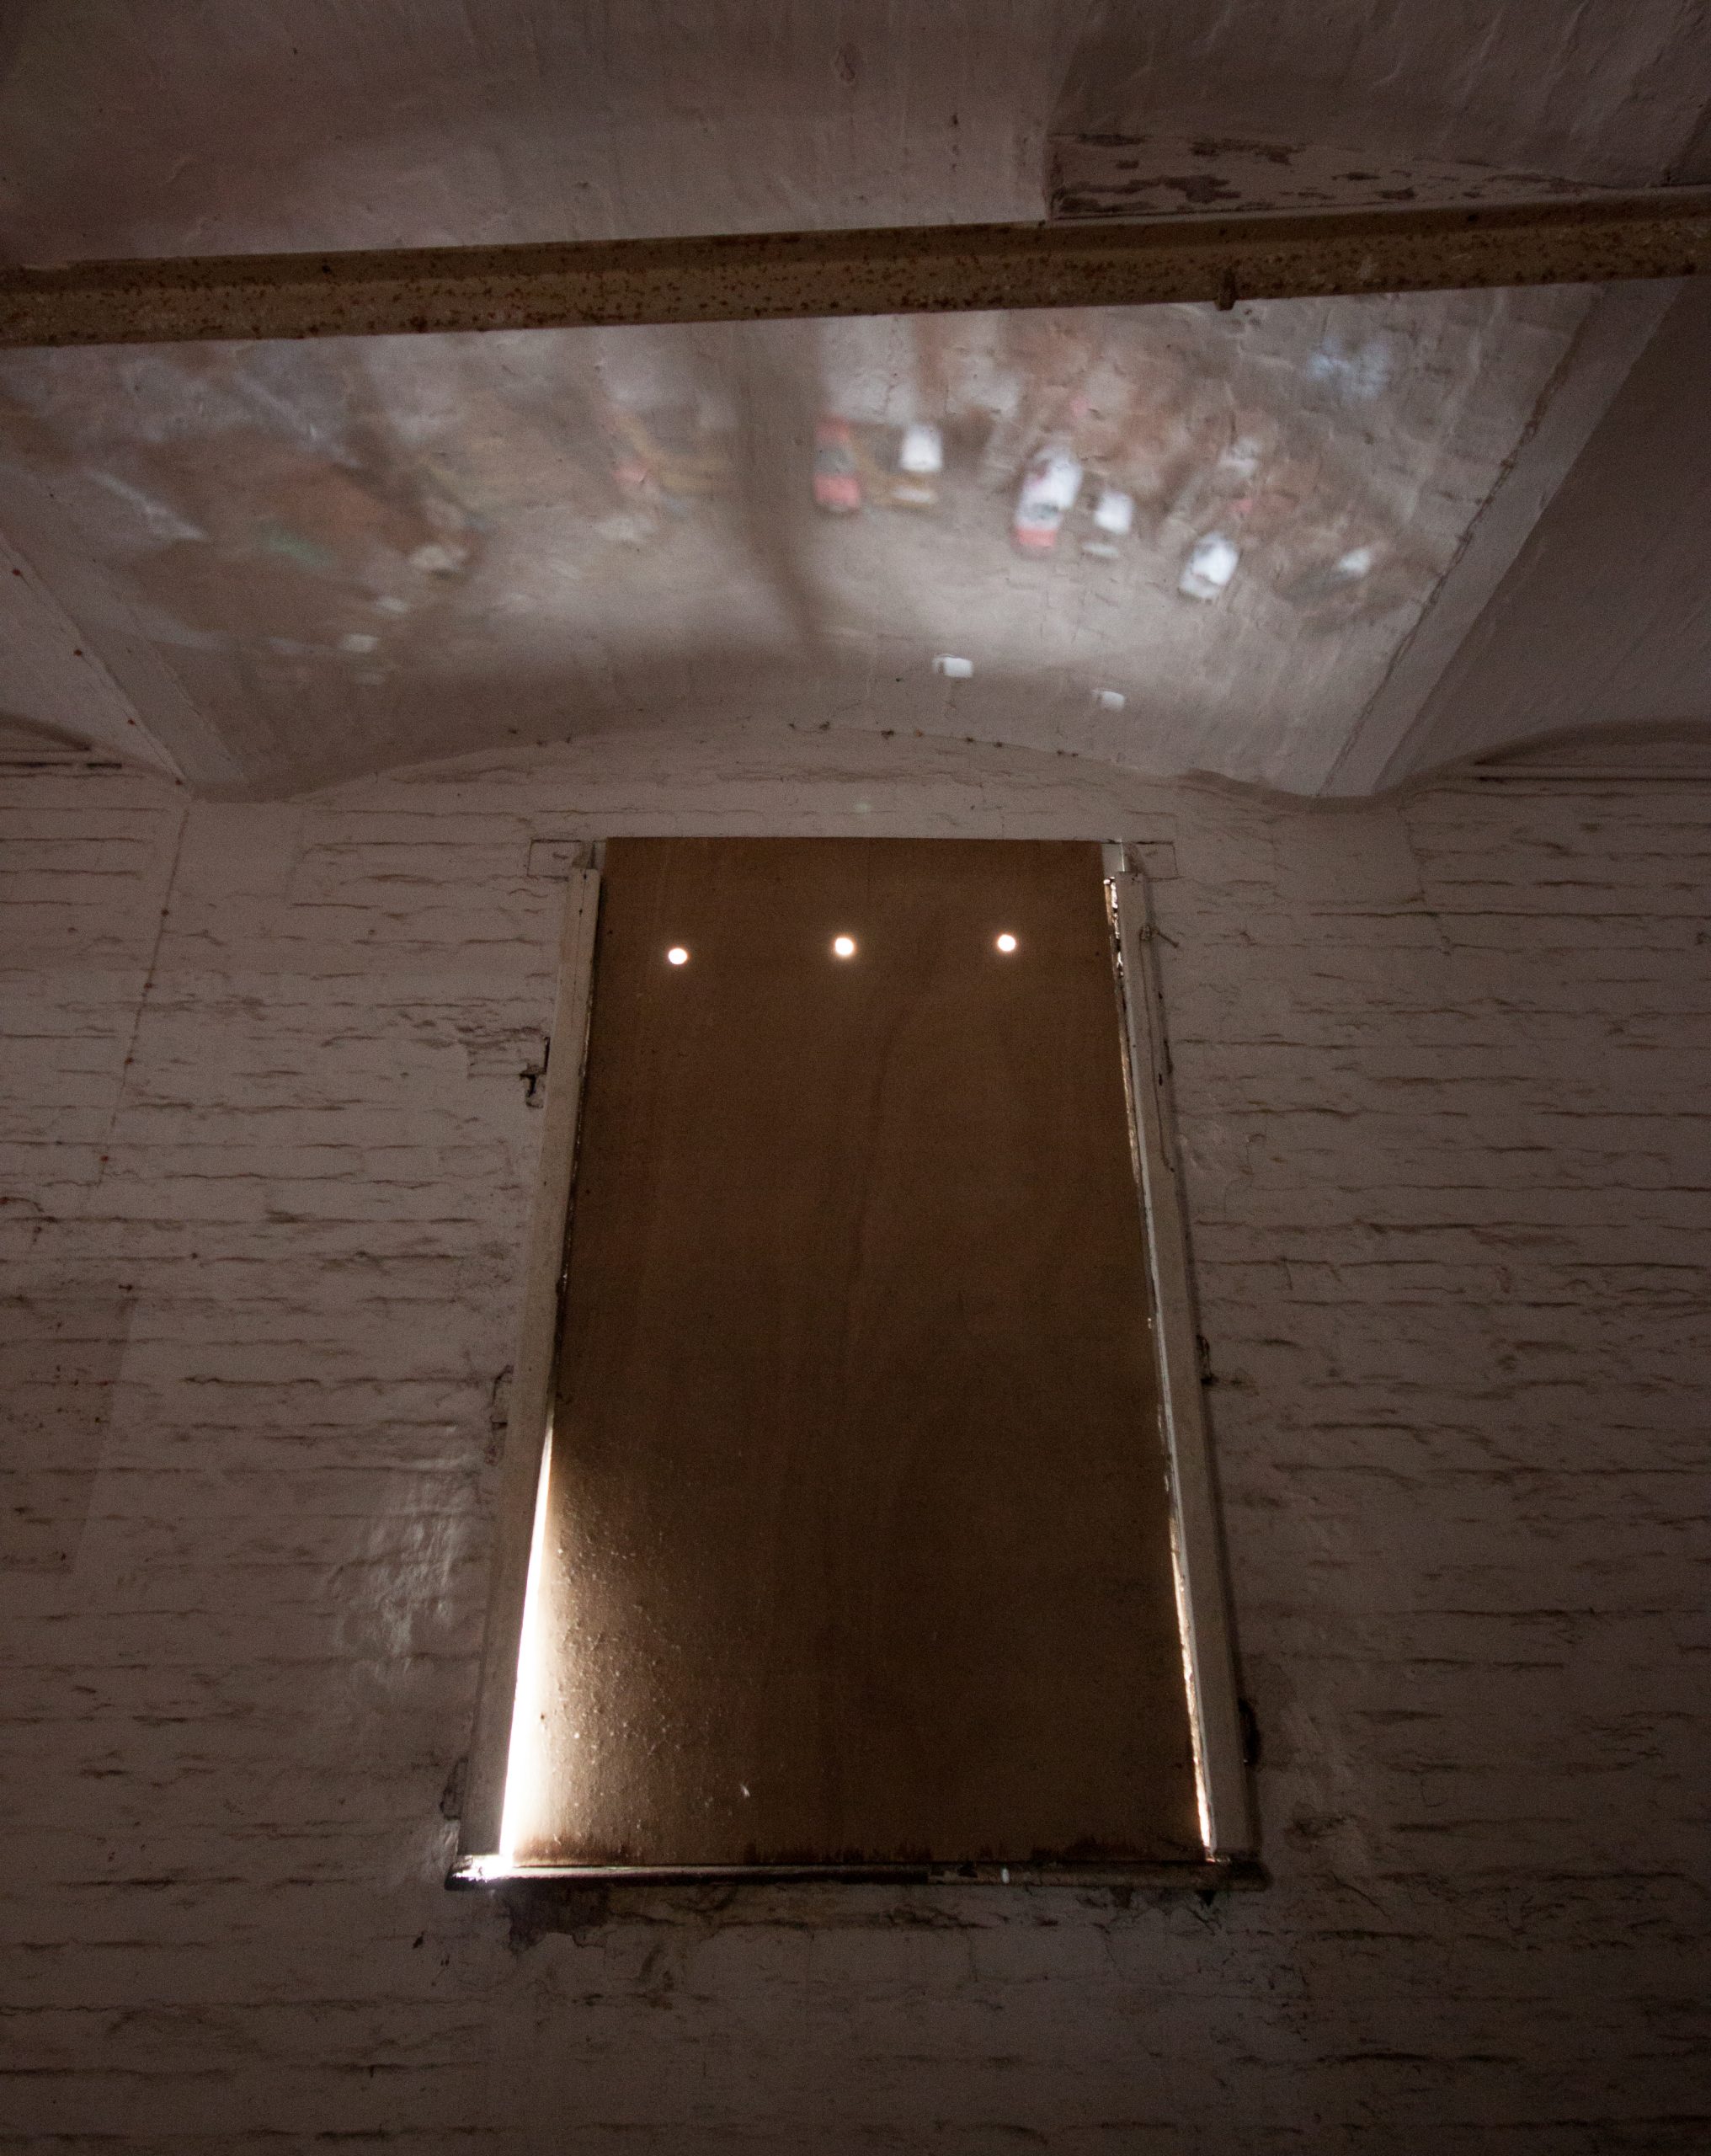
As I was getting some strange angles I noticed a pool of light on the arched brick ceiling and upon further inspection, after letting my eyes adjust to the dark I could see an image of cars parked three floors down in the car park. It was an amazing experience to see this coming from nowhere and I loved showing it to people[ who didn’t quite understand how it was happening.
There are actually three images being projected onto the ceiling as there are three holes, the holes are for ventilation and bats to come in and out of the building.
I set up my tripod and took this picture with mirror lockup on and use of a remote shutter release for 2 seconds exposure at f/5 on my 500D with a Sigma 10-20mm lens.
Since this image, I’ve played with making camera obscura and pinhole cameras for my digital devices.
Below is a recent example to explain the concept to my kids (21 and 18 years of age) and because I had a big cardboard box handy.
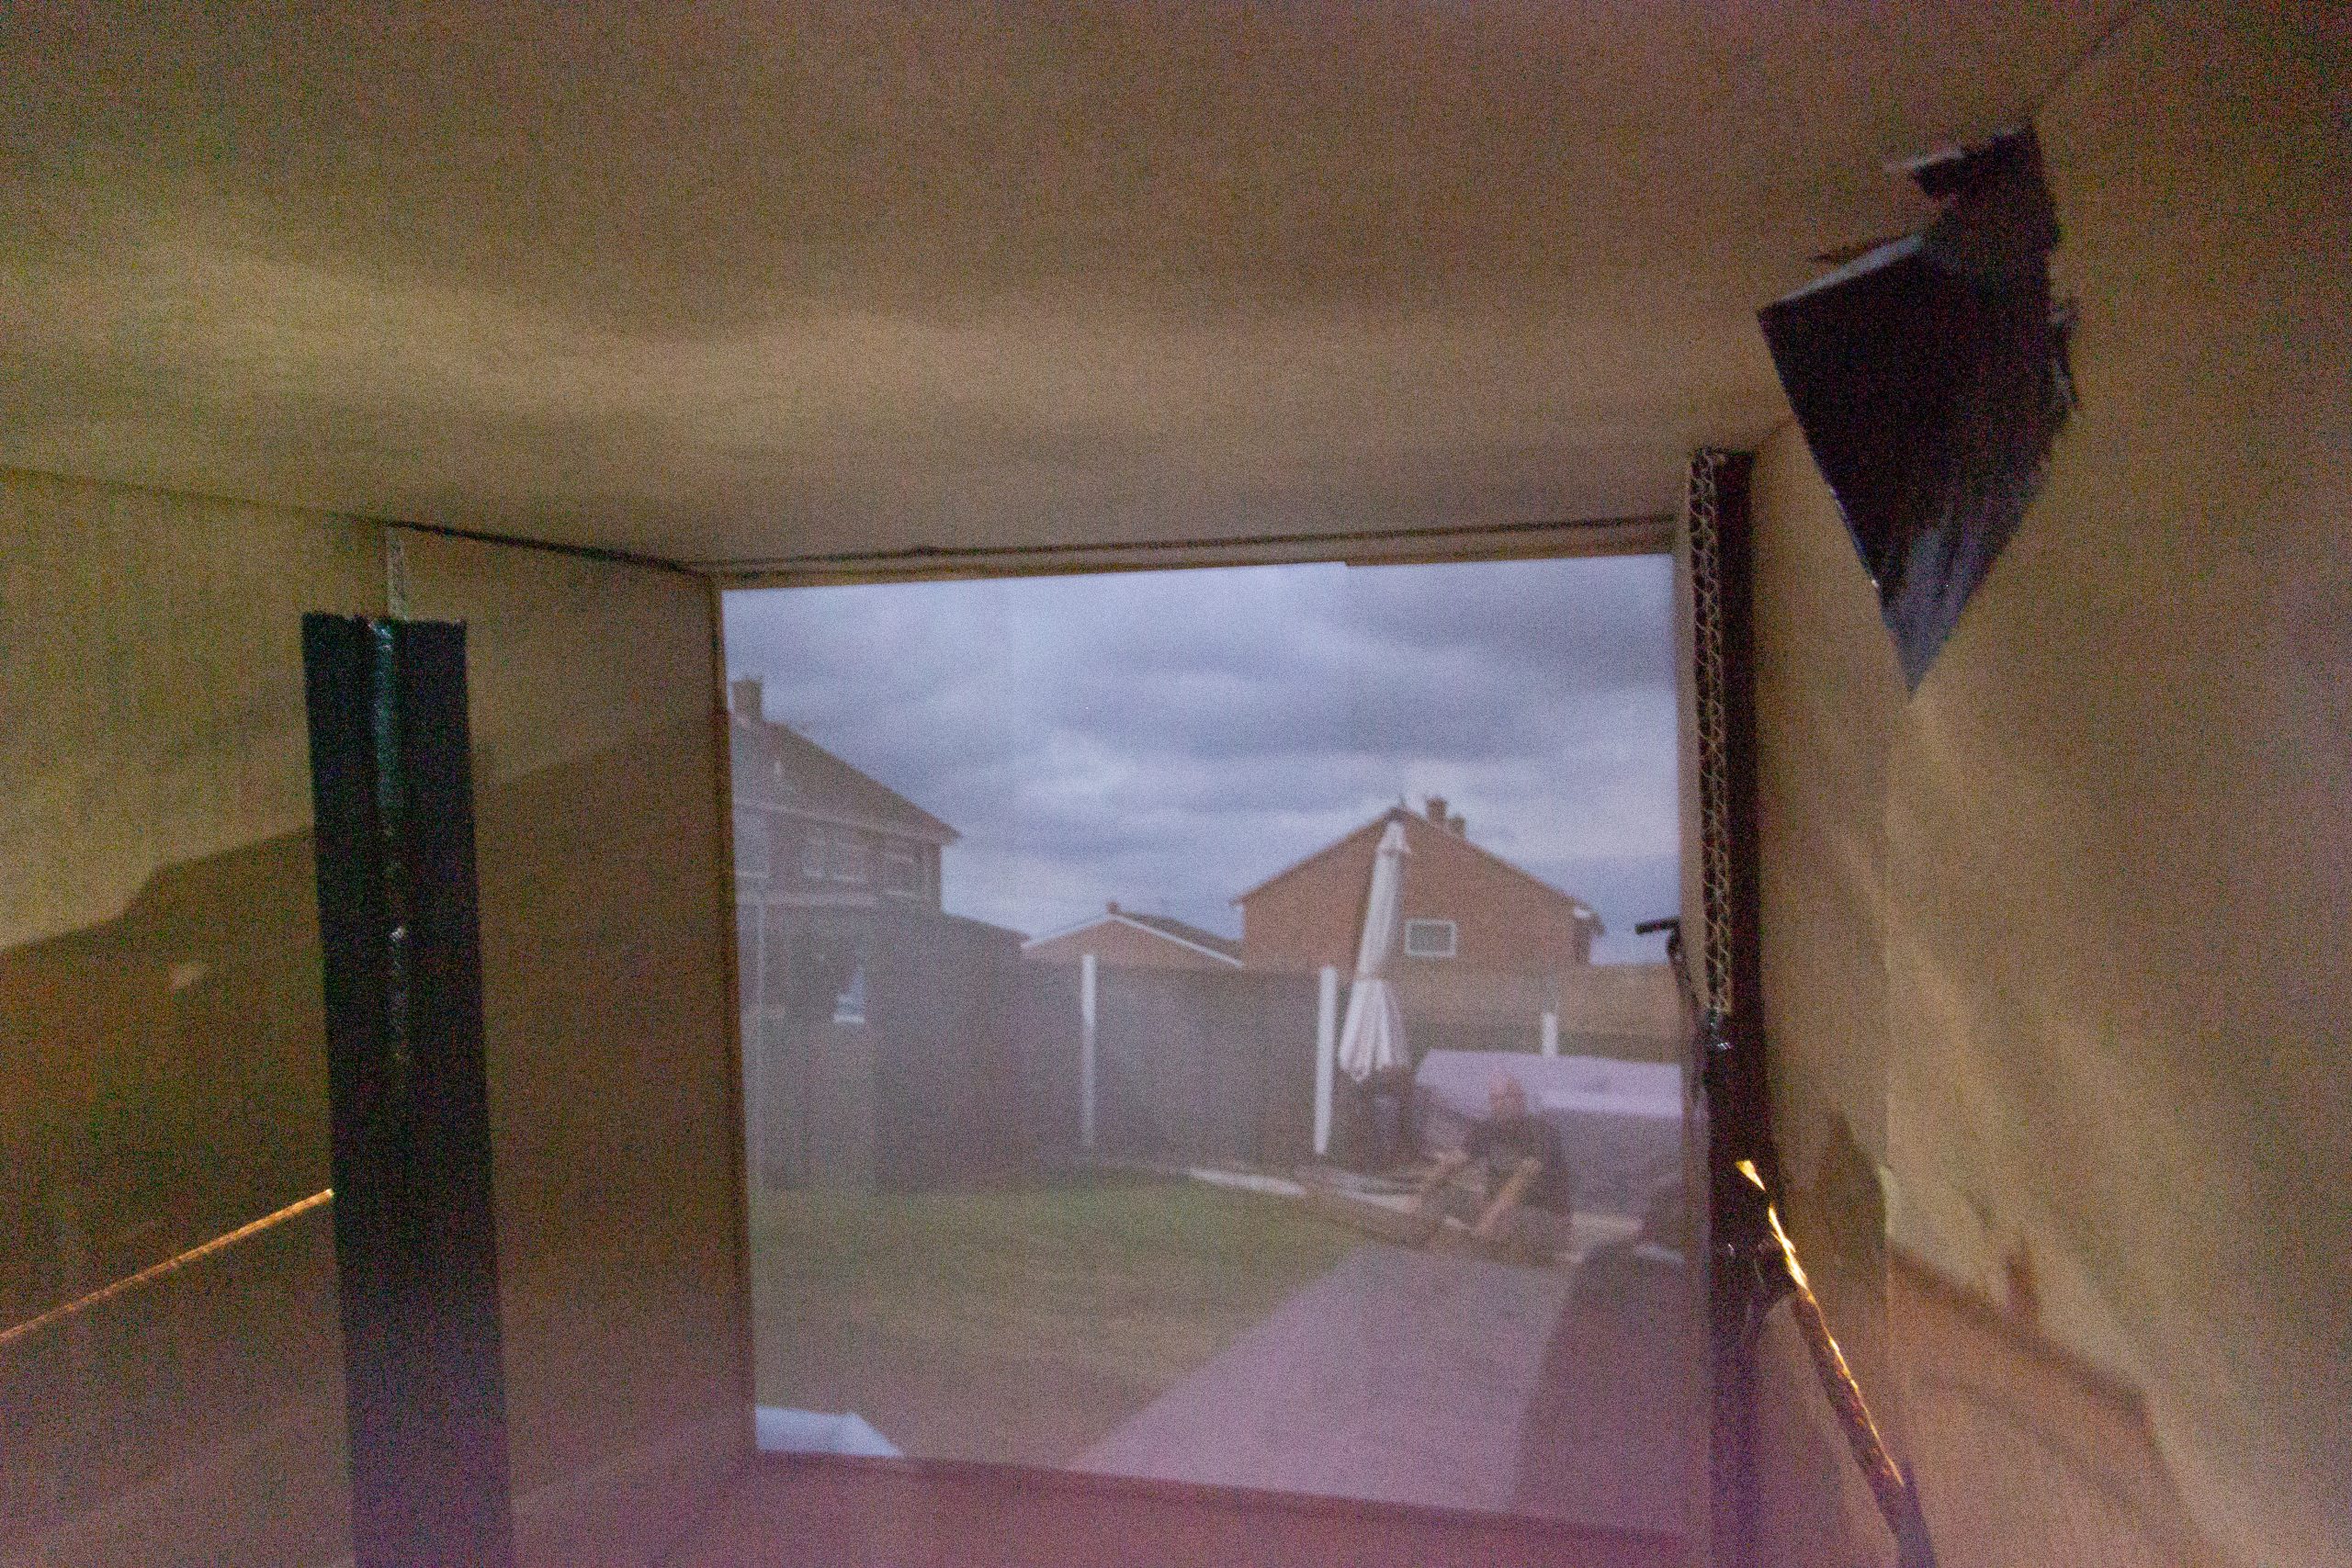
It’s a bit untidy inside the hastily duct-taped cardboard box, but it had a tiny hole poked into a flattened piece of coke can, taped to the box and a large hole for my 24-105mm lens to poke into to capture what was on the white paper affixed to the back wall of the box. This was a 20 sec exposure where I pressed the shutter and then went to sit down on my decking, hence the ghostly nature of my appearance. This effect still amazes me even today.
LIGHT PAINTING #4
Whilst I was the secretary and organiser of the Caterpillar Photographic Society we had monthly assignments leading to competitions and one such month was “Fire” so I played around with light painting again to catch some flames in motion, and I did this using a frosted wine glass with lighter fluid in the bottom.
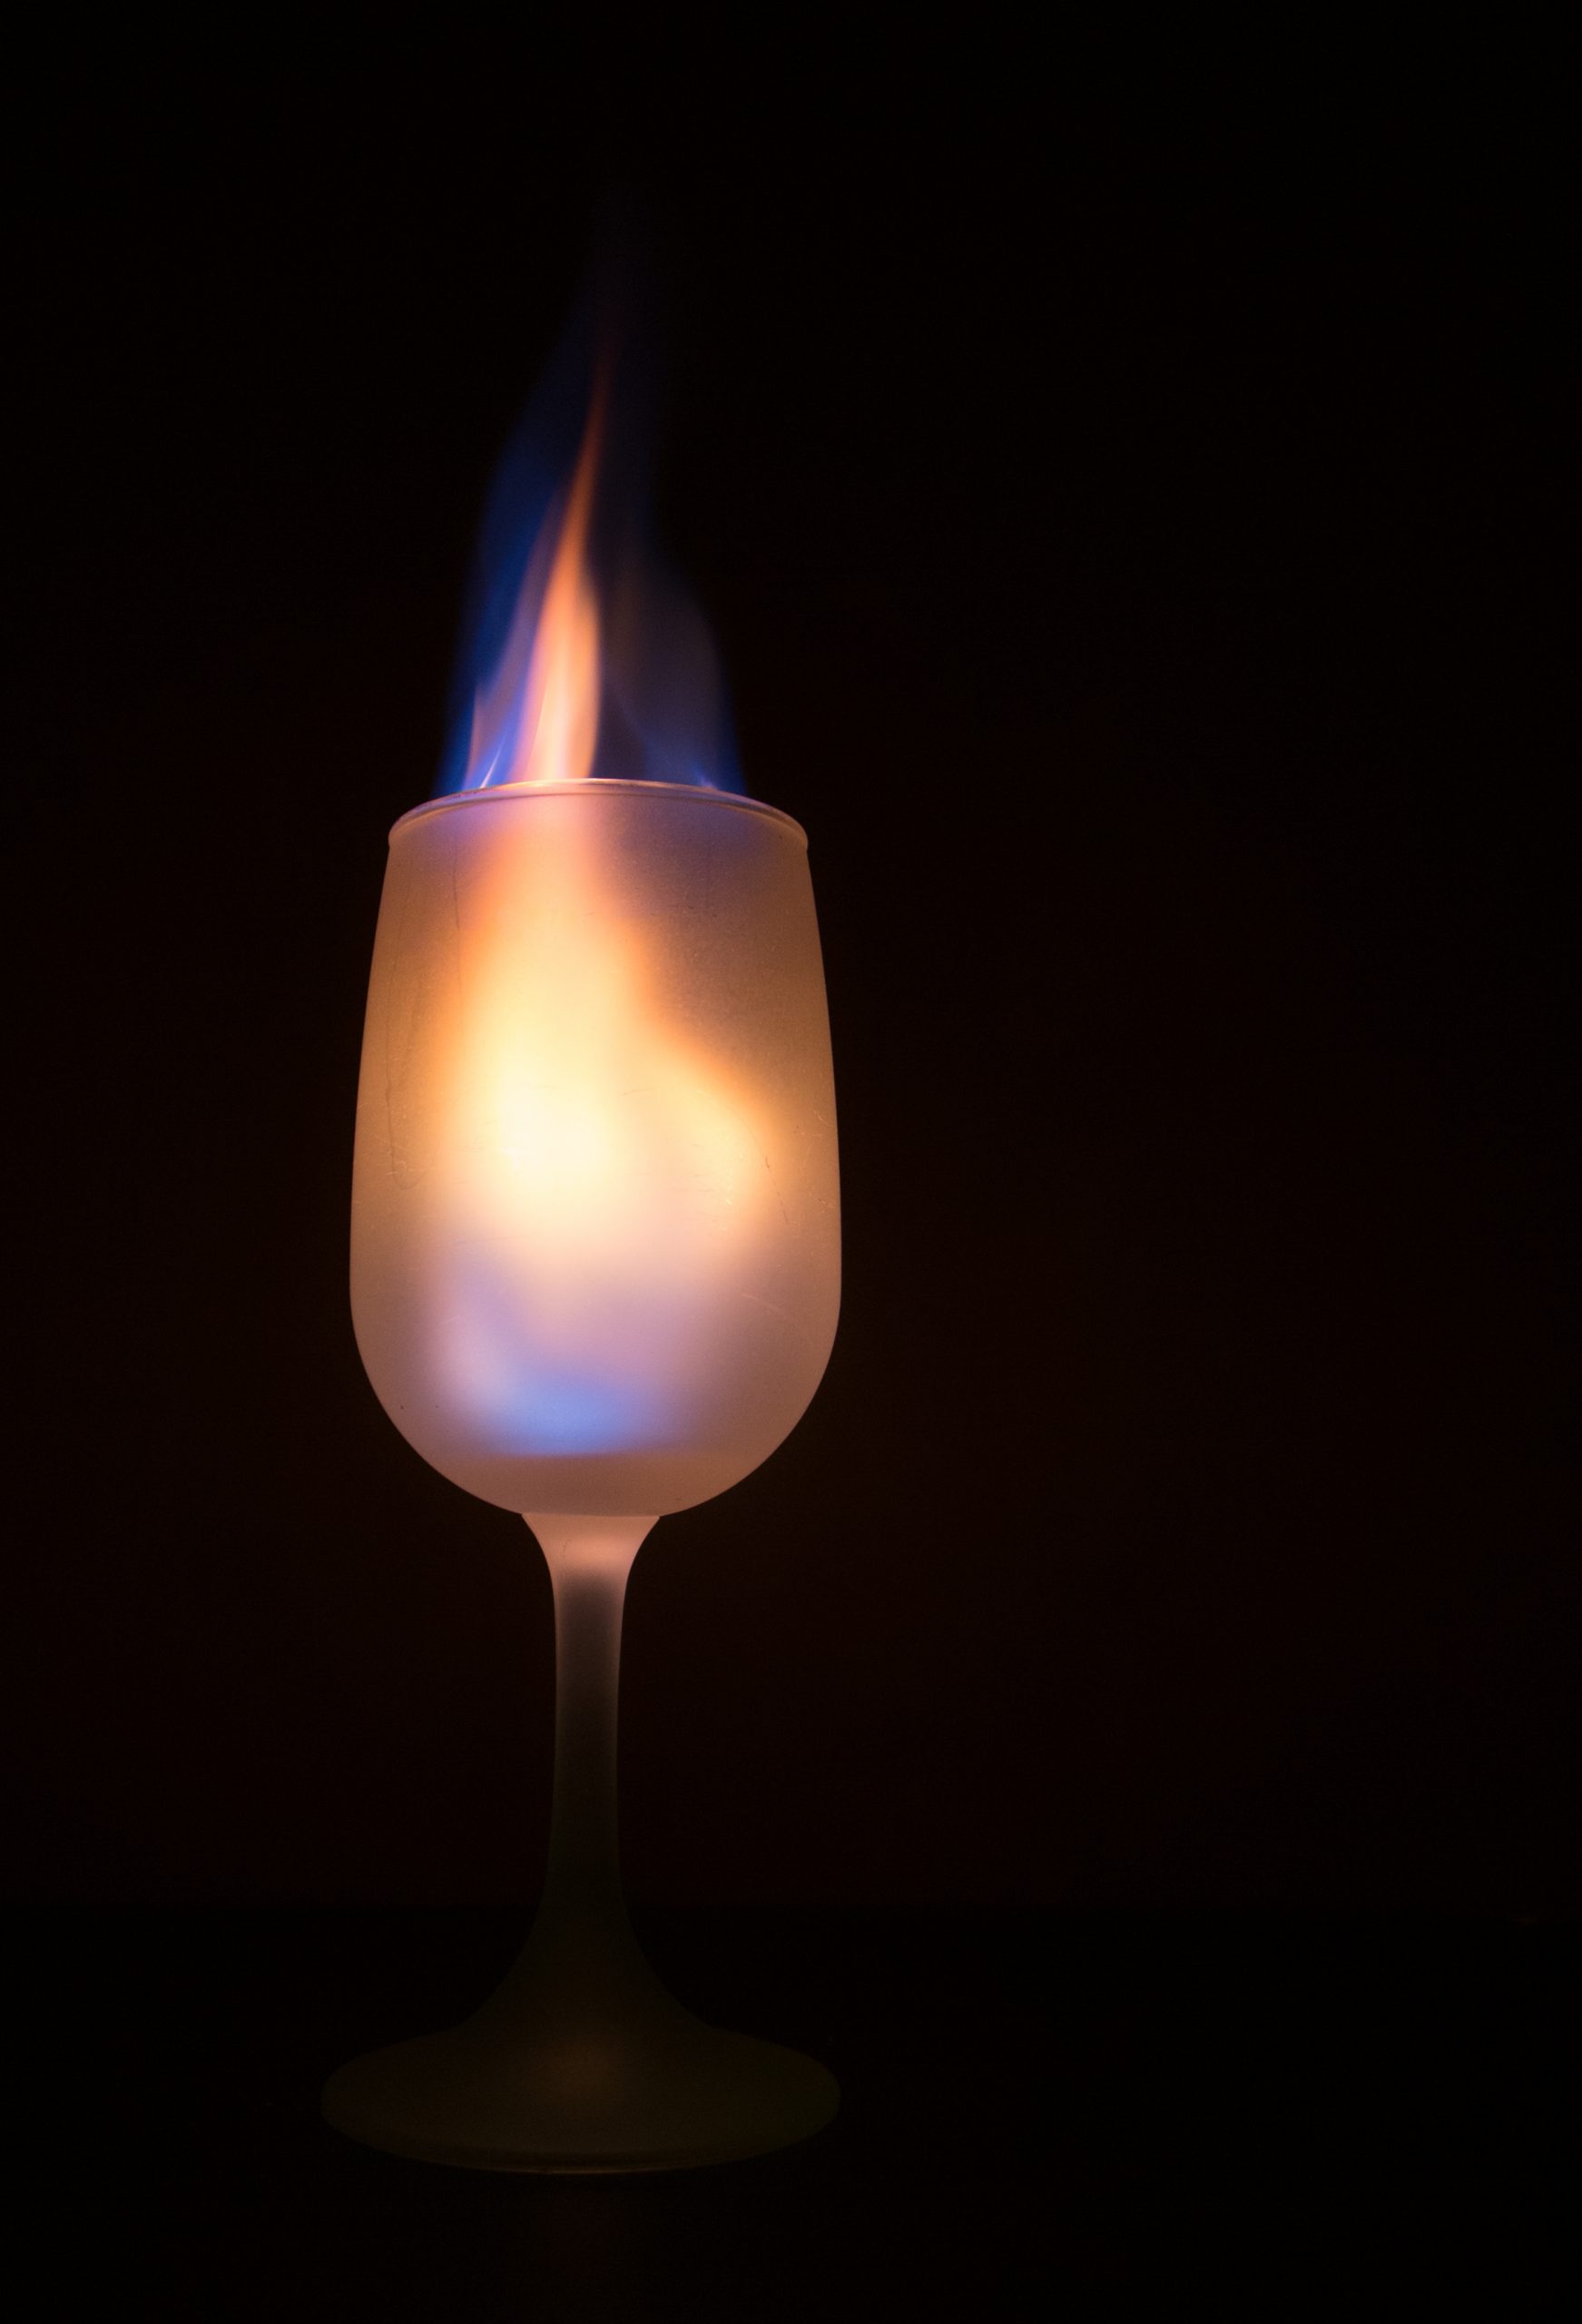
This image was set up and focussed manually before lighting the fuel and keeping the shutter open for 0.6 seconds. There were a few more images but this one does show the light going down the stem and the base, if you’ve got a dark room to view this in. I’m typing this in a sunny window and can’t see the bottom half of the image..
The second image on this page of the portfolio is “Neon Silhouette”, and is a photo of a gallery visitor in the Tate Modern, London, looking at “Violins, Violence, Silence” art work by Bruce Nauman.
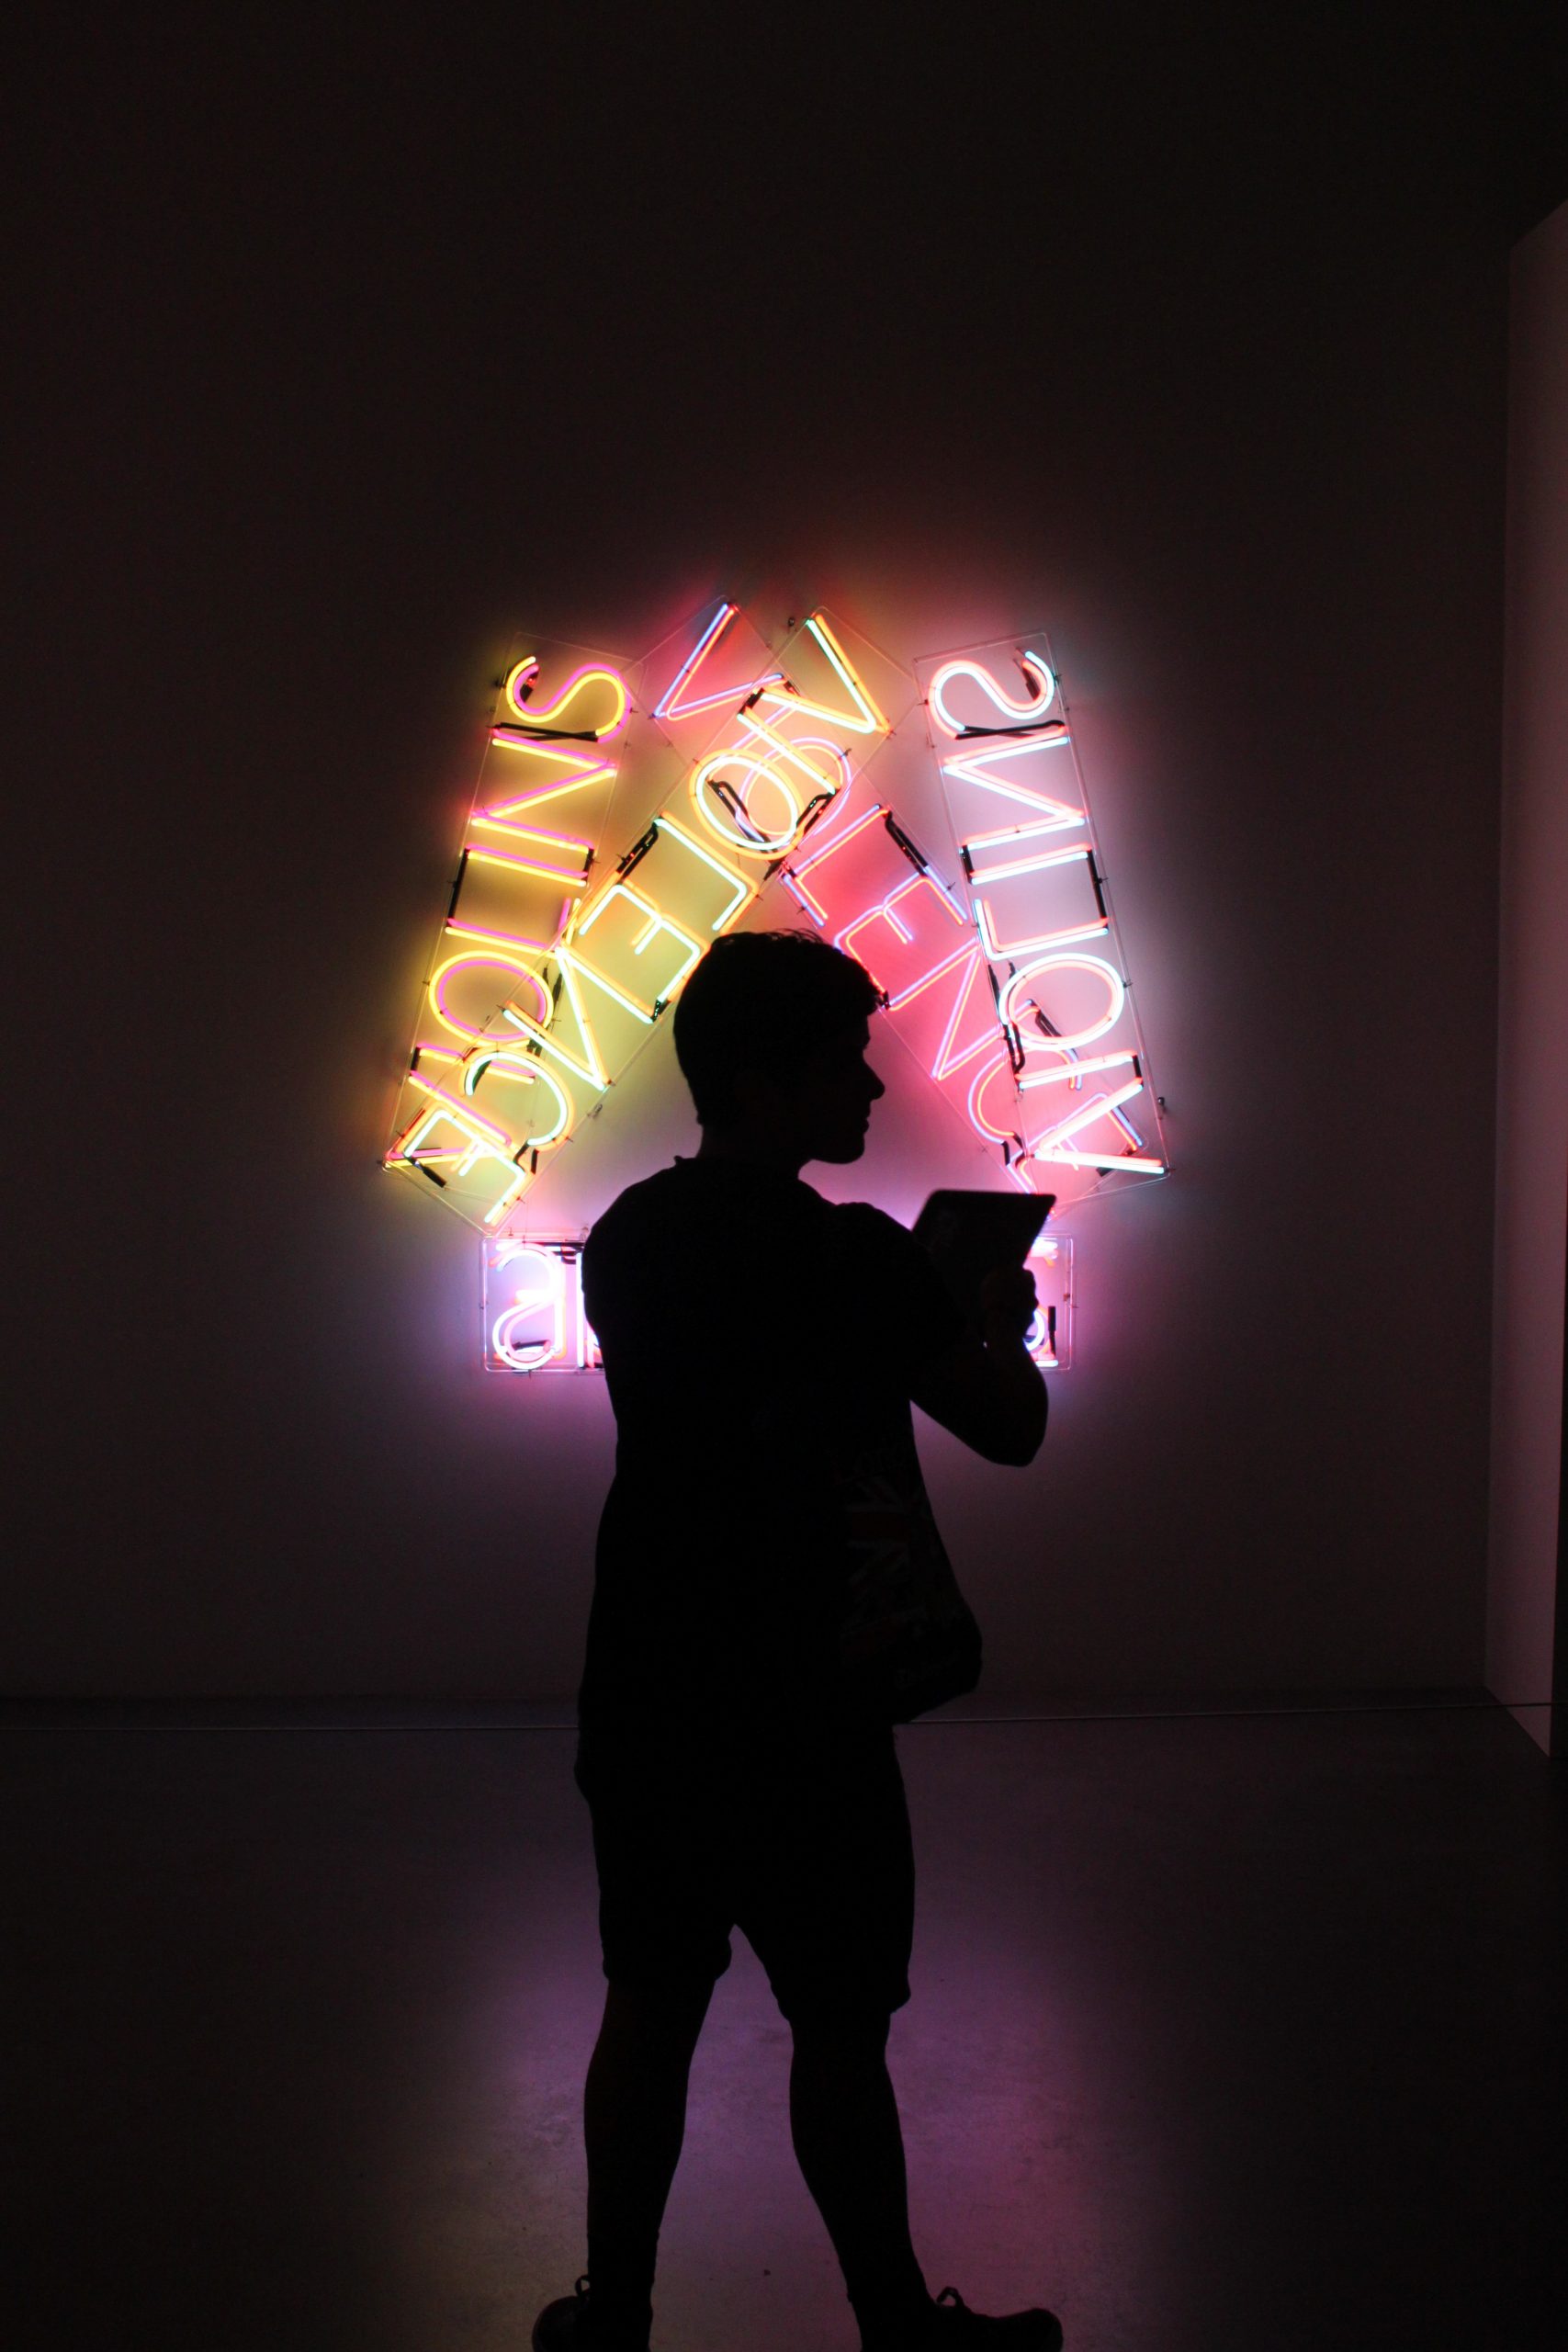
The visitor was stood in front of me using his iPad to capture a photo of this wonderful eye-catching artwork and I was originally trying to capture him , capturing the art. When I noticed he was silhouetted perfectly though and hios screen went off leaving a masked area of the screen, I knew it was an even better image. It feels like a negative space of the person is what makes the artwork on the wall stand out even more.. Just adding the link to the art title has surprised me, this artwork sold at Sotheby’s for $4 million. Oh my days…
LIGHT PAINTING # 5
The final image I included in this section of the portfolio was the culmination of many trial and error sessions up on the Long Mynd, in the back garden, Moreton Corbet Castle and other places. The issue was ensuring that the stars moved through the photo continuously. Obviously, the Earth is spinning around its axis rather than the stars moving so I appreciate it looks a little false.
This image was taken on my driveway, late one night, after I’d got home from an evening of Bell Target shooting and noticed that I could see the Milky Way and it was a lovely clear night.
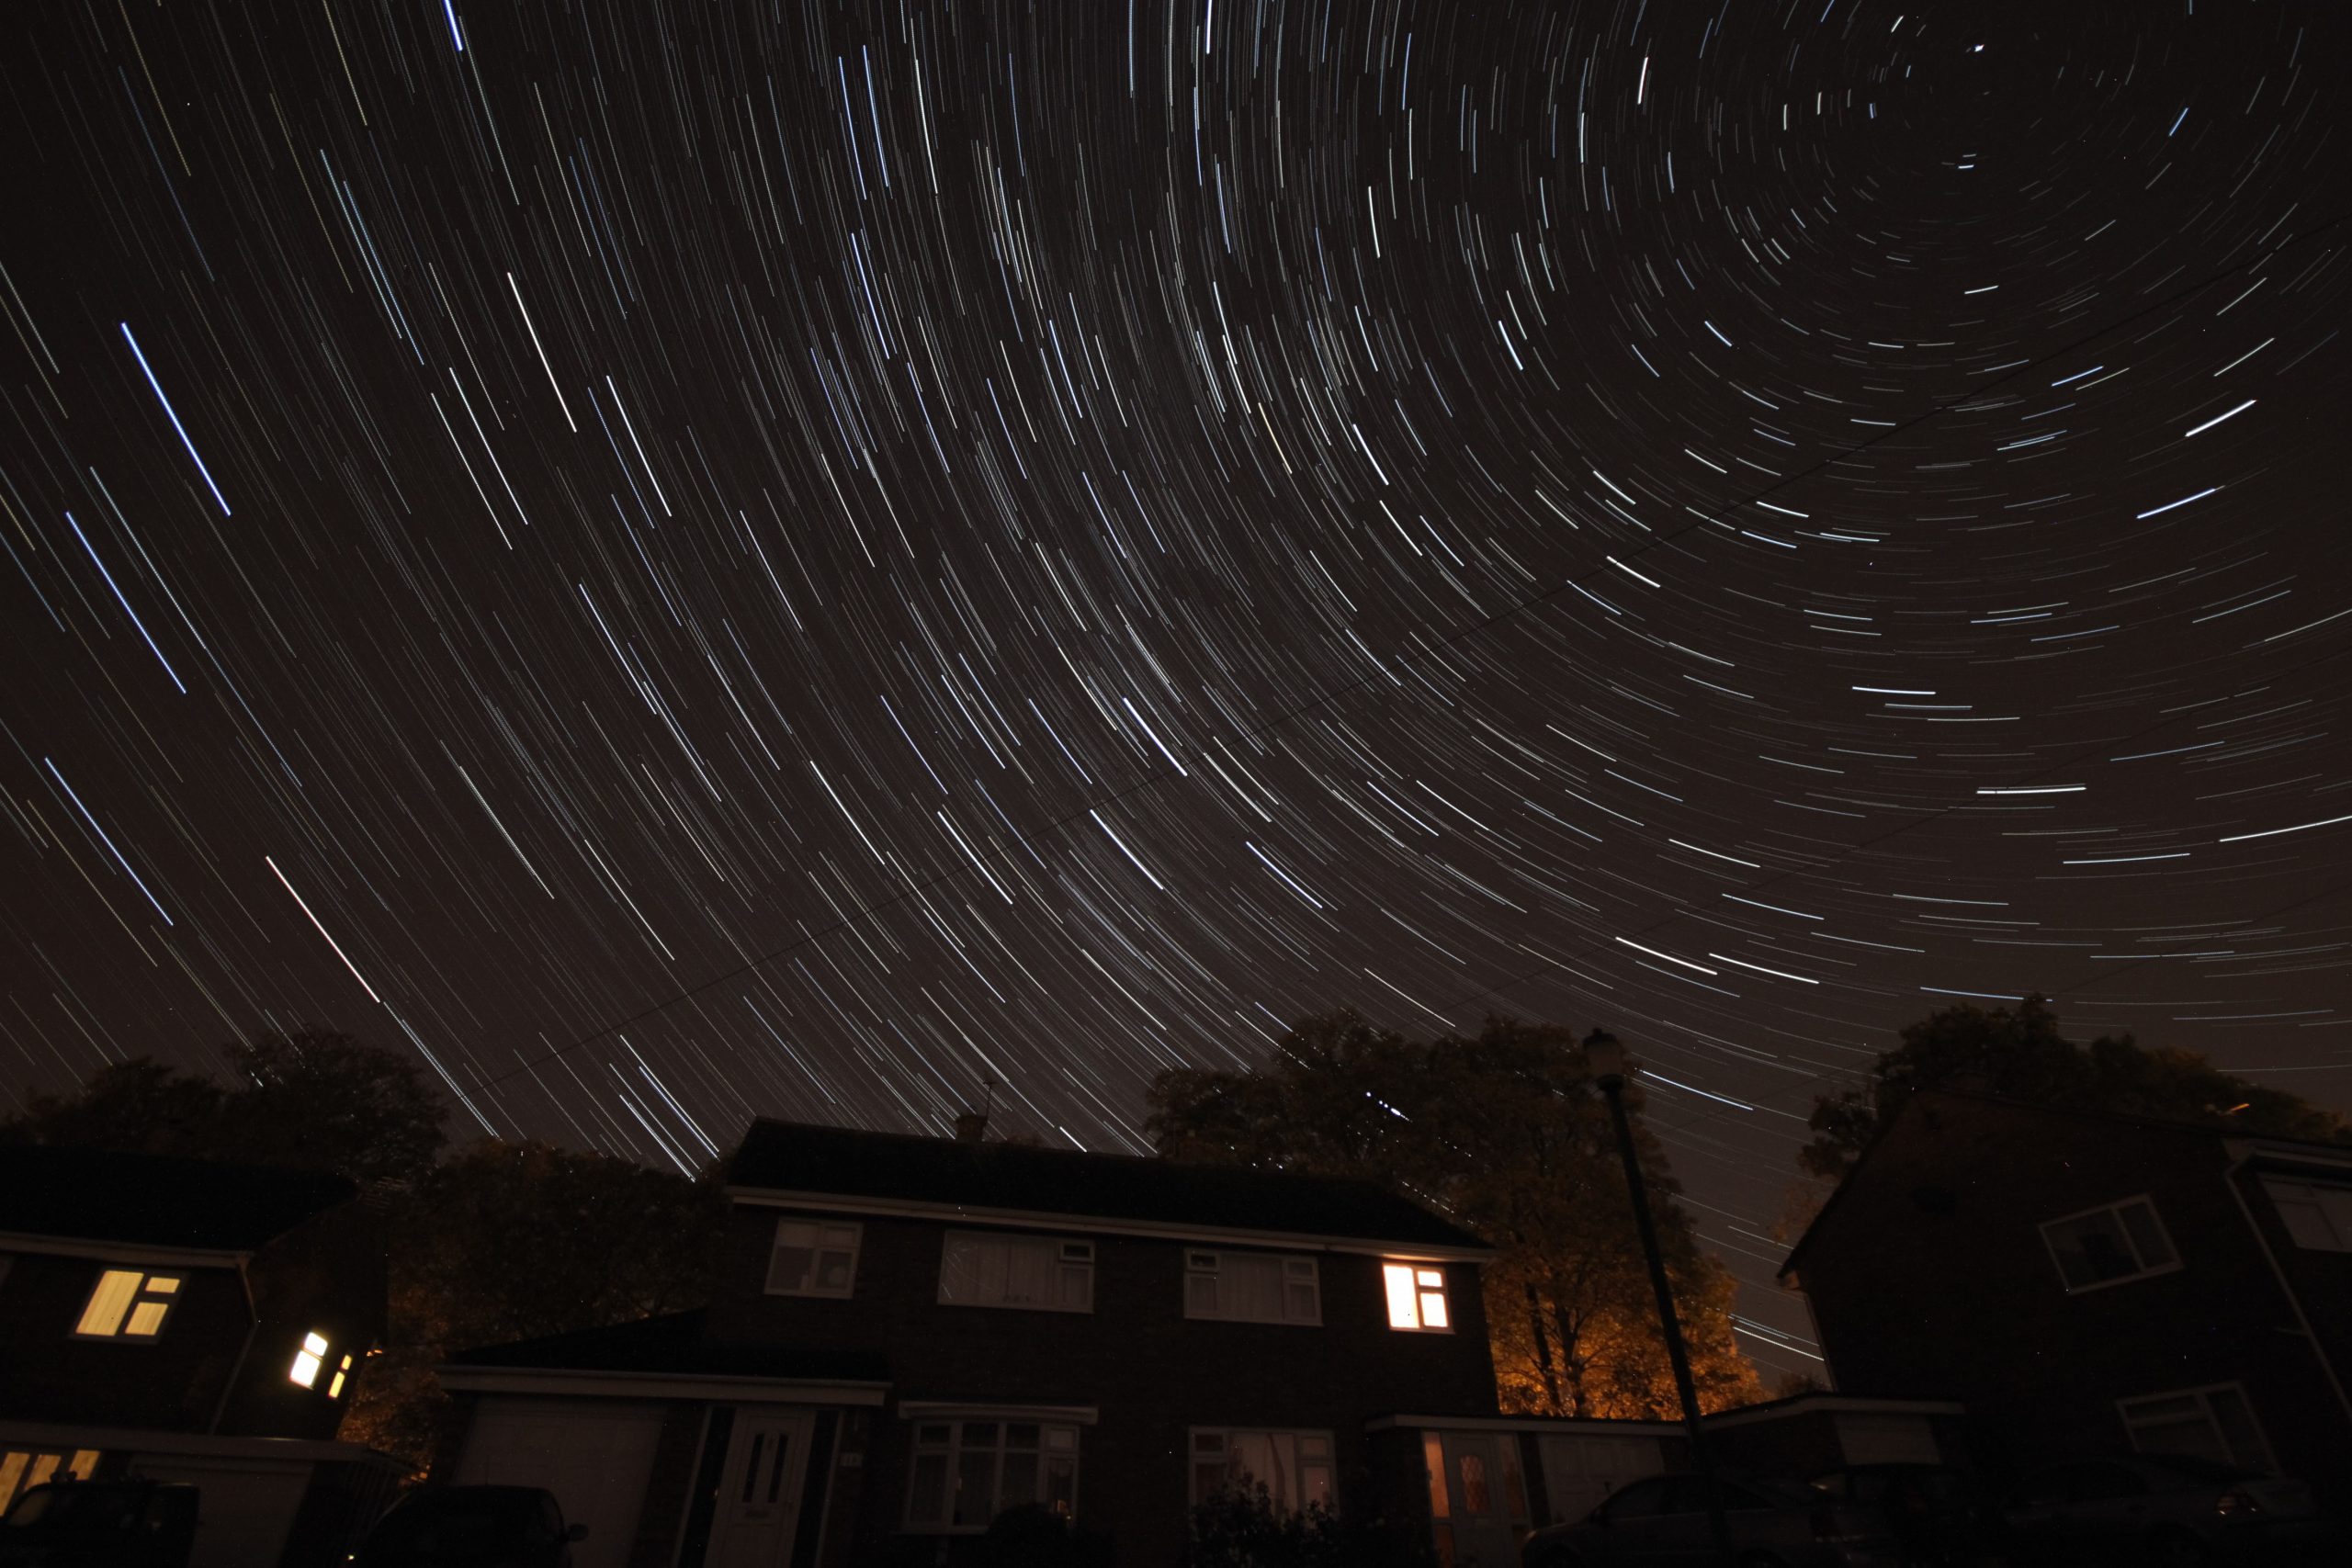
My intention with this image was to include some foreground as I’d tried it with a purely sky image and it lost context somewhat. Including my neighbours’ houses and the trees behind them grounded the image and offered some explanation to the viewer of the photo as to where this was and what was happening.
The top right of the photo contains the North Star which appears to stay fixed in the sky whilst the remainder of the stars rotate around it. The stars closer to the North Star appear to move less than those further away. If I had used an even wider lens and caught stars closer to the equator the lines would have been exceptionally lengthy.
There are multiple options to take a photo like this, the first is to leave the shutter open for the time it takes for the stars to travel across the image or take multiple photos and then stack them in post processing.
For this particular photo I used a Hahnel Intervalometer which I set the time for Bulb operation to 20 seconds and took 79 photos in total. The first is a BLACK image with the lens covered so that any hot pixels or noise can be accounted for later in the processing. It was over 25 mins in total to capture the images and for me to have kept the shutter open for this amount of time would have caused me some concern after reading up about the process. Ill effects of excessive noise and damage to shutter and sensor from condensation can sometimes occur.
Once I had the images I used the startrails software to merge the photos and create the image with the trails as you can see above. In some of the other attempts at this type of image, I experienced issues with the camera stopping, running out of power because of the cold weather and if there is a delay between the shutter closing and reopening again for the next shot, gaps appear in the trails.
I was happy with this image but I do intend to do another example once I can find a suitable foreground and the correct sky to do it again. This photo was featured in the Shropshire Star newspaper on a two page spread and the neighbour whose bedroom light is on came and told me off. Not for taking a photo of her house, but for not asking her to switch her light off. She was happy to see her house with this type of background and I had it printed for her.
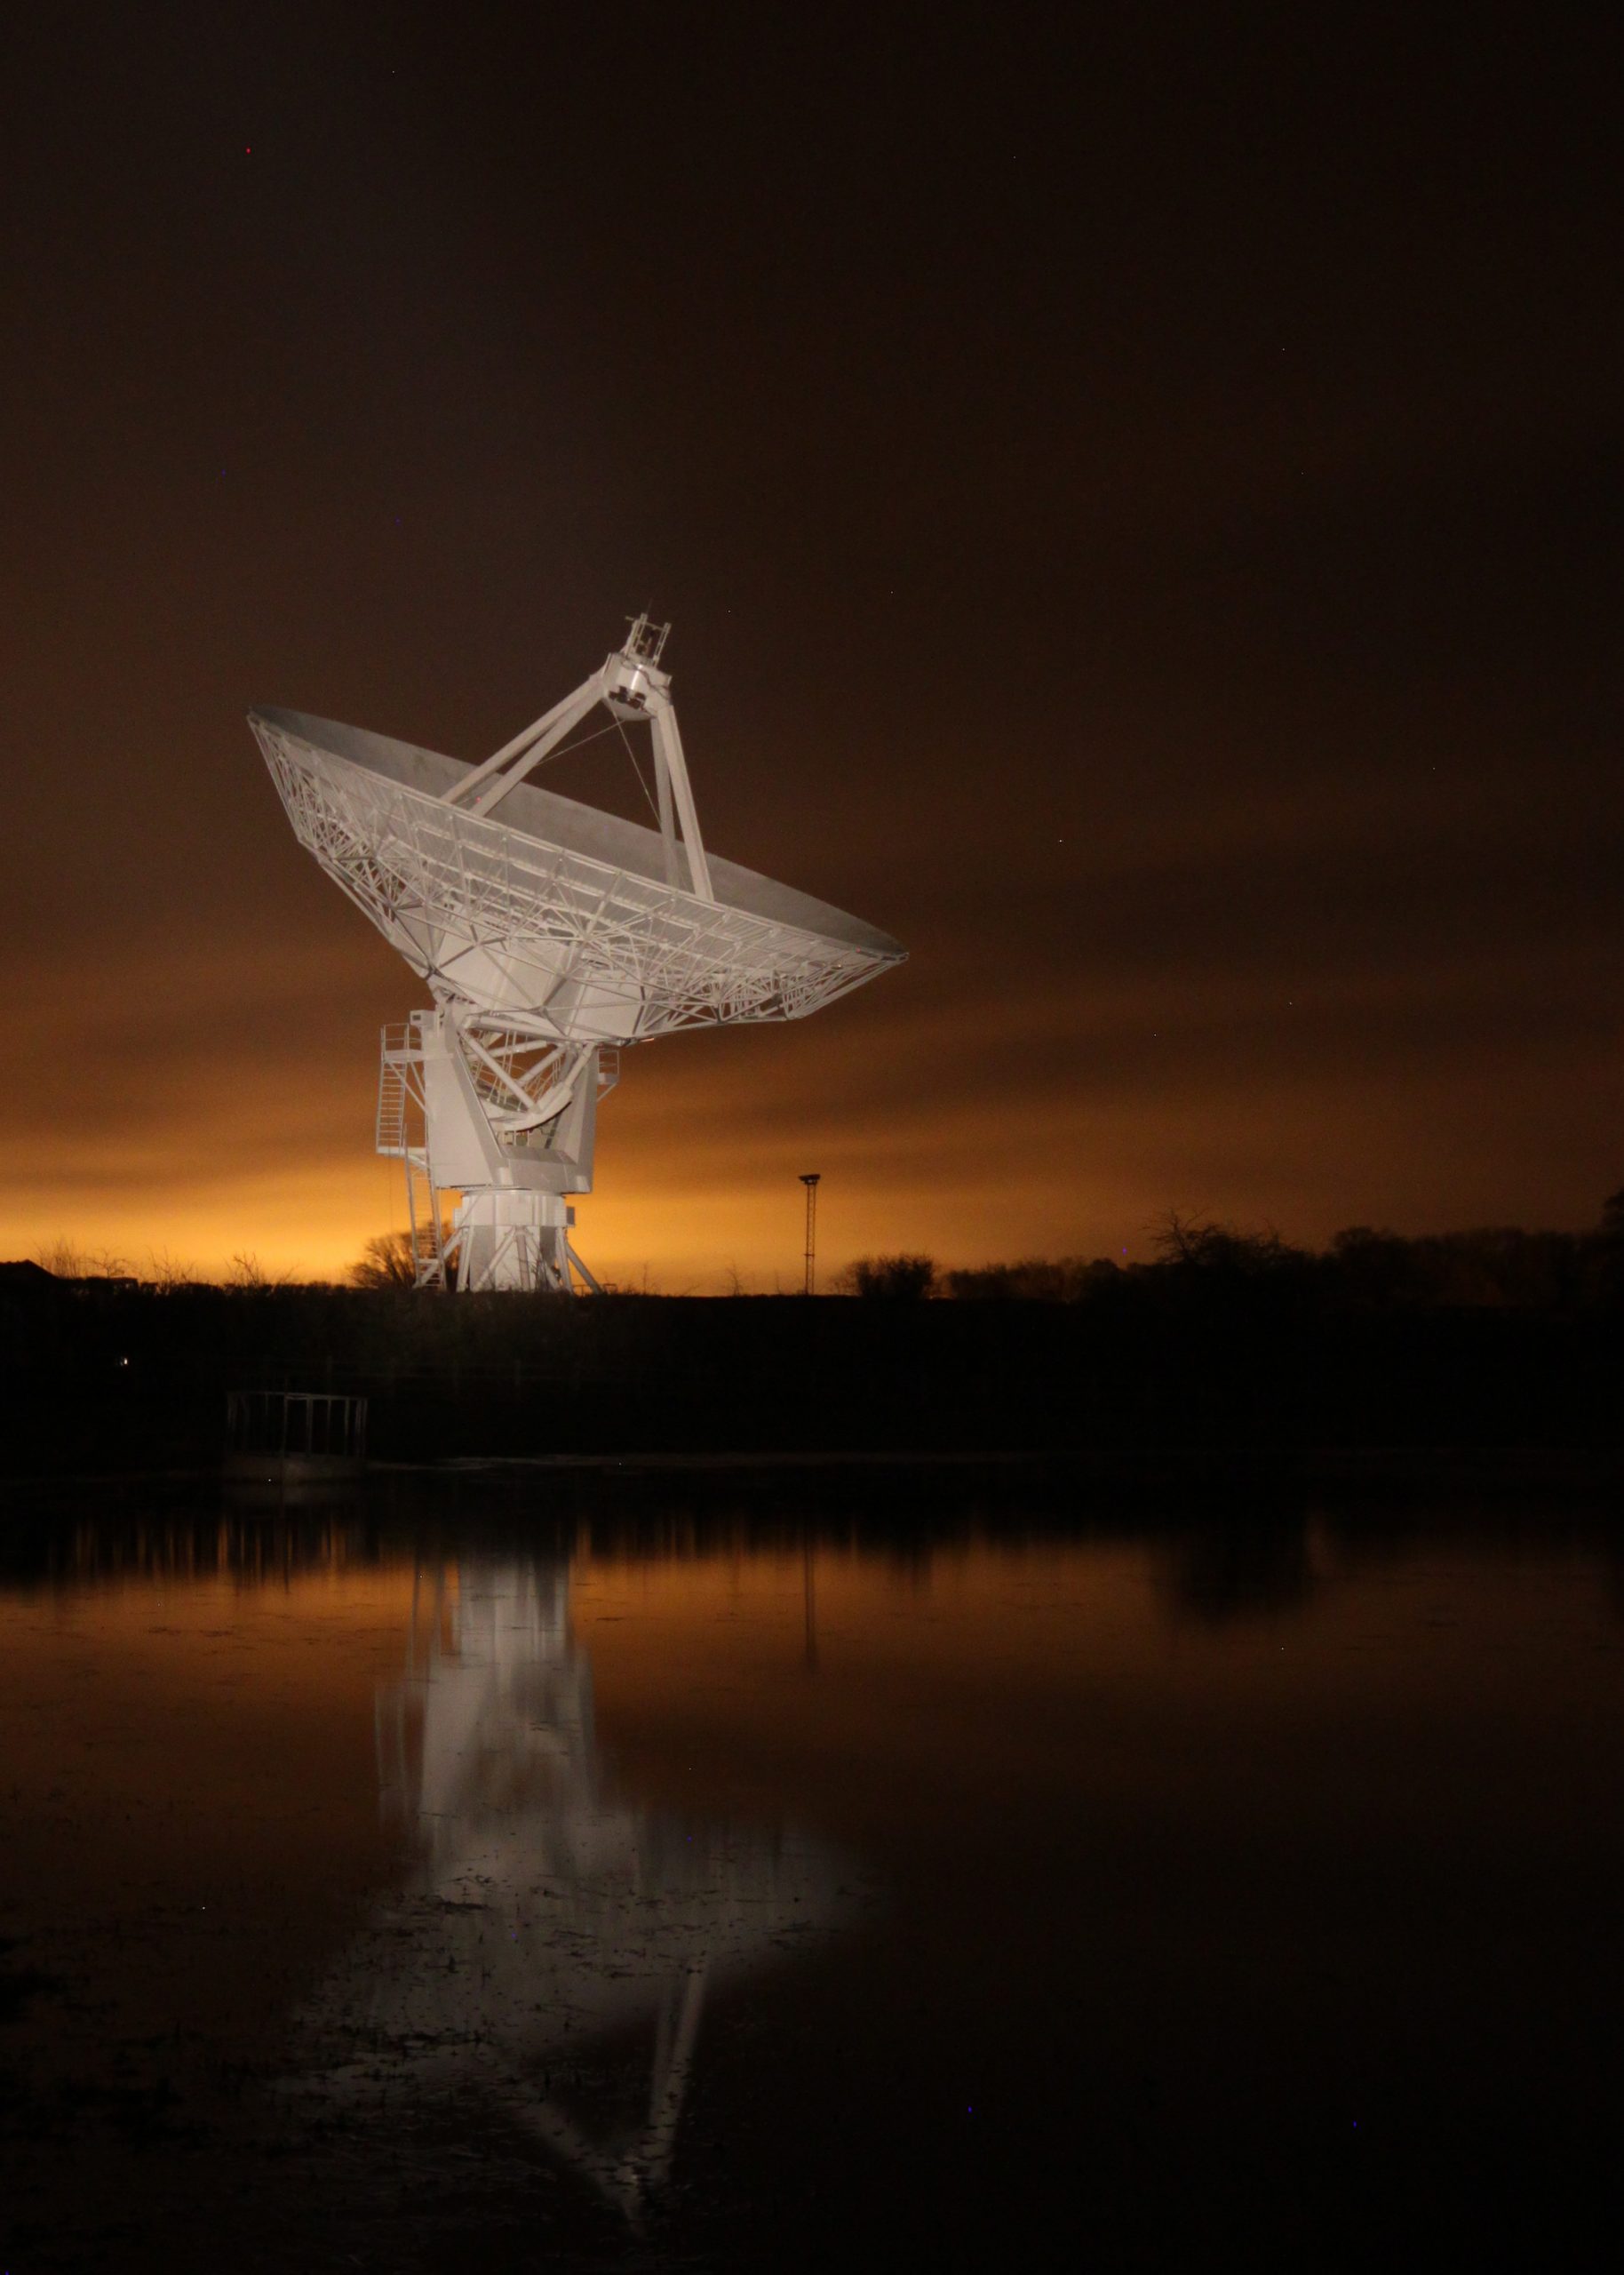
My ideal location to carry out an improved photo was one I’d tried before early on in the process at Knockin Radio Telescope and with a good sky and a strong torch I got reasonable results but too many gaps in the trails. I did however get another photo that’s not included in the portfolio.
One of the issues of Startrails with this in the foreground is that it regularly changes direction as experiments are asking it to study different parts of the sky, this lead to some strange appearances and blurry subject.
The photo was taken with a 58 sec shutter speed and a torch used to illuminate the white painted structure. I am also happy with this image but can’t include everything int he portfolio submission.
Also not included in the portfolio to keep to the limits is some of my Wire Wool Light Painting, a process in which one stuffs a food whisk with wire wool (Steel wool) and then light it with a battery or flame then swing it around on a chain, whilst keeping the shutter open on the camera. Swinging the whisk around enables oxygen to feed the firey steel and then it turns molten and flies off in spark type arcs away from the swinging.
I’ve had some success with this type of image after much practice and I led a workshop with my work’s Photographic Society in how to do these type of photos.

The image above saw me set up my camera and then use my wireless remote to open the shutter and close again once the wire wool swinging was complete. I wouldn’t recommend doing this in any area that hasn’t seen rain recently as the sparks can cause small fires to break out, so I advise taking a fire extinguisher or water to douse any flames.
This is such good fun though and you can use it in buildings so you get contained patterns of sparks, I’ve done it in an abandoned railway tunnel for instance and the results are always impressive.
Well, that’s it for this section. Two further sections to go for my submission, including Portrait and Abstract Architecture, and then a special bonus of photos that nearly made it but had to be cut out to keep it down to the suggested 20 slides.
Feel free to leave a comment or get in touch if you want any further information.
Be First to Comment