This Monday’s session in the Photographic darkrooms in the deep dank basement of the George Wallis building saw me making colour prints from select negatives after trialling with test strips. It wasn’t always successful and I learnt a few lessons that will help me in the future.
Training
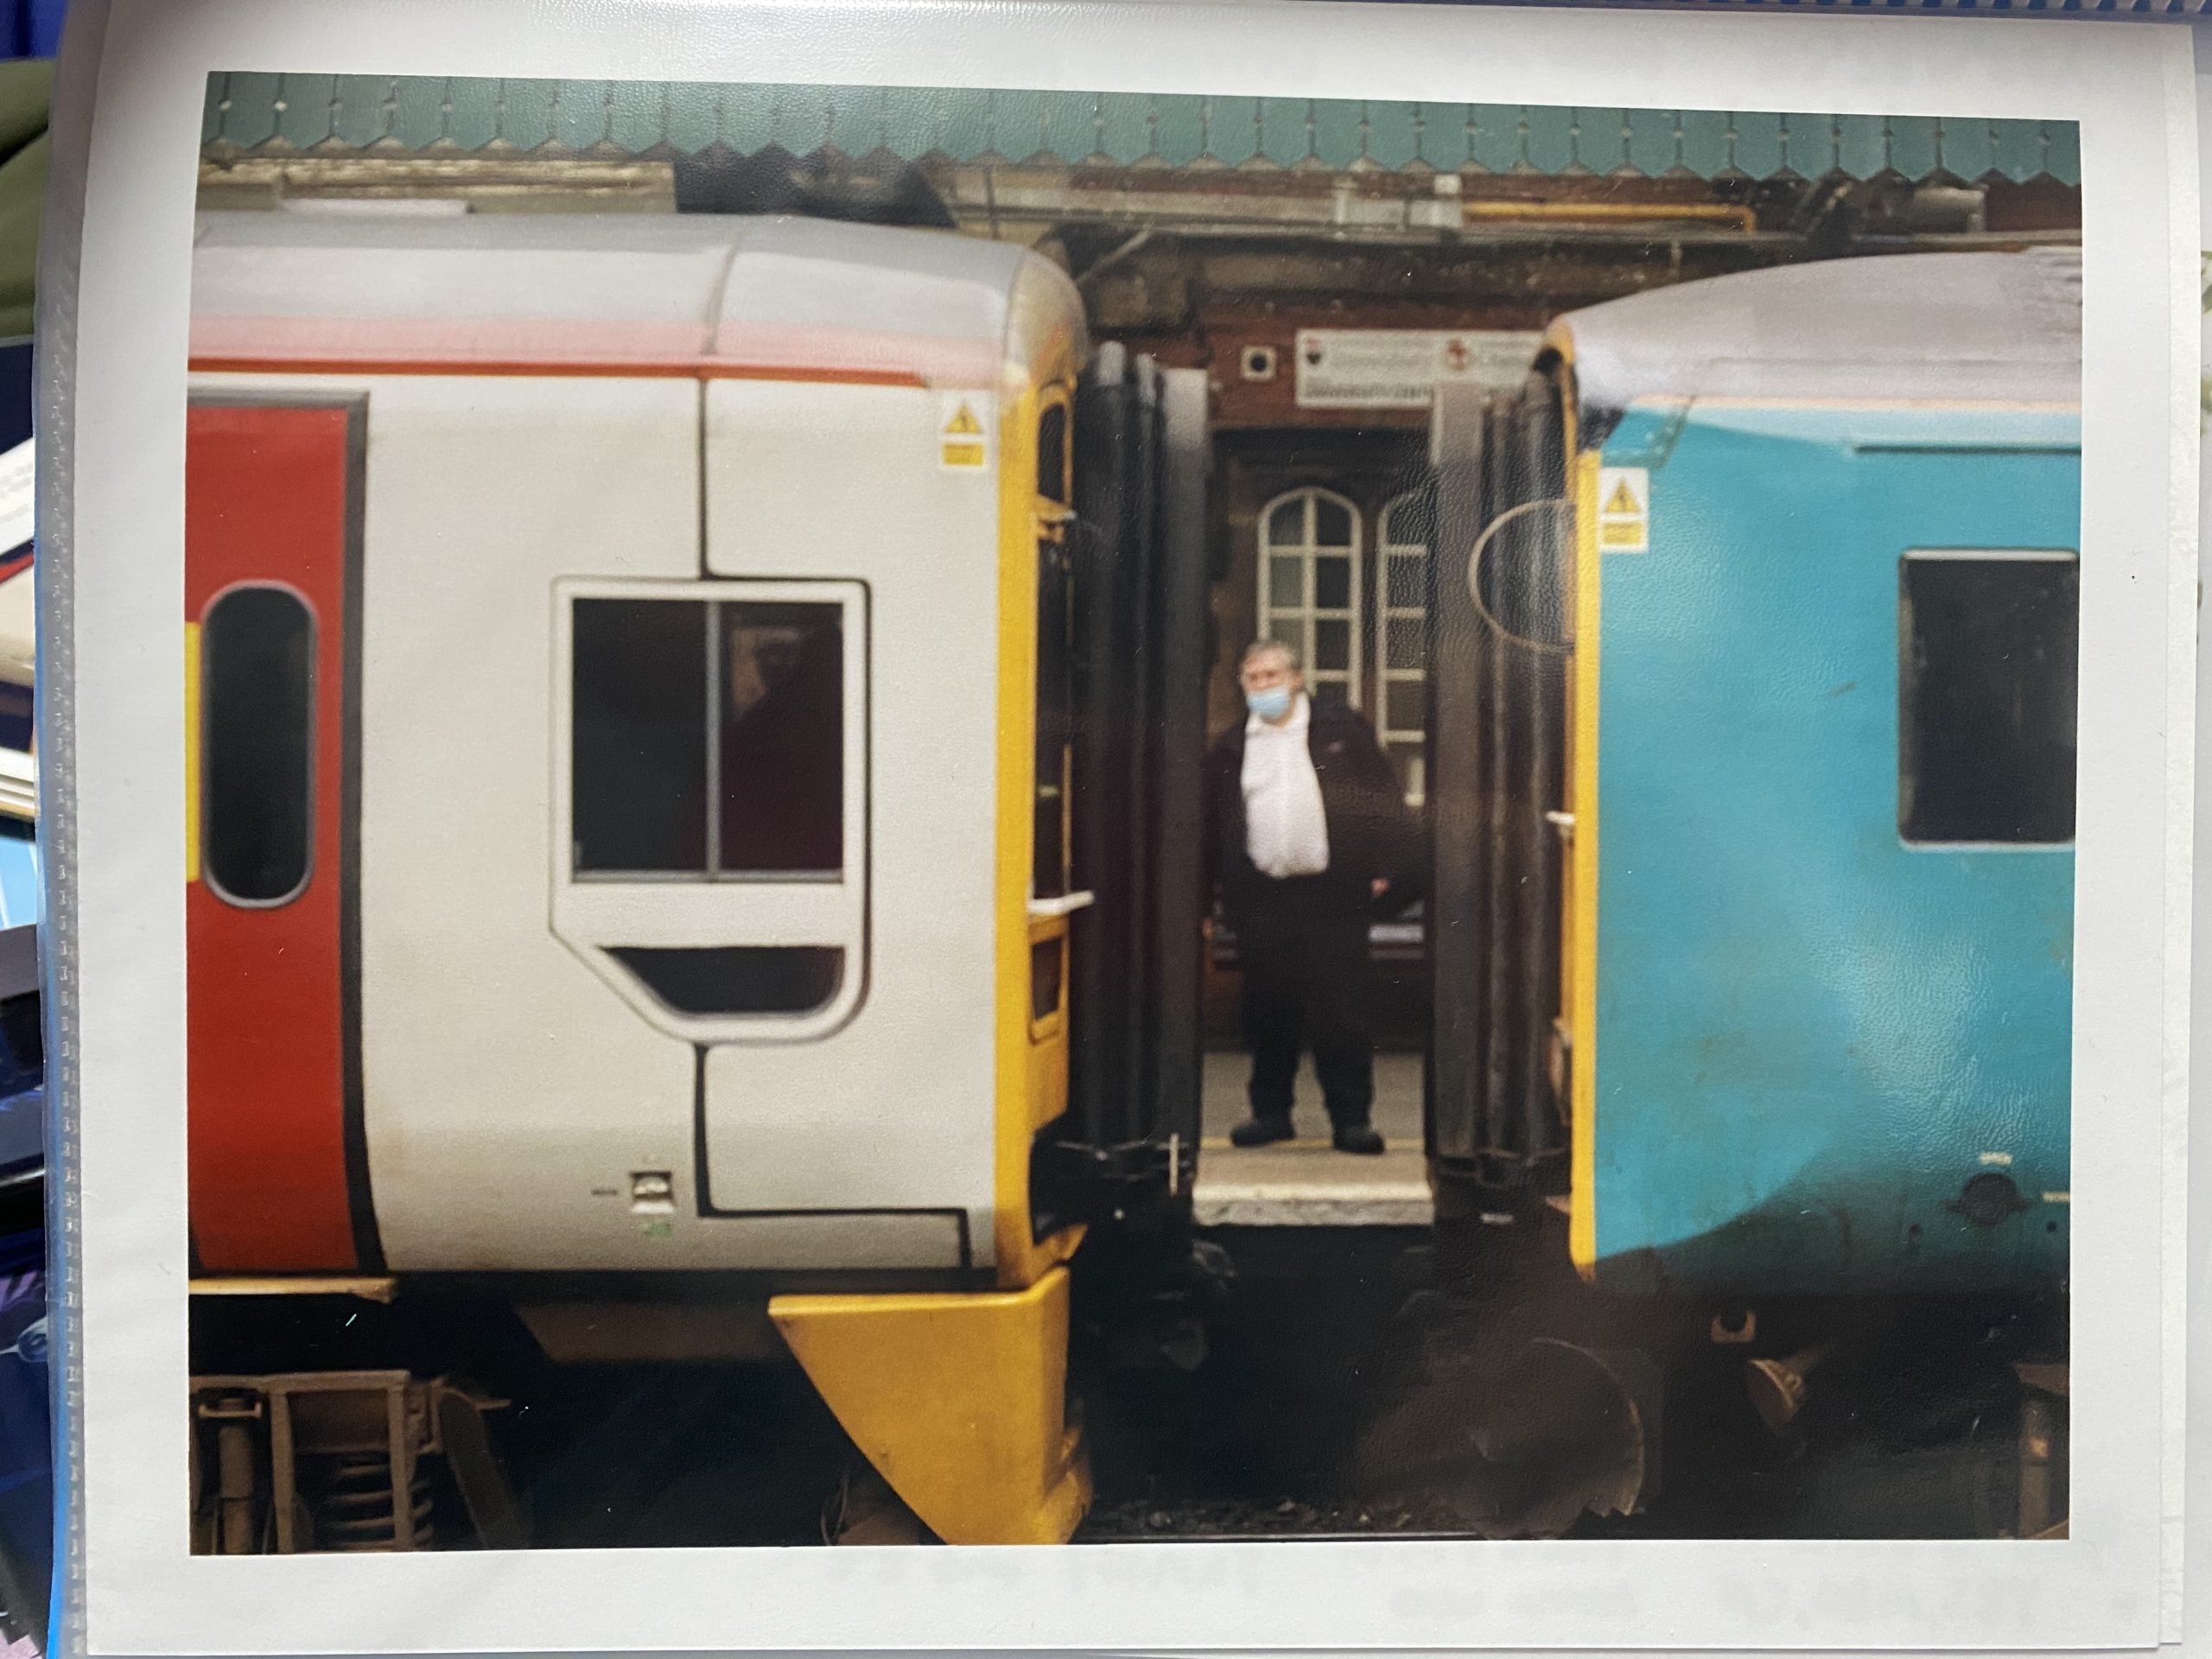
Looking at the contact sheet from Film #1 I could see a photo of two train carriages that were being separated whilst at the platform at Shrewsbury station. I thought the colours looked cool and it fit my “Replacement” theme as the single train was being split up into two and then going off in separate directions to far off destinations. I hope the travellers in the rear section were aware of this before they ended up in Crewe rather than Wrexham.
I ran the negative strip into the head of the enlarger and then set the filters to the usual jumping off point. Yellow 50, Magenta 50 and Cyan 0. This restricts some Magenta and Yellow light reaching the paper that would be sitting underneath on the easel. Cyan light from the system isn’t filtered at all and this is usually left well alone unless a strange situation occurs or you intentionally want to alter the colour balance in a weird fashion.
After taking my new 10×8 Fuji Crystal Archive paper into the darkroom with the guillotine, I cut up several sheets into strips ready to test the exposure levels and filters. Popping the light sensitive paper in my black bag and then closing the box correctly, I headed back to the LPL C7700 Enlarger and began to prepare for the first test sheet.
I set the focus on the easel and set the timer unit to an interval of 1.5 seconds so I could get a range of different exposures on the strip. The aperture of the lens in the enlarger head I set to f/8 as suggested by Jack and Matt, the lecturers. Lifting up the button on the timer module switched on the light in the enlarger so I could set the focus on the image. I used the focus finder again and this time I think I saw what I could consider to be the grain of the negative but I’m still not 100 confident.
Switching lights off and locking the door I removed the first test strip (1) from the bag in the under desk drawer and placed it on the easel, then taking my covering card I covered up 3/4 of it. Fully prepped I was confident that this was going to be a success, then I hit the timer button, 1.5 secs later a click, re-press it and it clicked off after 1.5 seconds. A third press on the trigger and the folder I had by the timer on the desk then moved forward and lifted up the trigger on the timer, jamming the light on. It took me at least 5 seconds to realise what had happened, before I panicked and got the light off.
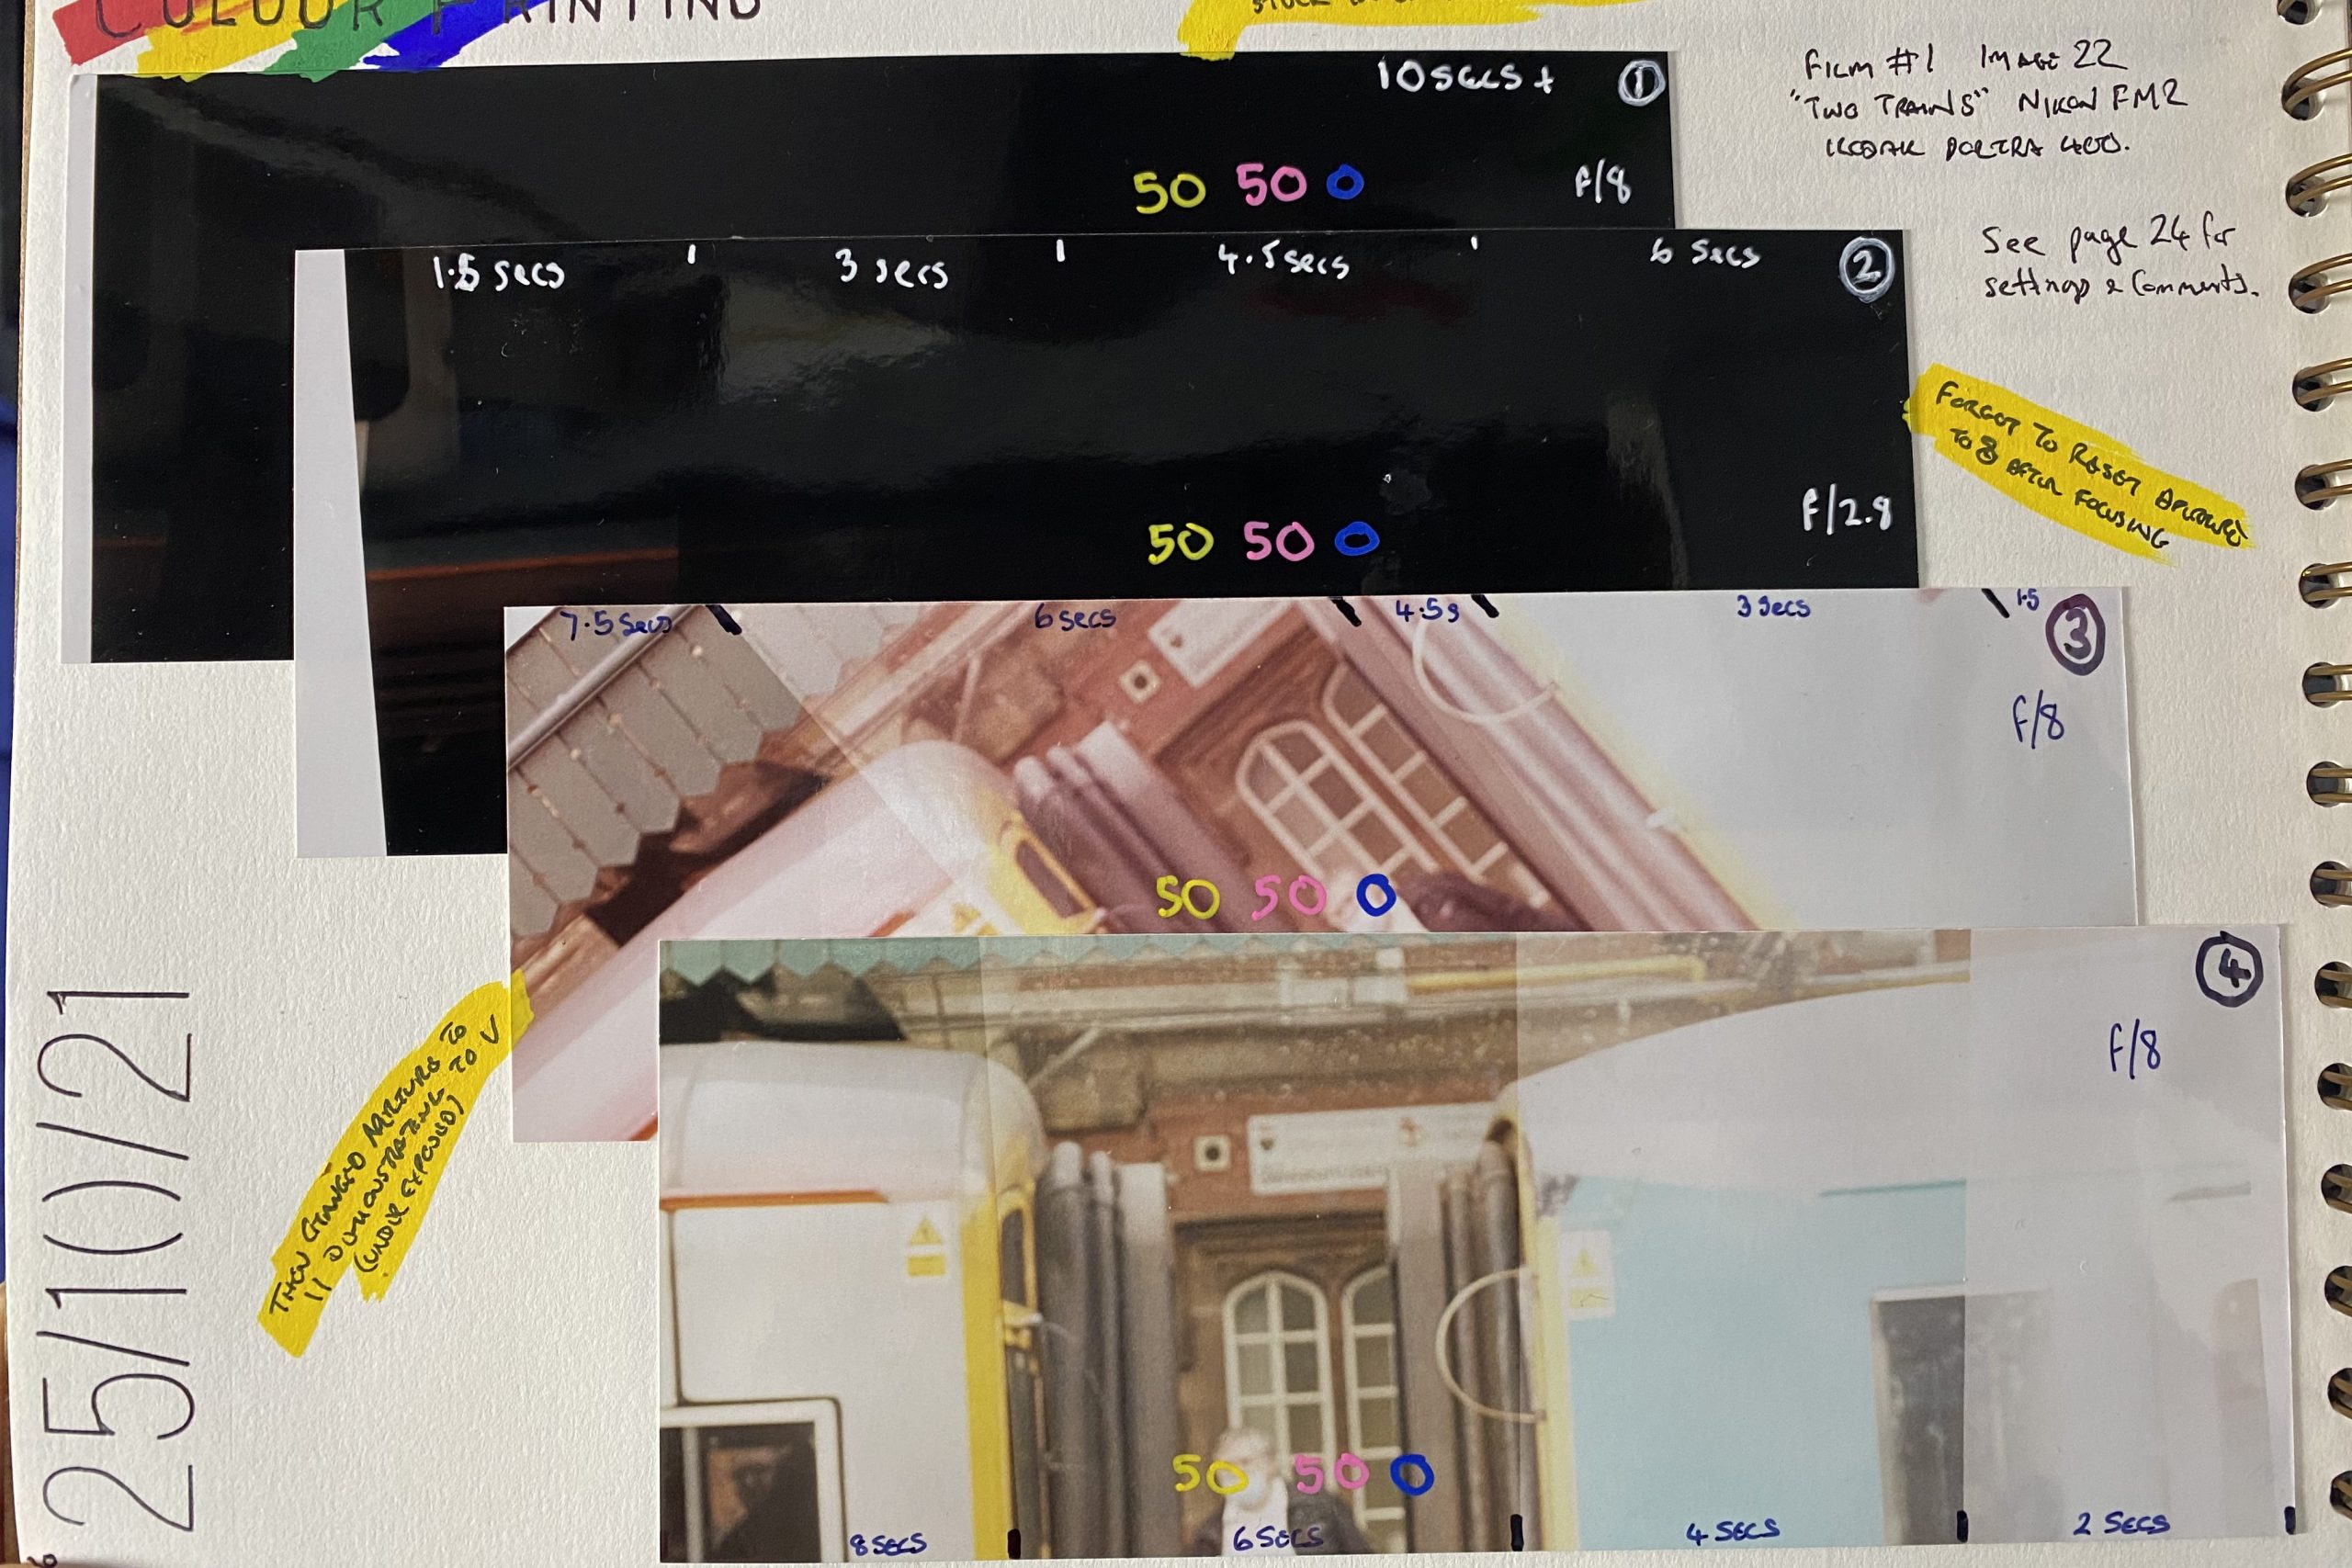
It went into the Colenta machine came out four minutes later mostly black with a small section showing barely visible detail. I knew it had happened so it was no surprise. Back to the enlarger again and I thought I’d recheck the focus to ensure it was accurate. I successfully hit the paper with intervals of 1.5 seconds and went back to the machine confident that I had a good one, but knowing that I’d still have to change the filters some.
Test Strip (2) came out of the machine not far short of the same darkness as the first strip so I immediately went into fault finding mode and realised almost straight away that I’d not reset aperture to f/8 after focussing, so it had exposed it at f/2.8 which is a full three stops away from the desired. This means it had doubled three times, hence 1.5 secs at f/8 was equivalent to 3 seconds at f5.6, 6 seconds at f/4 or 12 seconds at f/2.8. So that would explain why the paper test strip was completely over exposed.
Kicking myself in the shin I went back into the enlarger room and Veronica was also doing some test strip prints so I helped her understand the ease of focussing on f/2.8 but resetting it back to f/8 for the actual exposure. Little did I know that in demonstrating to V this fact, I’d inadvertently changed my aperture on the enlargers 50mm lens to f/11 so this would mean that the light to the paper in 1.5 seconds would now be halved.
My test strip (3) came out vastly under-exposed as can be seen above, so I instantly went and did another strip (4) using intervals of 2 secs. and this image turned out a little better than before but still quite pale. The filters would need changing a little to allow the blues and reds to pop in the image so I altered them to Y80,M80,C0 and ran through another strip (5) in 2 second intevals.
This print didn’t work out at all this time, but due to no fault of my making. I fed the strip into the Colenta’s hungry input rollers, waited for the beep and then sat with my colleagues in the output room waiting. One person’s strip came out but there were three others in the queue that had put our strips into the machine before her, so we raised it with the lecturers. After all I didn’t want a repeat of the other weeks crispy test strips, and it might damage the internals so we thought it a wise move to leave it to them, and I grabbed a nice cup of coffee.
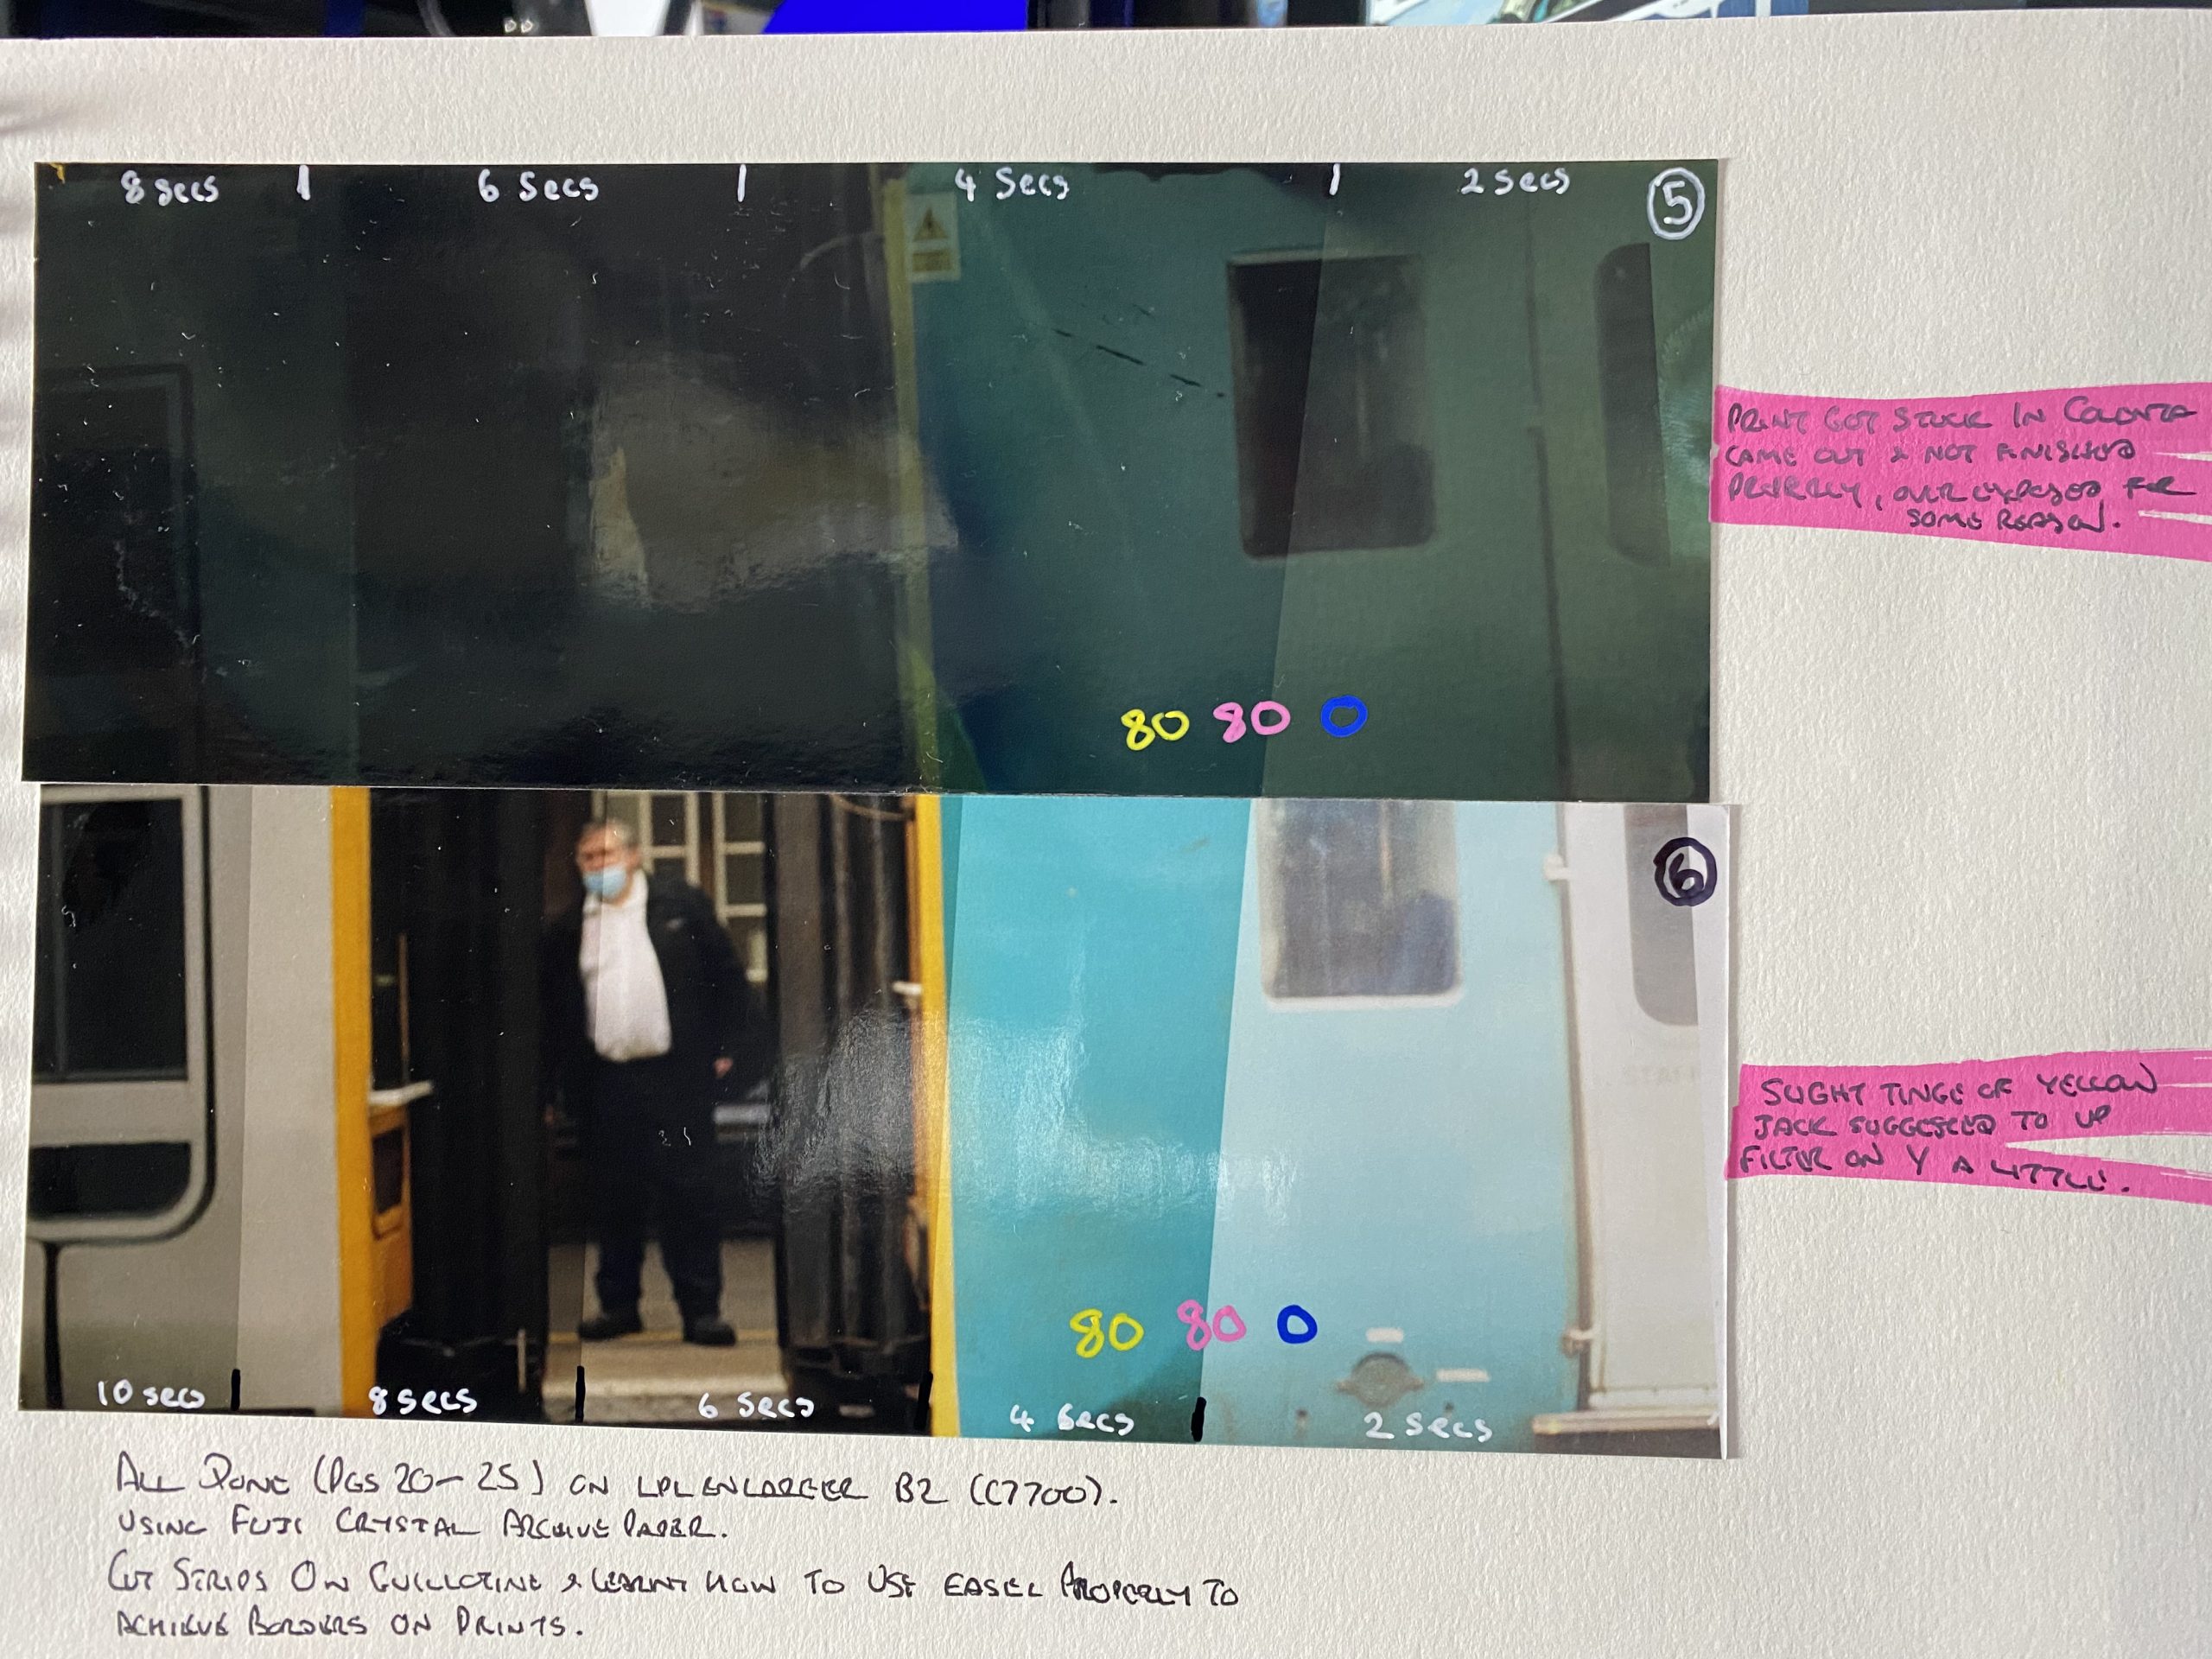
Jack shouted that we could use the machine once more after my little caffeine injection so I checked everything I needed to, before turning off the lights and exposing test strip (6). This one came out relatively good with the filters still set at 80,80,0 but Jack suggested a slight yellow cast was evident so I’d change it to 83,80,0 for the next print.
Pulling out a full sheet of 10×8 paper and feeding it under the rulers into a reasonable location so that I could get a border around the edge of the print was troublesome. The print (7) came out of the machine looking ok, after 6 seconds exposure time with a good colour balance but Jack and Matt noticed it was slightly over exposed and the blacks in the undercarriage were slightly saturated with little detail so I’d reduce the time of the exposure by a tiny amount.

It Ain’t Easel
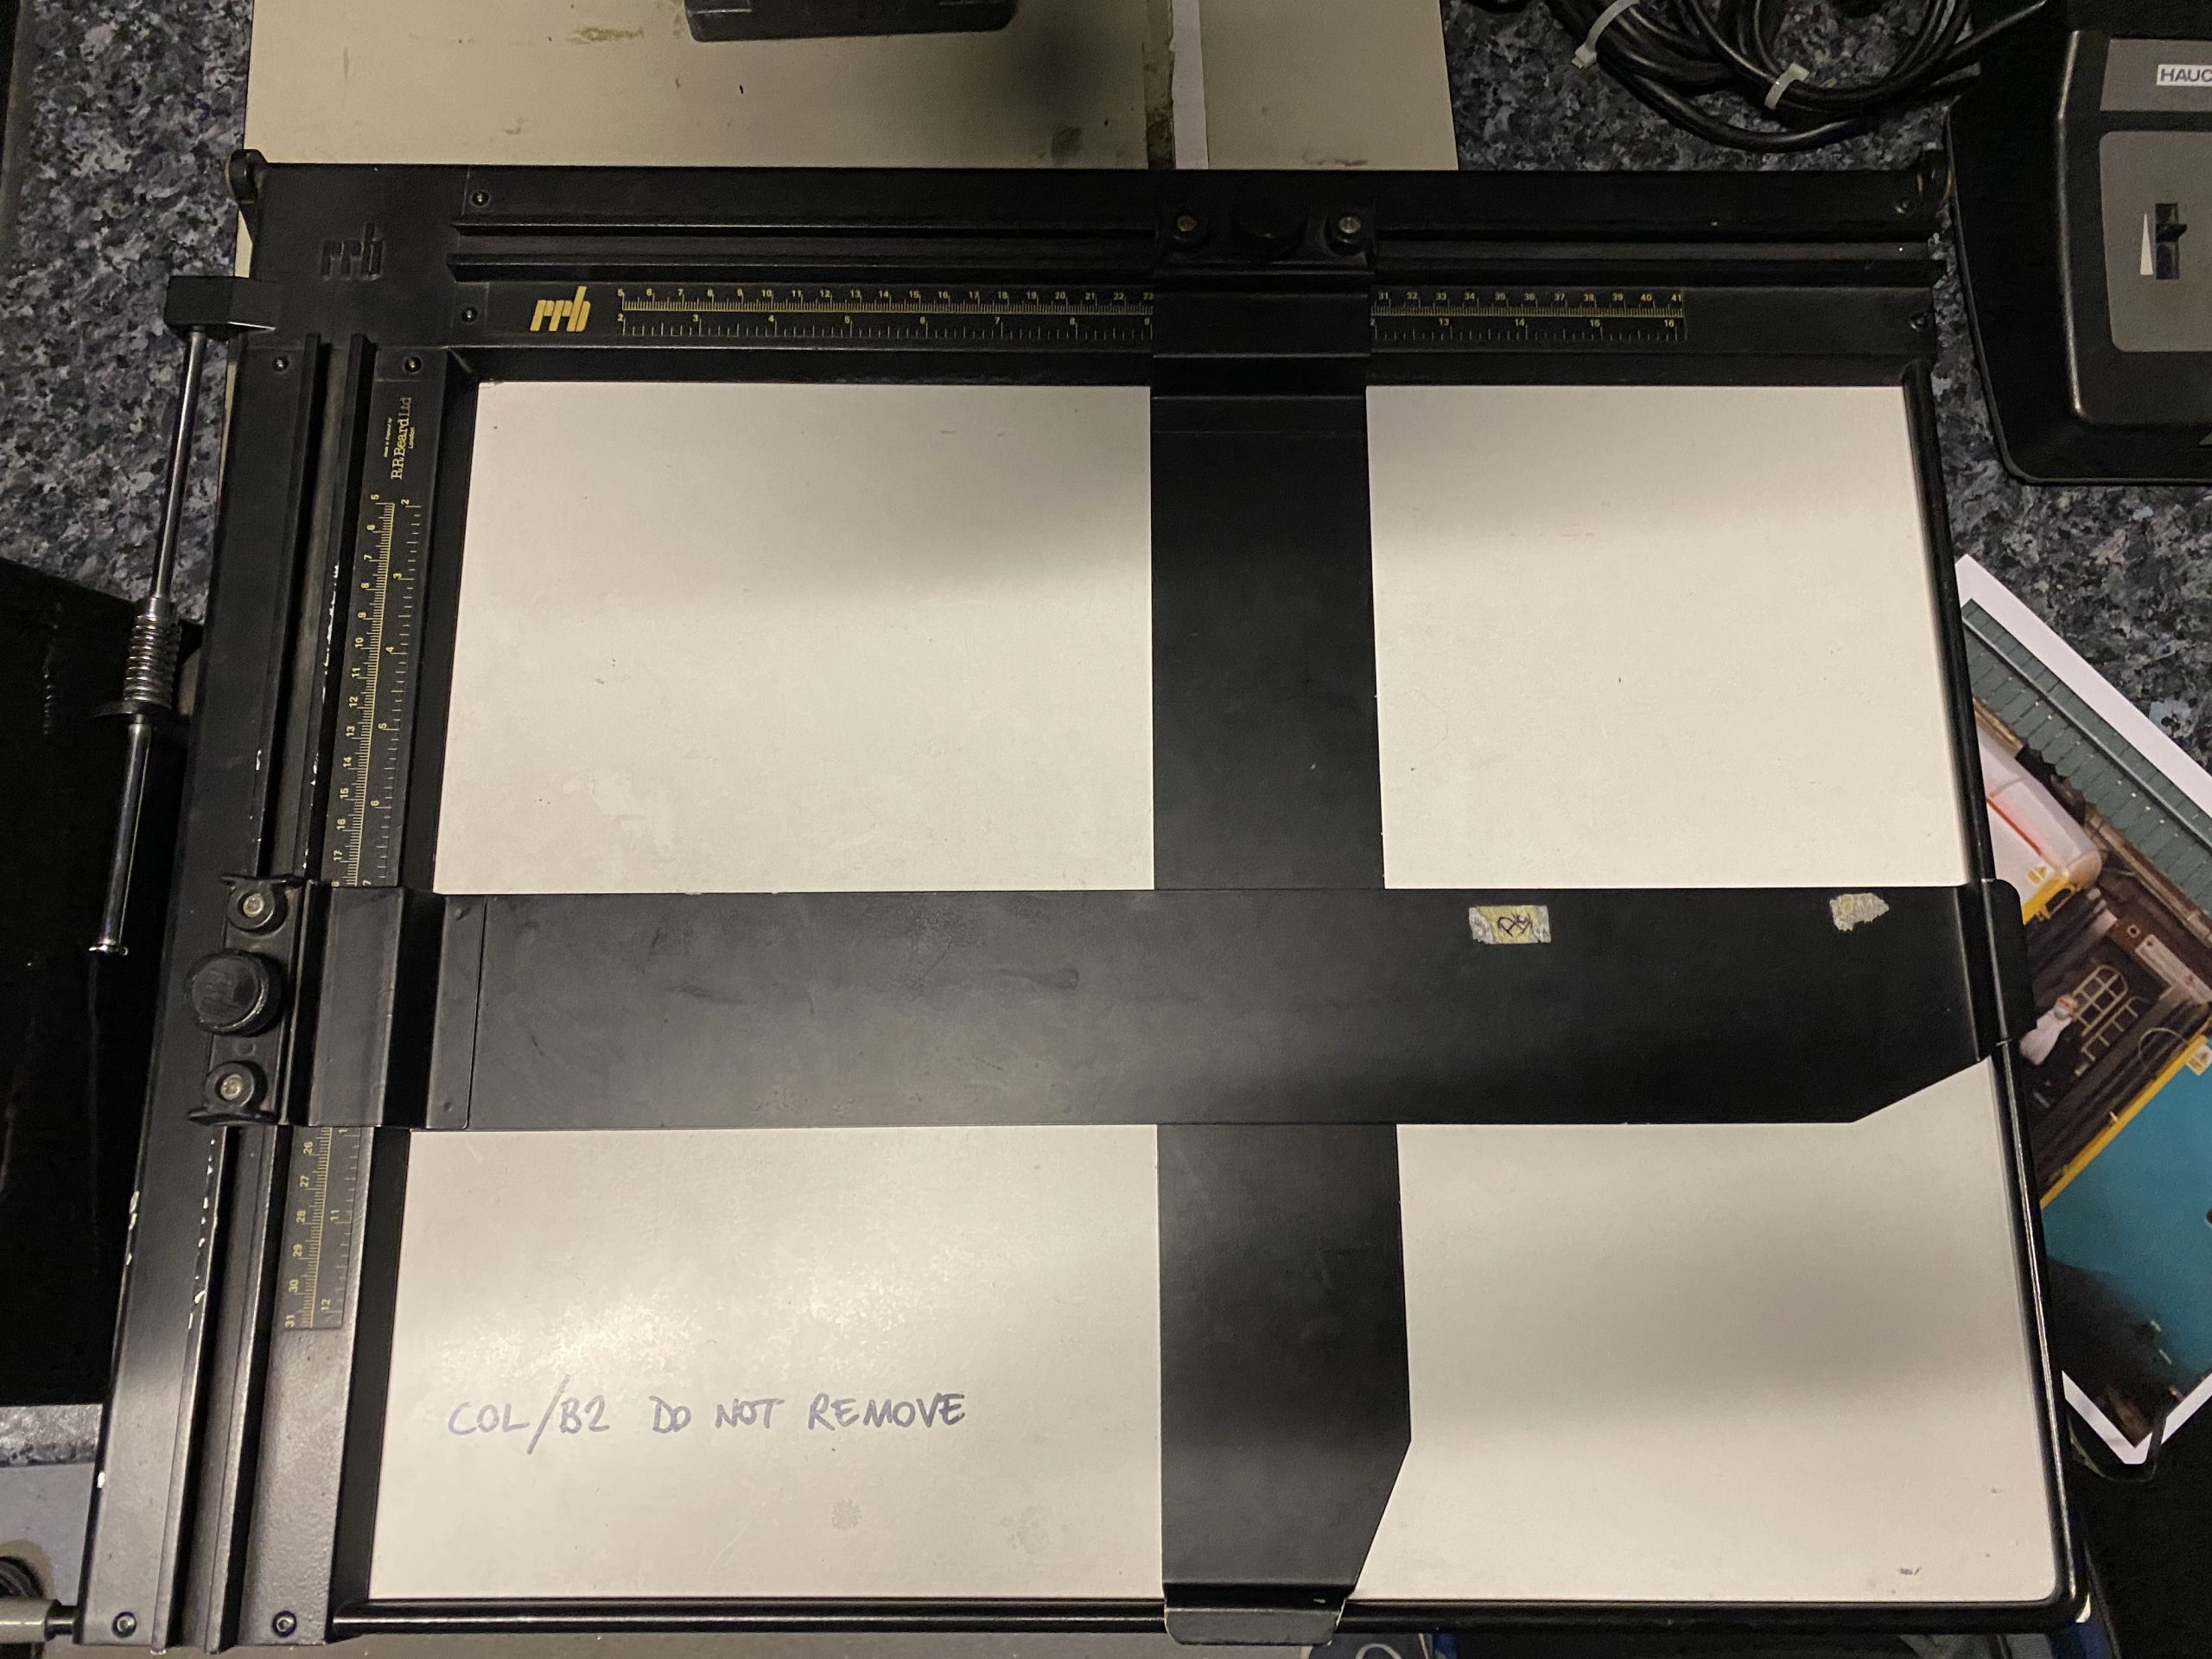
It was at this point talking to Jack that I mentioned I was unable to get a good border as I couldn’t see how to set the easel correctly as the paper went under the corner of the easel. He didn’t laugh in my face but I wouldn’t have minded as I’d been a bit daft. I’ve never seen an easel used in a darkroom so was unsure of how it should be used. I didn’t know though that you could lift the frame up and set the depth of the borders using metal strips underneath. Setting these to the right distance for your selected border width, and then setting the rulers to the correct setting it would allow the paper to slide into place and then be covered in the corners and the opposite corners would be covered by the moveable rulers.
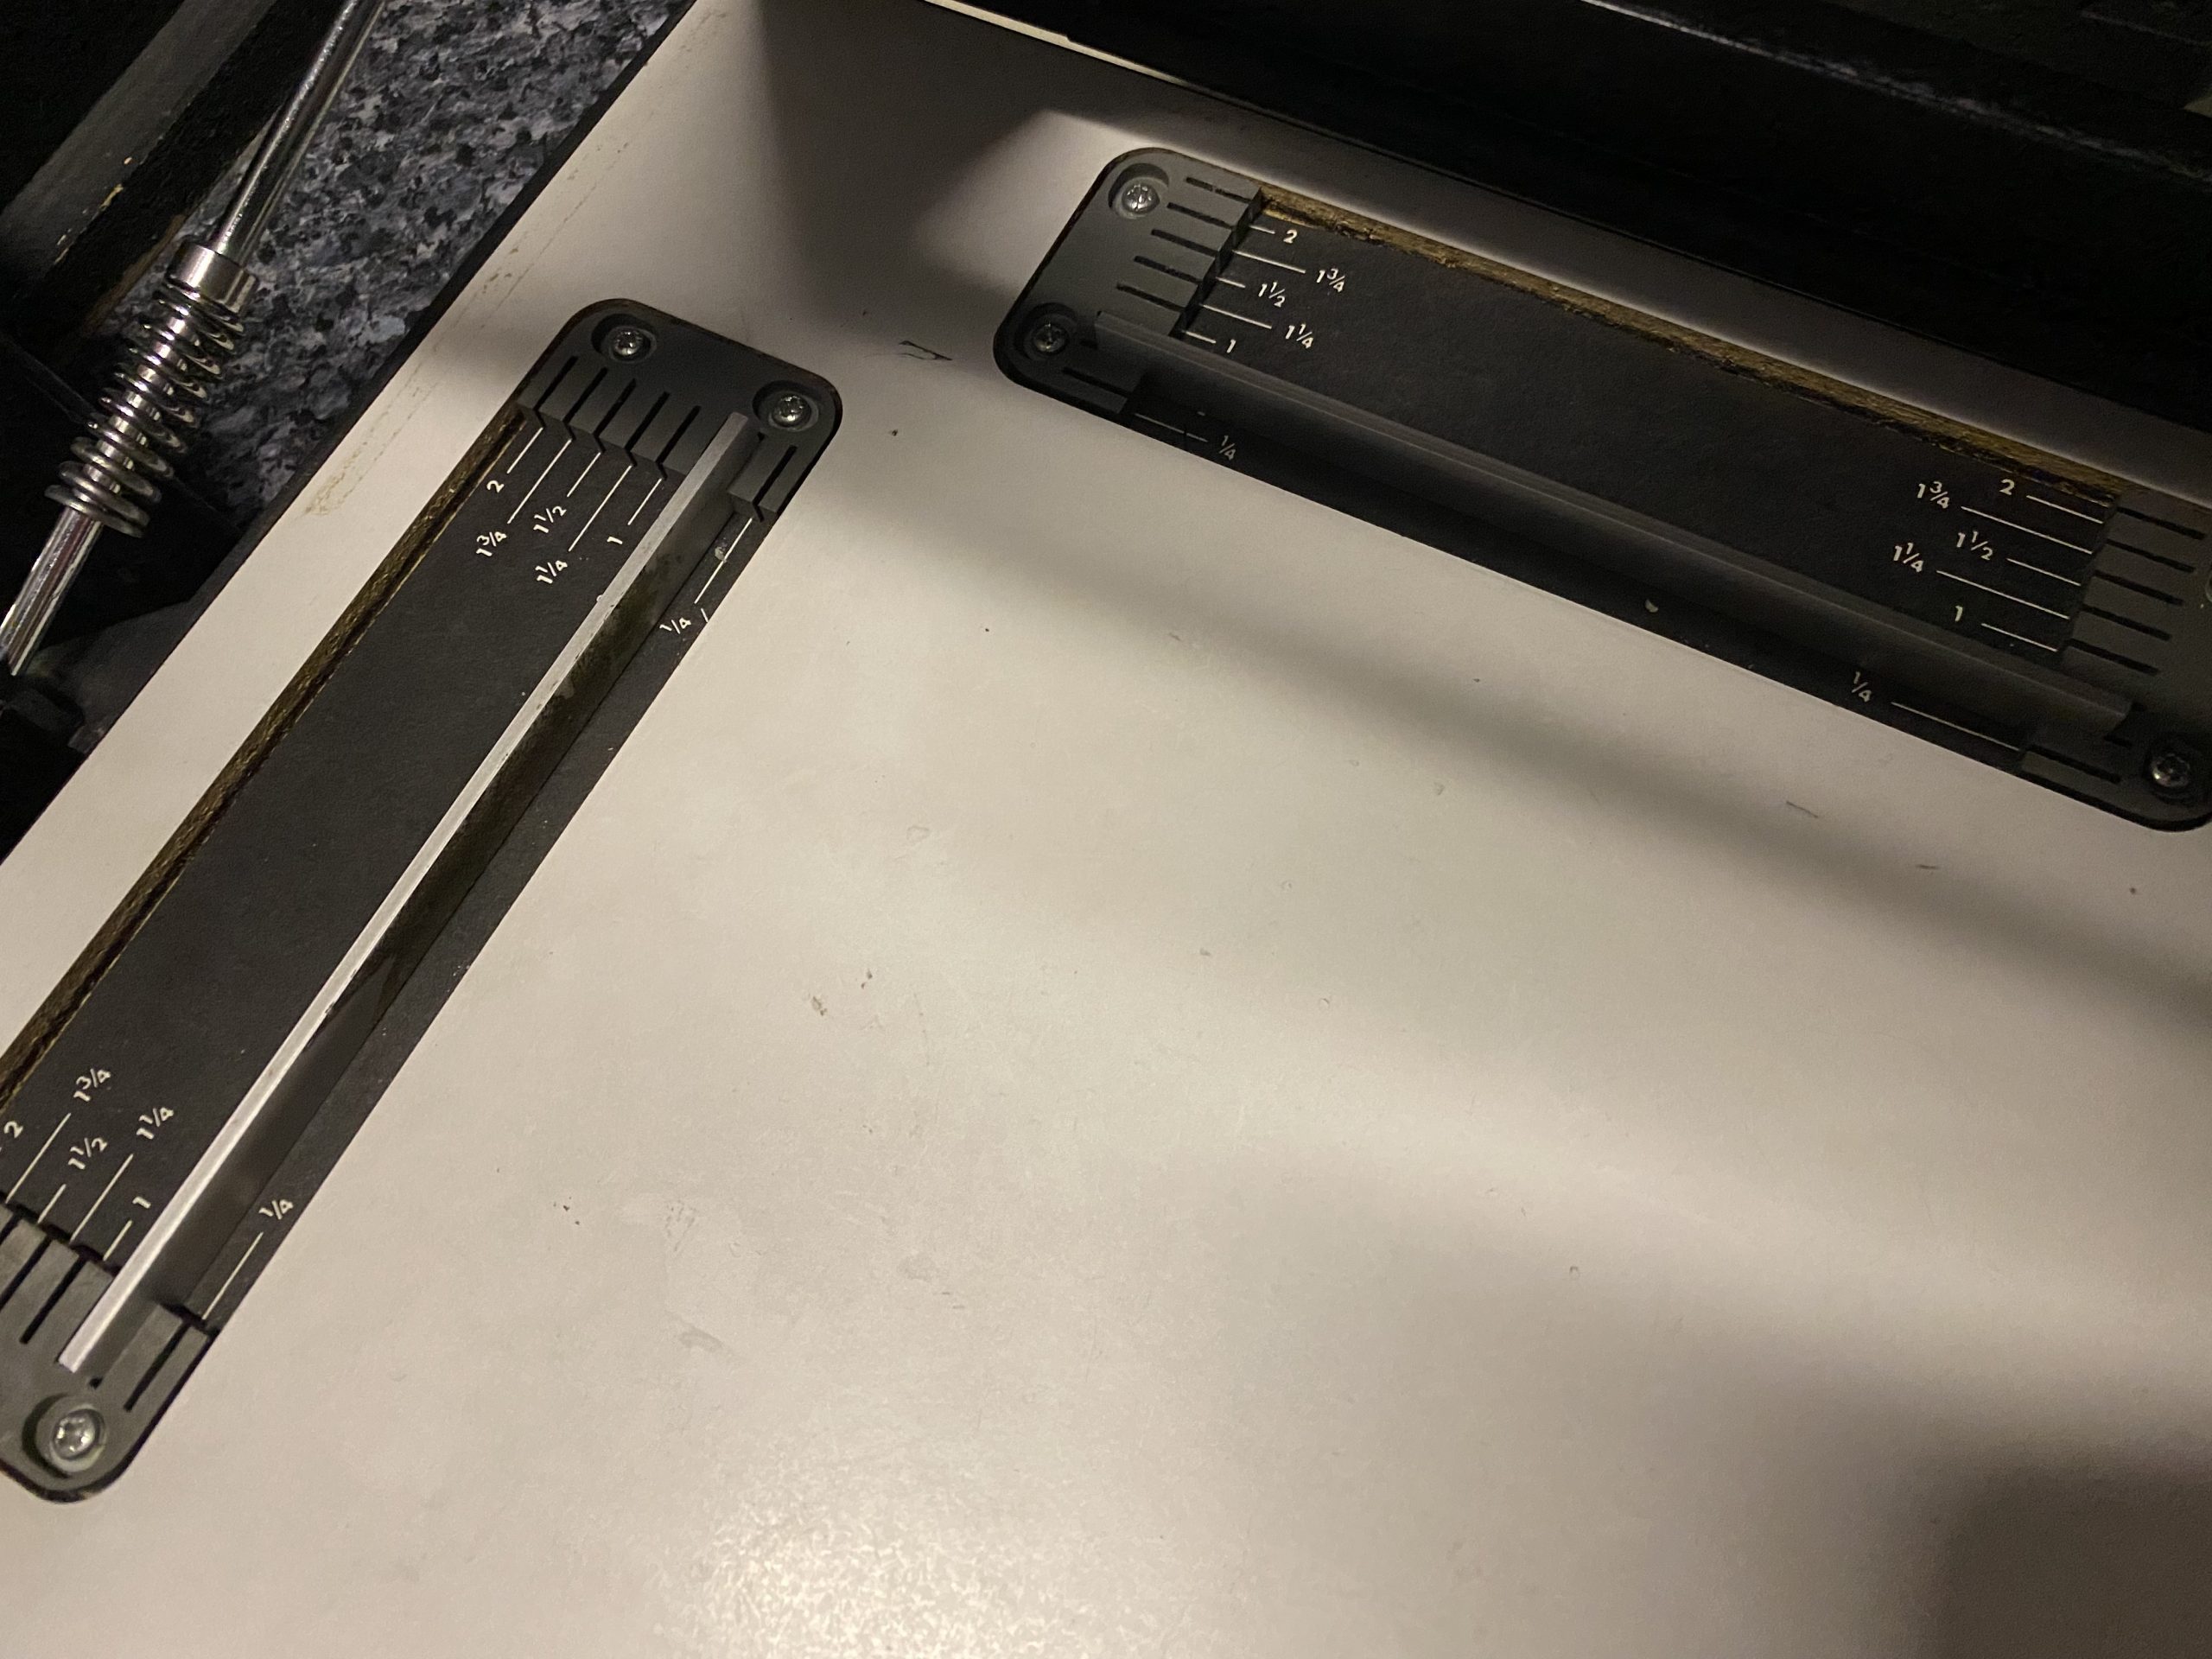
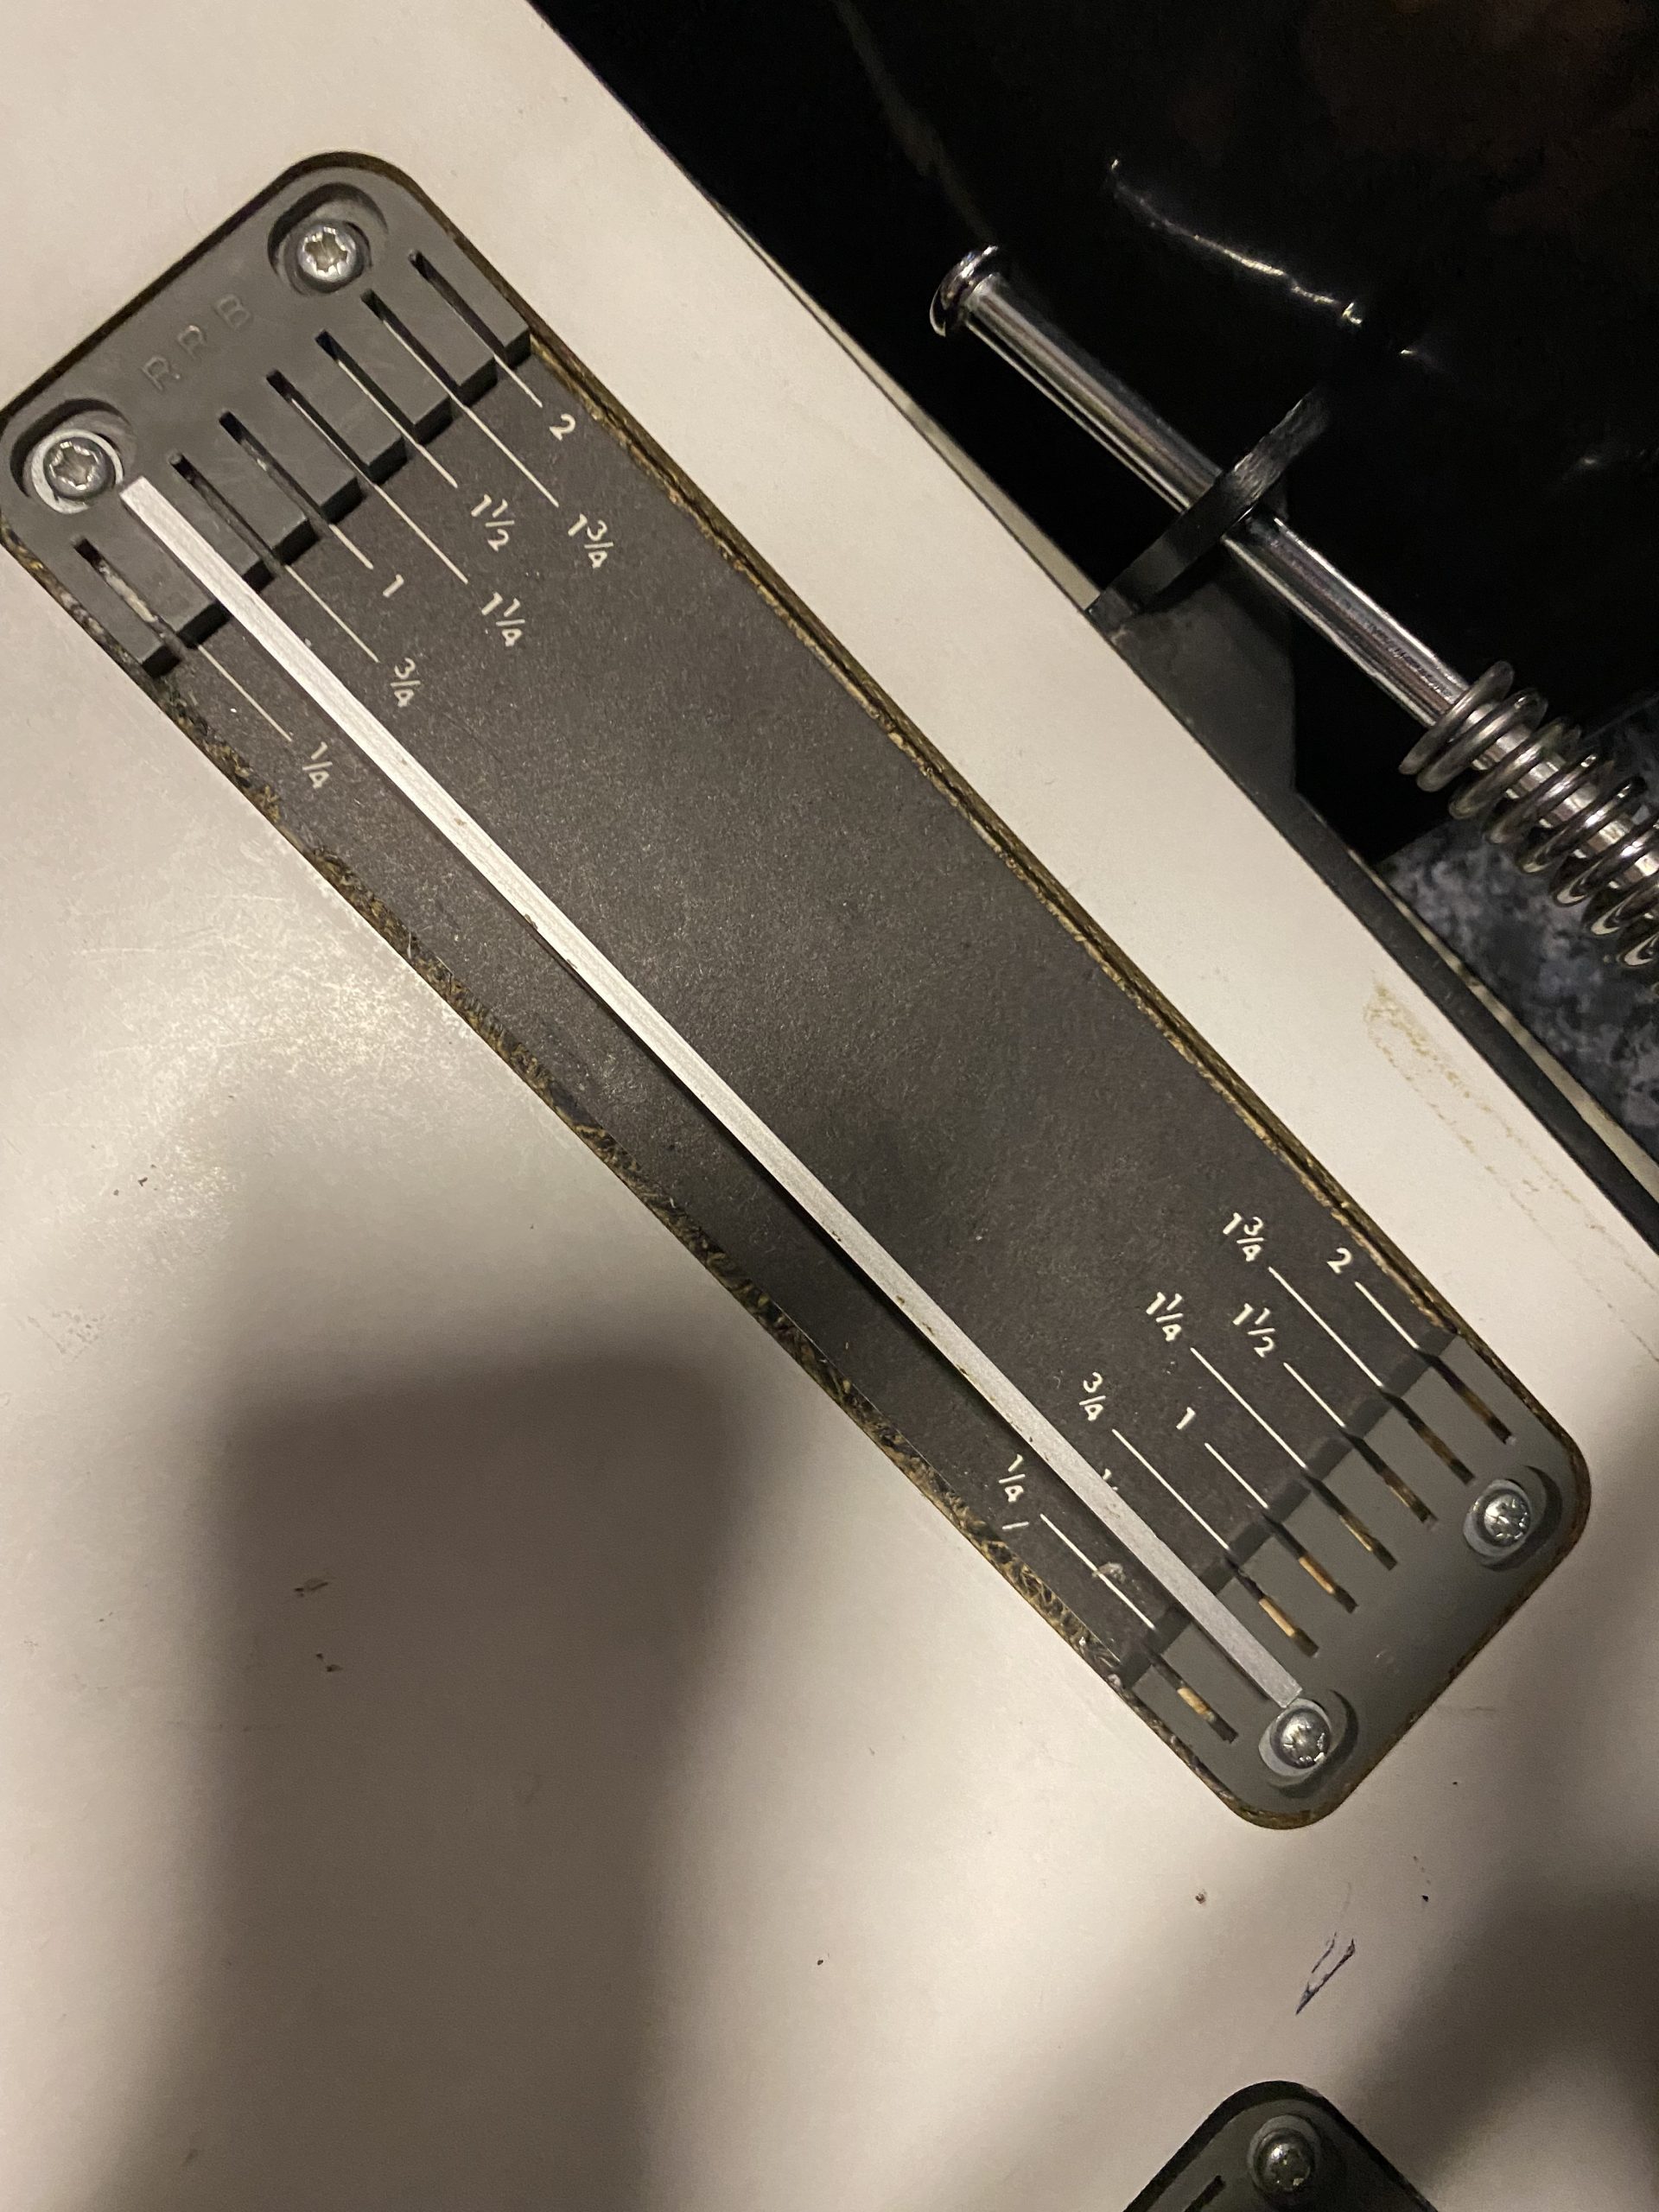
As you can see from the images above, click to enlarge, the metal strips can be set in 1/4″ intervals from 1/4″ to 2″, I had it set to 1/2″ on the two strips (X and Y axis) so with a 10″x8″ print I would need to set the moveable rulers to 9 inches and 7 inches.
This is because 10″ – (2 x 0.5″) = 9″ or the ten inches minus the left and right side margins of 1/2″ each results in 9 inches. Using the same method the other axis needs setting to 7″.
The Print (8) came out well with consistent borders around the edge and I was really chuffed with this important lesson. The colours looked spot on and the image was framed better after changing the crop on the easel. The picture shows that the railway worker in the gap between the two carriages was out of focus and Jack said that this is ok as the trains and the colours in the trains are the subject of the image, Matt mentioned that he like the blue colours being tied together. The detail is more evident in the underside of the train too which make it look like a more accurate representation of what I was seeing with the Mk1 Eyeball.
Dereliction and Denial
From this success (for me) I decided to jump straight into another print, Jack said he was happy that I’d got a good print also so it was time to choose another negative that fitted with the “Colour Of Change” project brief we’ve been set.
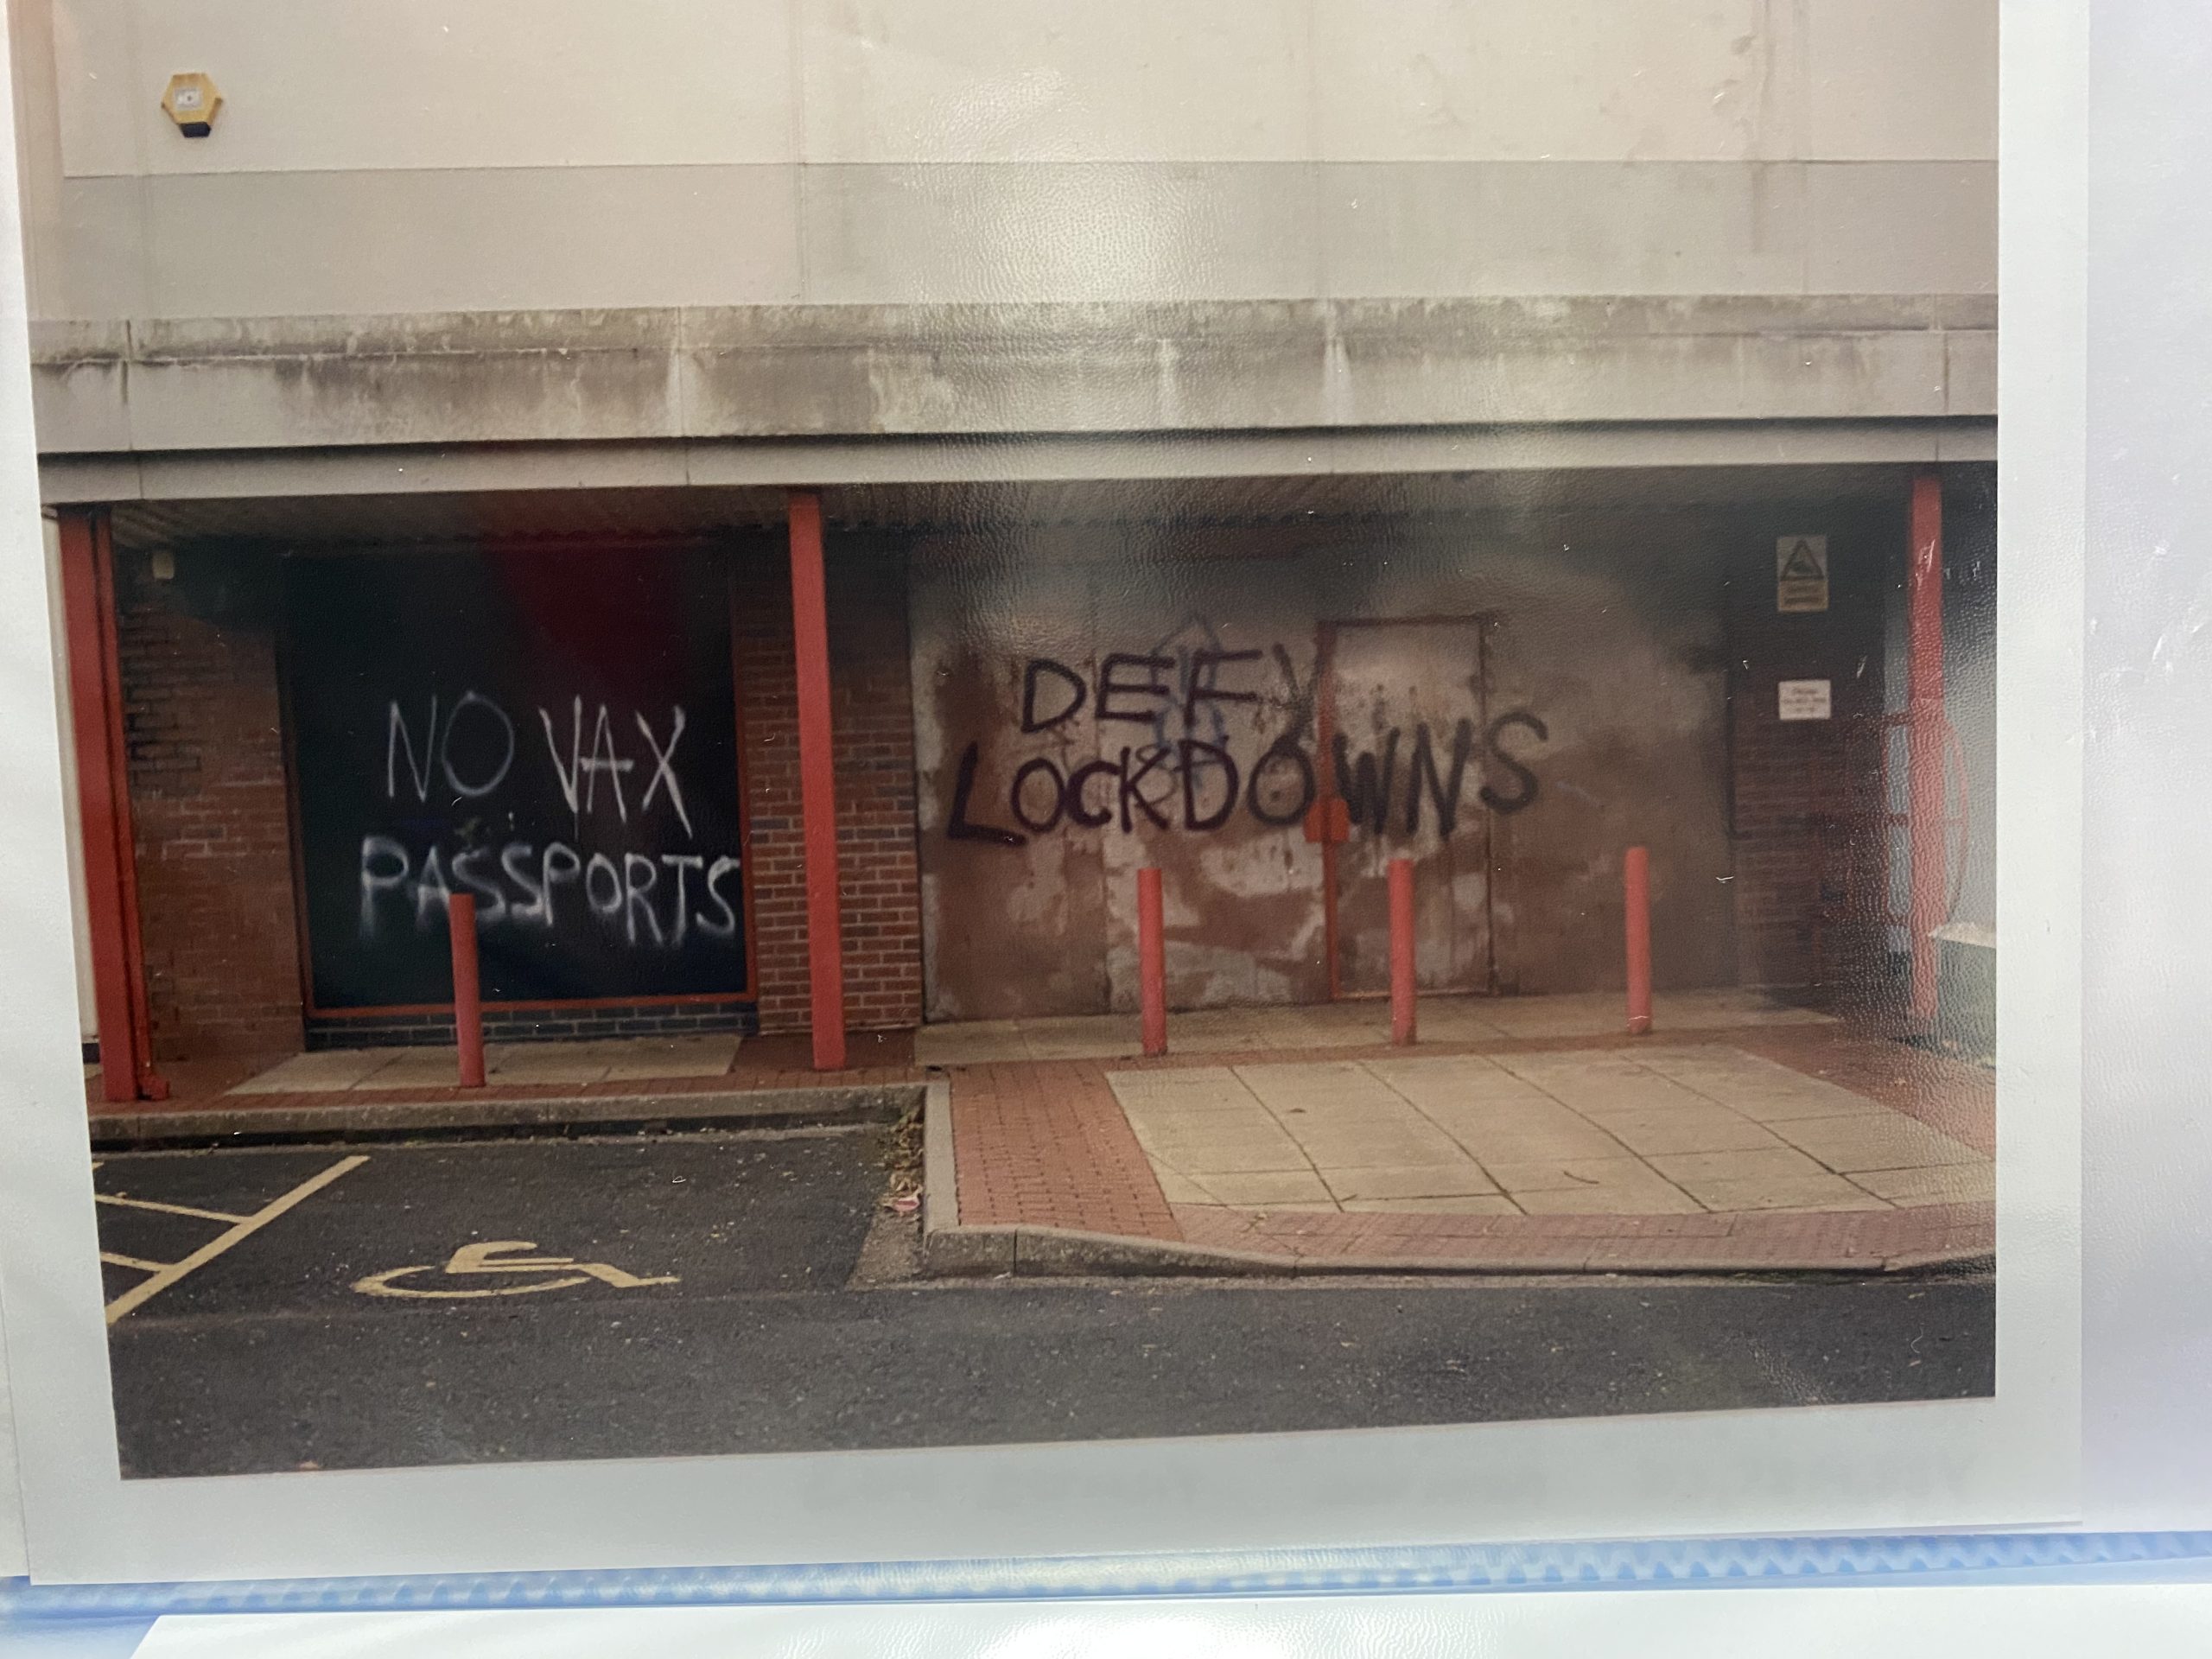
I chose from the same film #1, negative #3 a picture of a closed down Brantano shoe shop in Harlescott, Shrewsbury. The shop has the windows boarded up after vandalism had broken some of the large glass panes, not content with causing this damage the vandals had then sprayed graffiti onto the wooden boards. The graffiti was supportive of an Anti-Vax and Anti-Government stance so it fit a few of the themes in my original brain storm. It touched into “derelict & empty shops”, “aging street furniture”, “covid 19”, “replacements”, and “shopping”. Looking at the front of the shop though you wouldn’t immediately know why the windows had been replaced by wooden boards or why the outlet had been closed down.
First strip (9) went under the enlarger with the same filter settings as the previous print, as it was the same film stock so I gambled that it would be similar. After the initial focusing I exposed it for time intervals of 3 seconds and then popped it into the Colenta Paper Procesor before waiting four minutes for the result. Oh no, not again, another black print, guess who forgot to reset the aperture again!! Back in and setting the aperture to f/8 I exposed test strip (10) and then had a look at it under the light in the corridor. It looked like the 3 seconds interval was a bit wide as it looked closer to 3 than anything else.
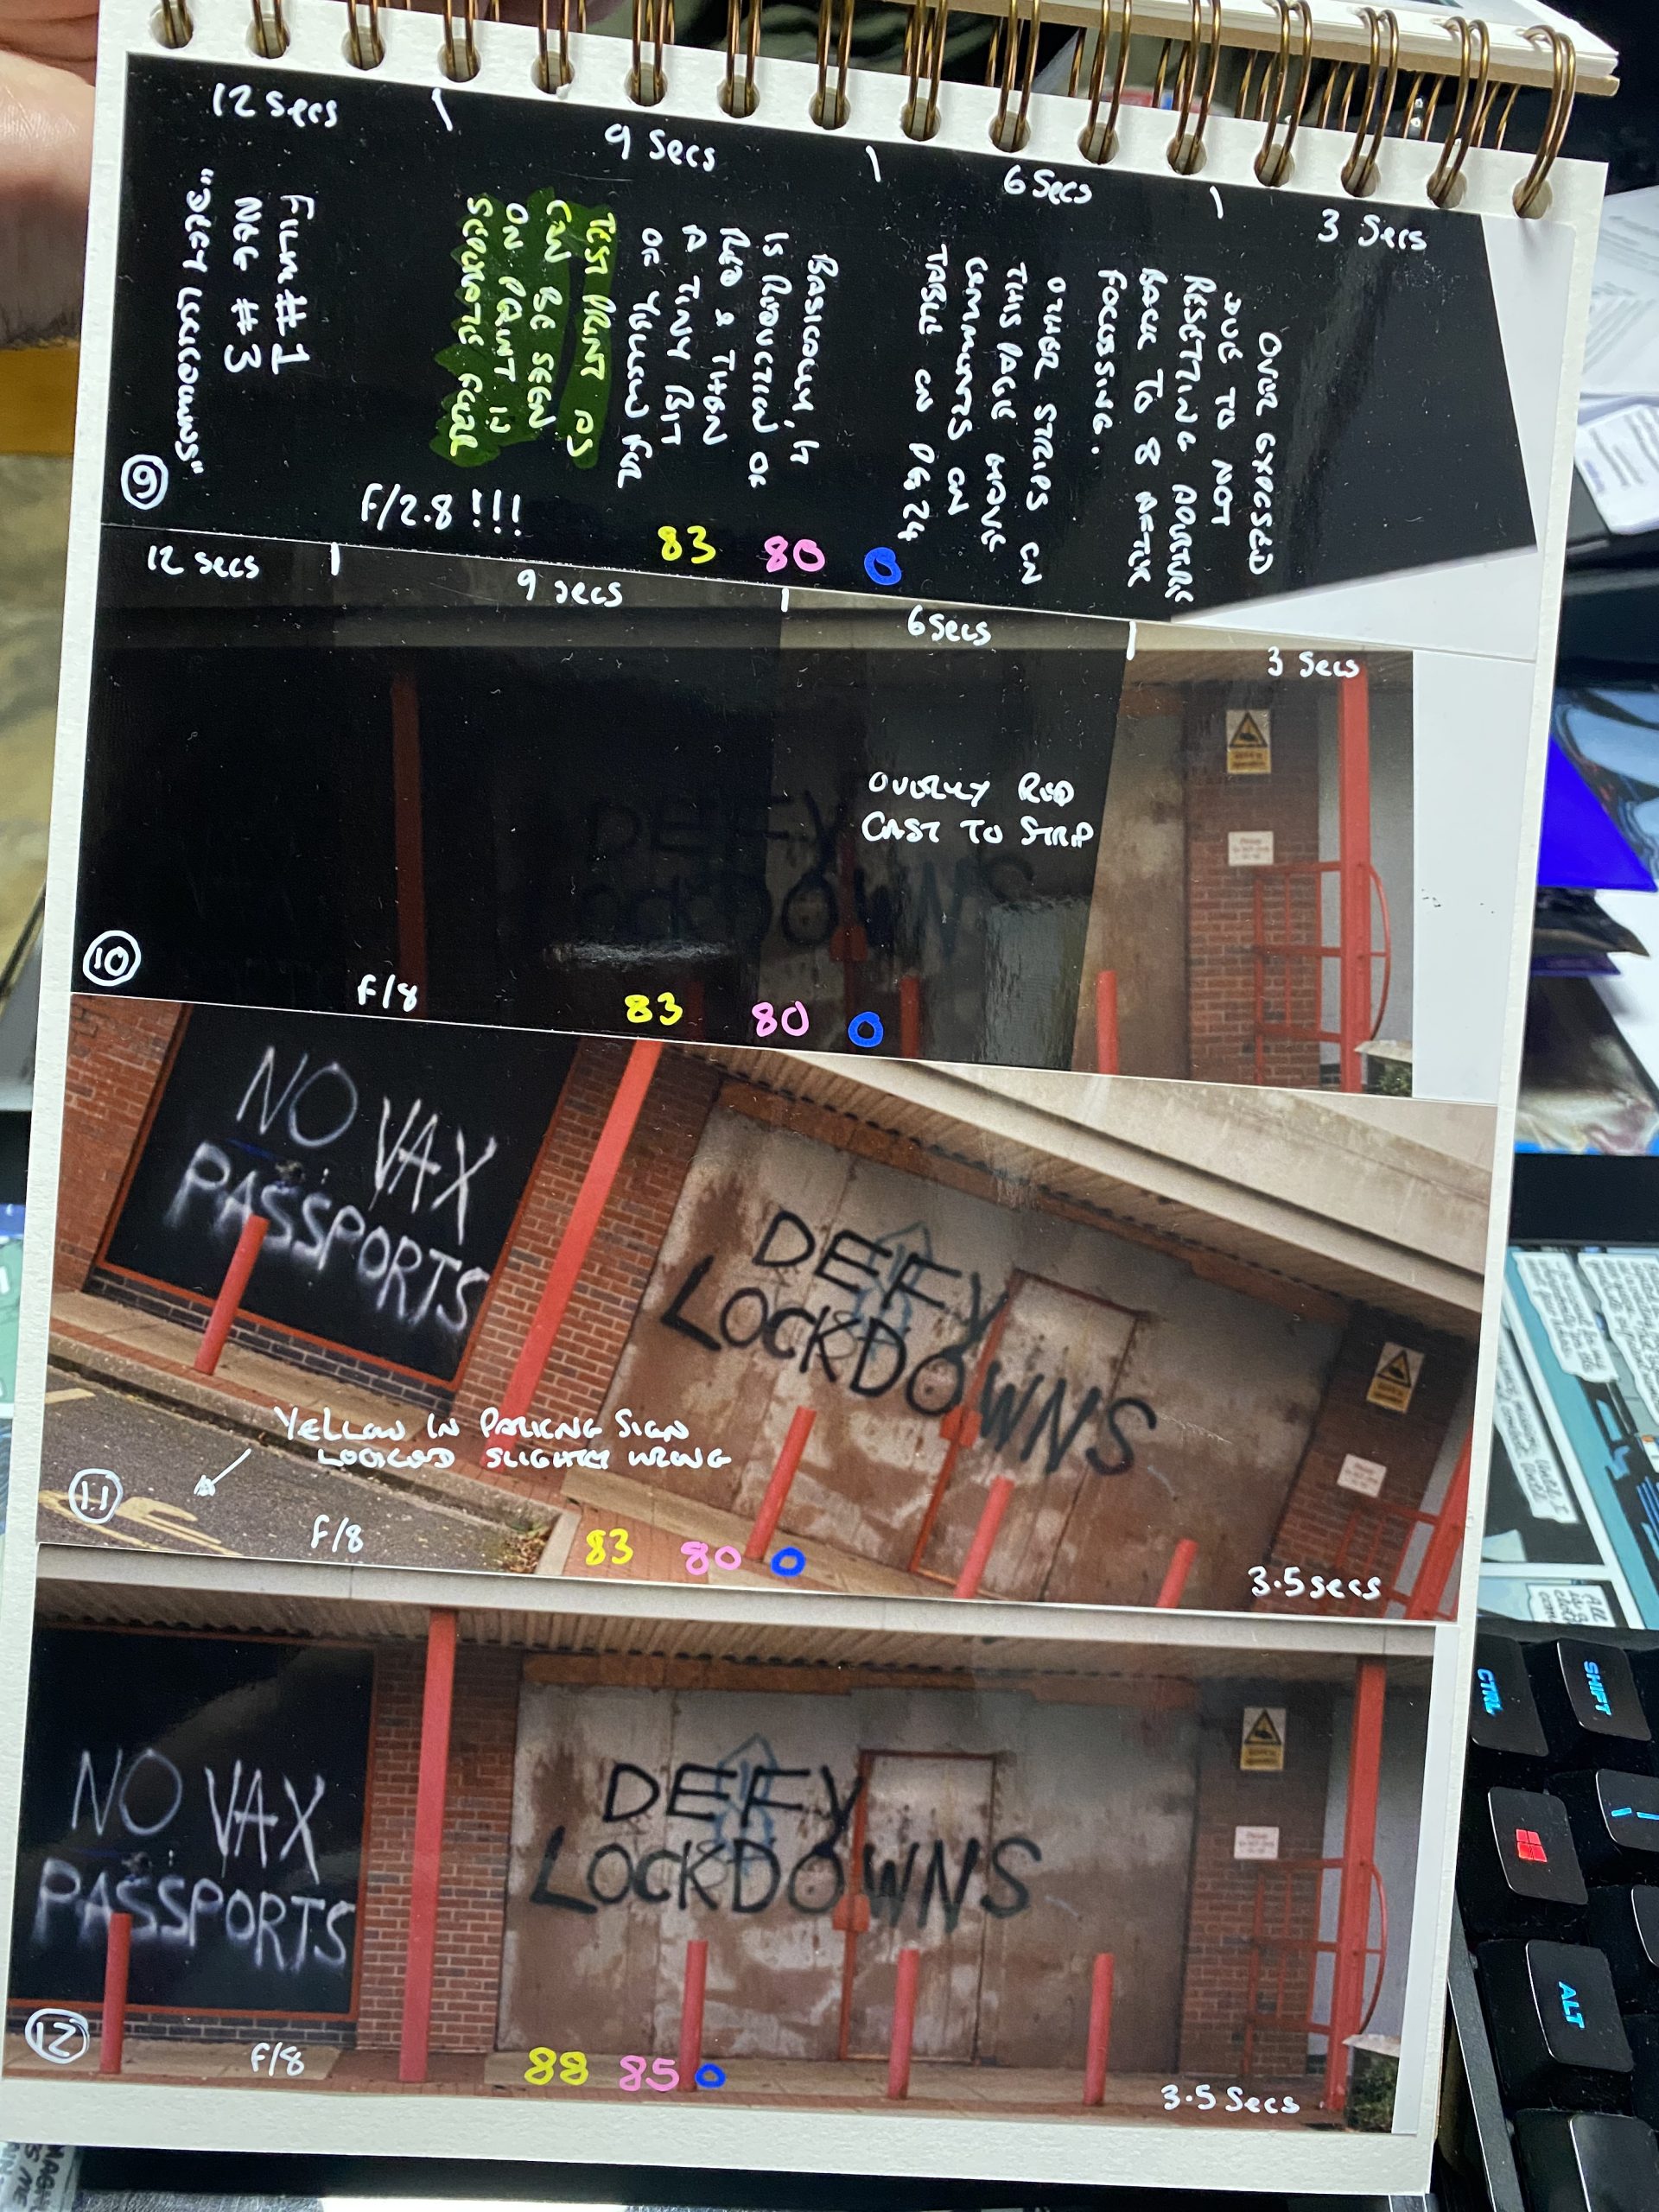
Jack suggested I tried a full strip on the same exposure so that I can compare the colour balance across the whole strip rather than a tiny section so strip (11) was produced with a timer setting of 3.5 seconds and filters set at 83,30,0. Looking in the light again it was obviousl that the yellow in the disabled parking floor sign was a bit off and perhaps a red cast across the image, so Jack suggested that I add 5 to Yellow and Magenta filters so it was now onto test strip for 3.5 seconds at Y88,M85,C0.
This came out nice and neutral so the next step was a full print and that can be seen below, this photo of it is through a plastic sleeve so isn’t perfect but it gives you an idea.
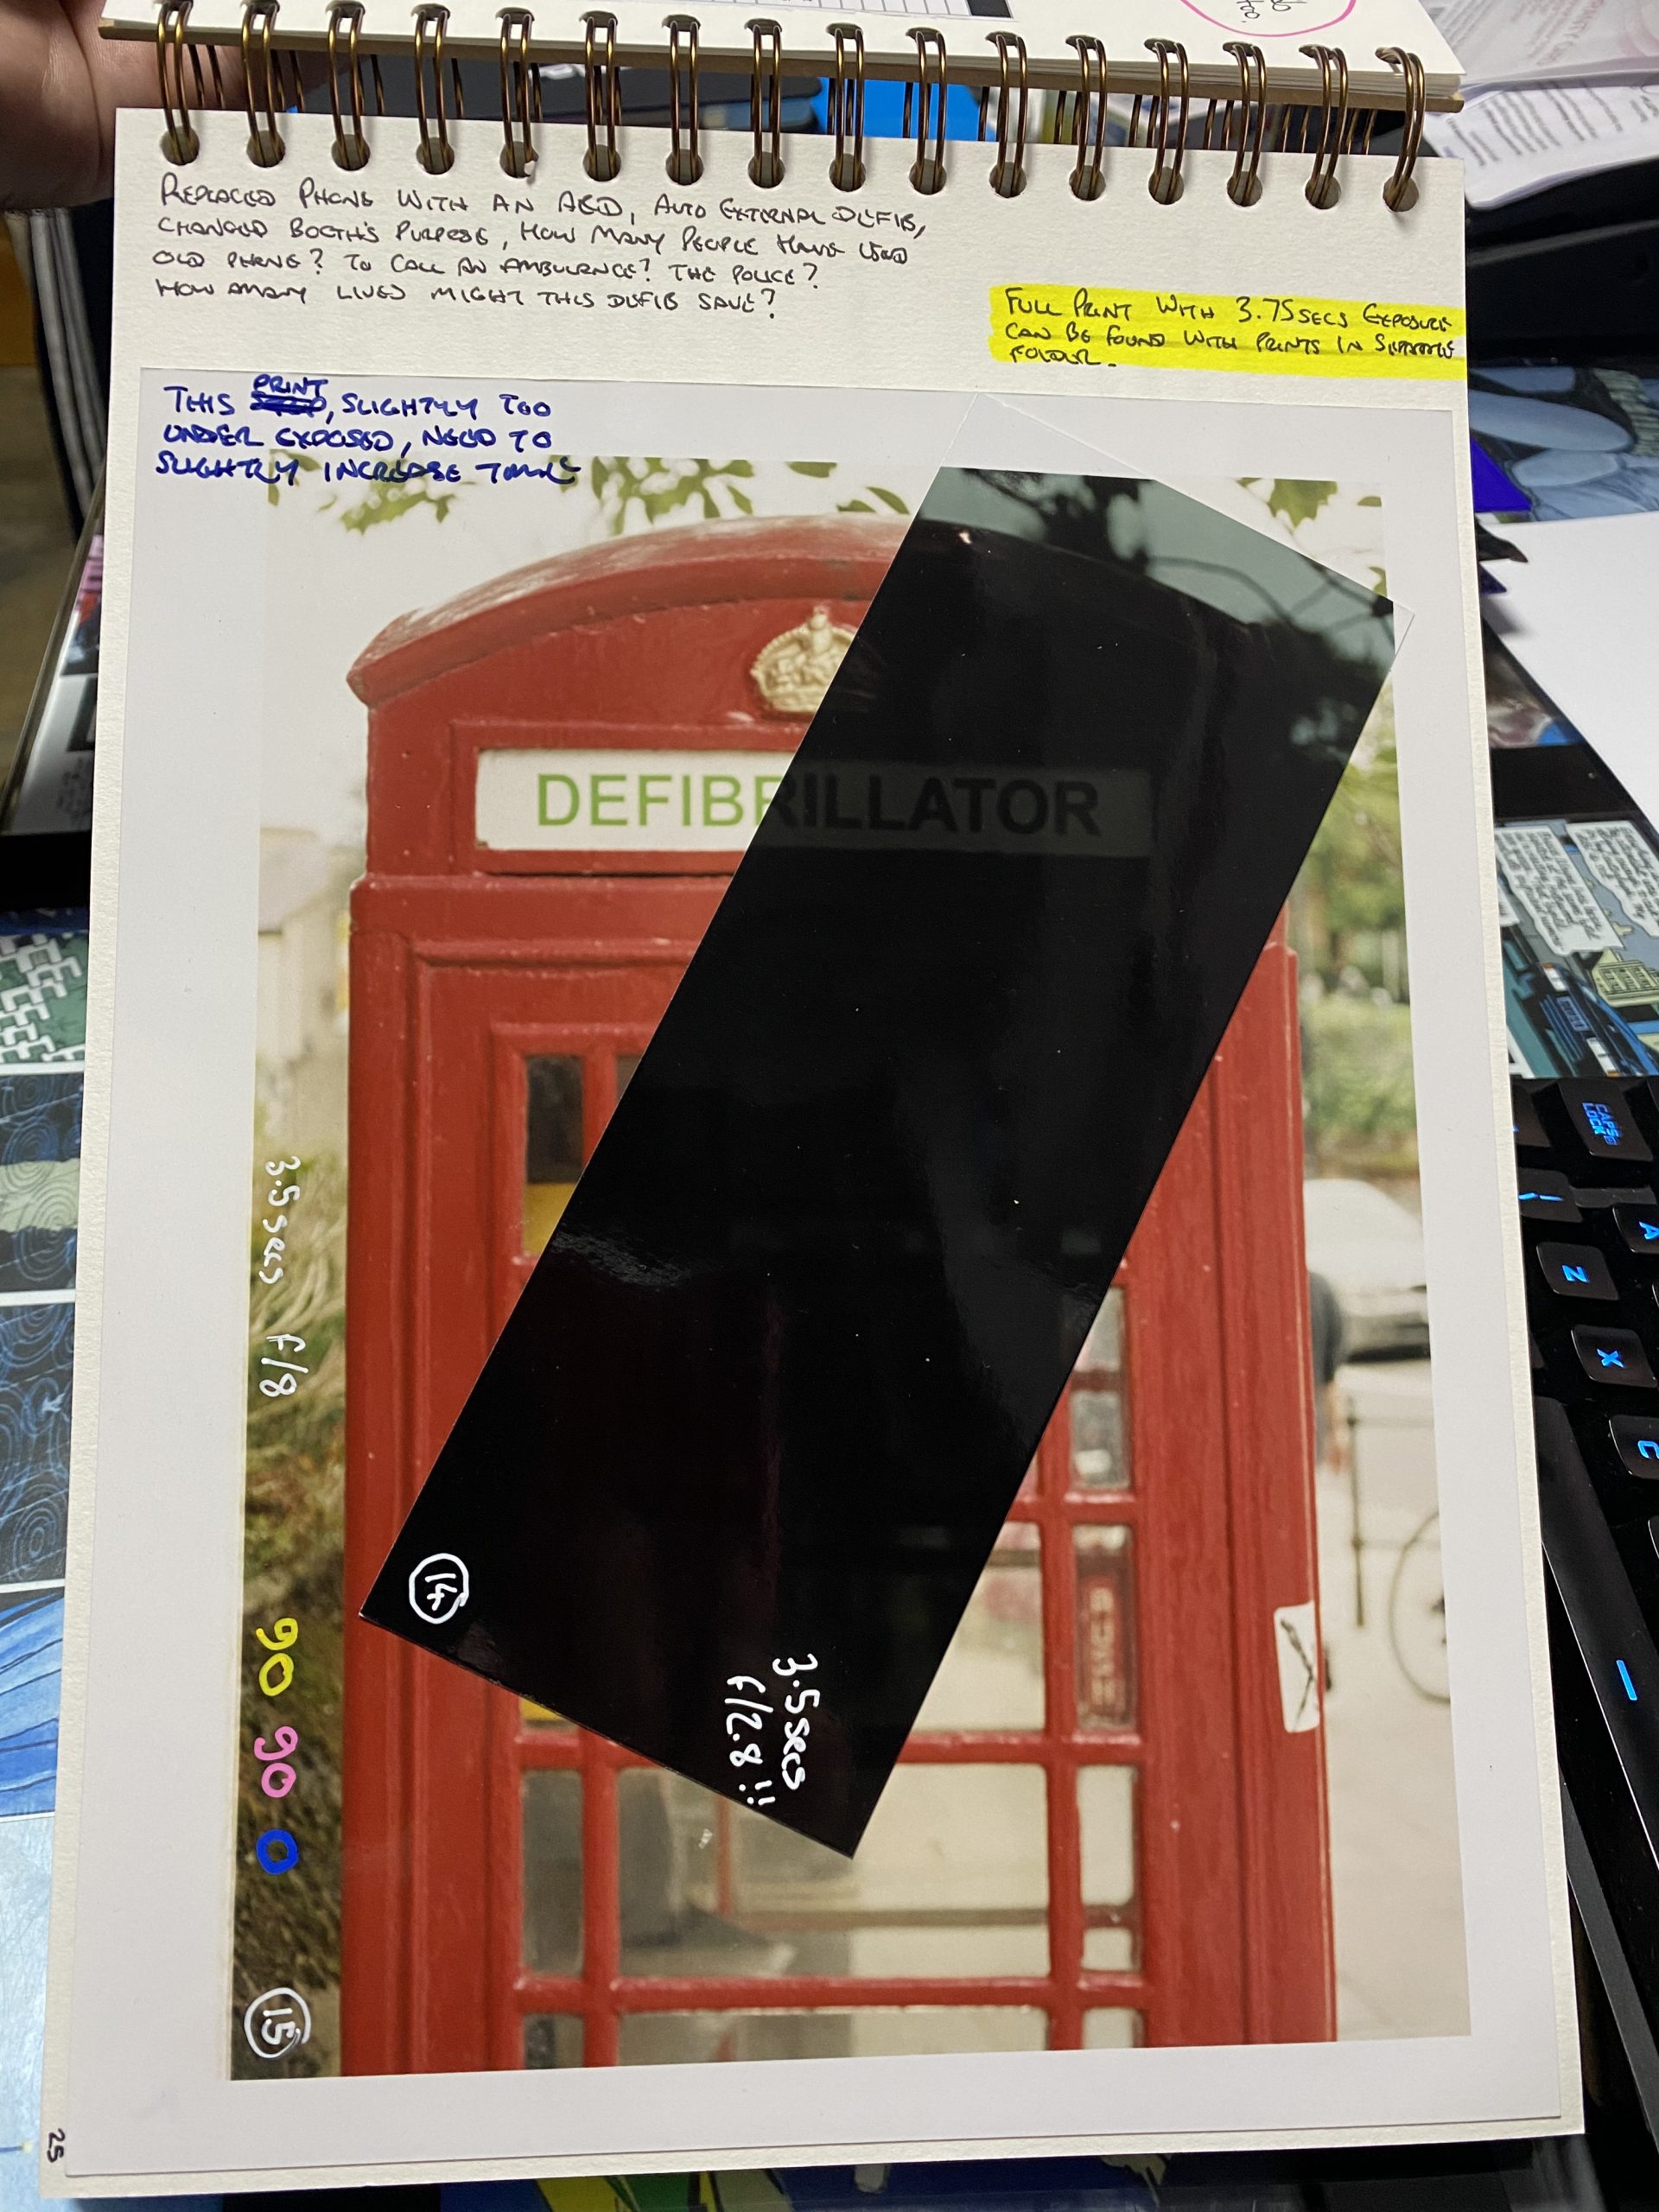
From Defy to Defib
The next negative selected was a nice deep red telephone box that has had it’s BT phone replaced by an AED (Defibrillator). There is a nice red colour with the yellow box inside and some green text “DEFIBRILLATOR” where it once said “TELEPHONE”.
This image is also from Film #1, being negative #14 was going to be similar to the the previous images. I did set the filters to Y90,M90,C0 as I had a couple of weeks before and got on with a test strip (14), I exposed a full strip for 3.5 secs and only realised that I’d made the same mistake again when I pulled an overexposed strip from the processor machine. Again, I hadn’t reset the aperture to f/8 from f/2.8 after setting the focus. Hopefully this is a mistake that I’ll learn from and won’t repeat it again every time I set up a print.
Once I’d set the aperture back to f/8 I put a full sheet under the easel for exposing and it came out ok apart from looking a little pale like it was under exposed. I left the filters as they were and changed the timer to 3.75 seconds and re-ran the exposing and processing steps , achieving a good print out of the end of it. I was happy with it and hopefully it fits the brief, with a bit of selection of a few more images I should be ok, as long as the images look ok alongside one another.
Art Block
I had to quit after the final print of the phone booth as I had a work meeting to dial into at 2pm, so I legged it over to the Harrison Library and into the study room I’d booked earlier. I did my day job from 2 til 5 and then headed back to the School Of Art to do a few more prints before heading home.
When I was going in the front door, Matt (one of my lecturers) was exiting the building and he told me that the darkrooms were just about to close for the evening so it wasn’t a good time to go in and do some more work. I figured that I’ve already done more than enough for the moment and I thought to myself that there’s always Monday next week when I can print a few more out.
We’ve also had an email now that means we have a review in the groups of the work we’ve got so far and the progress we’re making on our brief, with any ideas and artists that have inspired us.
I still need to post the bit of my reflective journal with the artists/photographers that I look up to. That’ll be coming along soon.
Be First to Comment